10f headstock spindle threads

JustTrimitaLittle

Registered
Registered
Joined
Mar 20, 2024
Messages
64
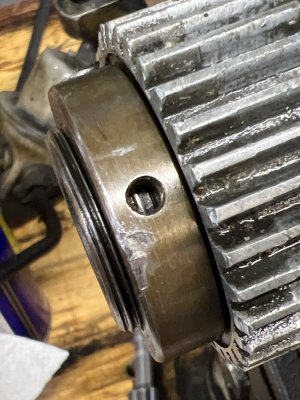
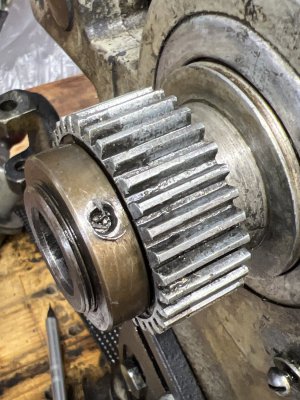
Anyone know what the thread size is on the left side of the headstock spindle (part 10-31t)? I went to pull it off to prep to change the belt/clean up a bit and found that the threads under the collet are serious fudged up. It was super hard to turn so I pulled the set screw all the way out and you can see some really gross threads in there. Seeing as how a replacement is not only hard to come by but pricey I thought maybe I’d just see if I can run a die over it and rethread it and replace it with a new matching collet. I’m not even entirely sure how bad it is since I stopped pulling it off when I seen that. As of now it functions. I have a feeling if I pull it off that’s the end of function and the beginning of “fix now”.

This machine is really starting to hurt my head. I just have to keep telling my it’s my learning lathe…. And trust me I’ve learned a few things already!
 
There's supposed to be a small brass or copper stub between the setscrew and the threaded area on the lefthand end of the spindle.
Sounds like someone removed the screw and lost the stub piece. A tiny piece of copper house wire would make an acceptable substitute.
Try to work the collar back and forth with some oil- that might chase the threads enough to allow removing the collar.
Flush out any little broken bits of threads if possible with a spray solvent like wd40

Spindles for these used to be reasonable but since the pandemic it seems the prices have skyrocketed
 
Last edited:
Initially I was going to pull the spindle to replace the belt. But after seeing that mess under it and reading up I decided against it. I also watched a few videos of pully and gear replacement, and while it doesn’t look super difficult it sure looks like an awful lot of room for adding play into the system and breaking stuff. The pulley and gears are fine and it all spins nicely. It it is remarkably filthy, but that’s about it other than the frayed belt. I got it back on I just don’t know if I took enough play out of it. It’s cranked down pretty hard. Someone has clearly been in there. I’ll just replace it with a made to size type belt. If I ever actually get this running.

I’m not sure removing the collar is a good idea at this point is it? I mean it’s technically functional as is. It feels like more threads are getting smashed down as I go. If I pull the collet off I think I’ll either have to replace the or find a smaller die and re-thread it and replace with an appropriate sized collet. That’s why I was looking for the thread size, so I can kinda be prepared for an outcome. Also it has two set screws and a hole for a spanner pin. The videos I watched and the exploded diagram show 1, that must have been added?
 

Attachments

  • image.jpg
    image.jpg
    274.7 KB · Views: 2
  • image.jpg
    image.jpg
    335 KB · Views: 2
Here's my take on it:
To replace the belt and/or service the spindle bearings, the collar has to come off.
As far as I know the collar normally has only one setscrew although some models may have two.
The function of the collar is twofold: it retains the spindle gear and adds preload to the Timken roller bearings.

Personally, I would probably drill into the setscrew hole that's sitting over the most damaged area, to clear away the
damaged threads in that area and allow the collar to be removed.
Drilling out a small section of those threads won't affect the assembly negatively in any substantial way.

Worst case you might have to cut the collar off with a Dremel tool and abrasive wheel.
Another option would be to cut the old V-belt off and install a link-belt instead.
 
Last edited:
It looks like about 3 of the threads on the spindle itself are fubared. And once the interior side of the collet hits those it gets really hard to loosen. I mean I had a Rhino wrench extender on my spanner and I was having a hell of a time.
Hmmmm. I may just go with a link belt for the time being. The bearings feel decent enough for now I think.
I’m actually just looking for a second machine for parts. At this point I’m nearly at the cost of another machine just for a the few parts I need. There are a few semi local that are either disassembled or needing parts that are cheap enough to make sense to buy if they have the parts I need.
 
Back
Top