Gear oil leak from 'speed lever' on RF-45

AlexPeel159

Registered
Registered
Joined
Jun 5, 2023
Messages
37
I have a Rong Fu RF-45 with an oil leak in the head. Traced the slow leak I have back to the 3 speed gear lever. Oil seems to be seeping out past a rubber part that surrounds the speed lever shaft. Unfortunately the entire speed lever assembly seems to be missing from the parts diagram in the machine manual. The only thing listed is the handle for the lever. You can see part of the lever shaft in some of the breakdowns of the head but there are no diagrams or lists of parts. Even the page which breaks down the gear train internally does not show how the levers interact. I can see the shaft coming out of a hole in the head and a flexible washer/grommet/something surround it. I am very hesitant to try disassembling the parts for fear of making the problem worse and I figure I would need to fully open and disassemble part of the gear mechanism to get access to everything.

Questions are does anyone know what exactly this rubber part is or have a parts diagram maybe from another manufacturer that shows these parts? I will try to post a picture when I get back home today but its not very informative looking at it because whatever there was painted over.
 
For that sort of thing, it's really best to just disassemble and remove the part, identify and measure it, then go to mcmaster-carr and browse to a suitable replacement. It's one and done that way.

 
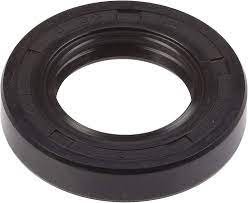
I think they take a standard oil seal like this. You may need to disassemble to change it though. You may be able to order directly from Rong Fu, but any local bearing supplier can get you a seal
Martin
IMG_0519.jpeg
 
I think they take a standard oil seal like this. You may need to disassemble to change it though. You may be able to order directly from Rong Fu, but any local bearing supplier can get you a seal
Martin
View attachment 458688
That looks exactly like the I am seeing from the outside with those rectangles around the face. I was hoping someone would tell me it was something straight forward like this, and now I know how to look this up better on mcmaster or grainger. I was just not looking forward to having to deal with ordering some bespoke not made anymore part from rong fu without any part number. I also did not want to disassemble it to find out whats going on and realize I cant get the parts to fix it and be left with a worse problem.

Thanks for the info guys.
 
Last edited:
Do you have the lever off? If not, there are NO RULES, but the air side surface of a seal of that type, where the "squares" are, is by far the most common place to put a seal number if one is present. That takes the all the sport out of ordering one.

Or, seals are often made without numbers, even if they're to a standard dimension that you would be able to interchange. I'm gathering you're not familiar, so let me offer a suggestion- If you've never measured a seal before, you might get the outside pretty close (it's rubber covered), but the inside diameter, that's really squishy. You may find it far easier to measure the shaft than to measure the inside of the seal. You can find details of what shafts different seals are for, or there's about twenty three thousand people here that could help you out if you had some dimensions.

If you're comfortable with hand tools and have a steady hand under force... This "can" be a dangerous weapon, but it works a treat. It'll pull a shaft seal out of a blind seat with the shaft still installed. Comes with directions, and my advice is to mock it up on a new, loose seal to see what you're doing, but it gets seals out without disassembly. The caveat is that you've got to be steady and respectful with it. You don't want to make scratches. But it works. There are others similar, that "probably" work just fine. This is a brand I trust (for now, that ALWAYS evolves...), and the one I use.

 
Thanks for your advice. Its good to know about that tool. I dont have any of it disassembled except for the handle removed. I didn't see any number before but it was painted over and I was not really looking. I will investigate tonight.

For now though the leak is slow enough that I can live with it and think that I will wait on this until its either more of a must do, I am disassembling the system for other reasons, or it just pisses me off enough. As they say I don't want to borrow trouble.
 
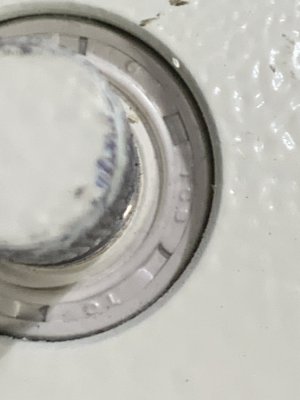
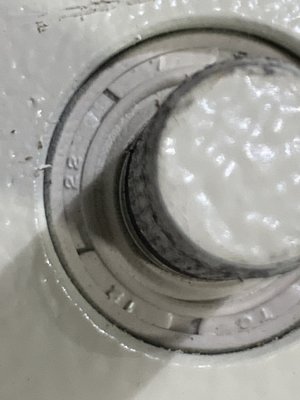
So if anyone was interested I just looked at the oil seal and found that it did have numbers on the outside. Hard to read because they are small and covered in paint but as far as I can tell there are the following: TCS TC 12 22 7. The numbers I am sure of the letters might be TC8, TOC, TO8. These shaft diameter is 12mm and the hole diameter is 22mm so I am guessing the 7 refers to a 7mm thickness. I see on grainger.com there is a TC style oil seal (also have a TCN). Here are some pictures, which only came out so so because my phone did not want to focus on the surface. These pictures are actually from the non-leaking side, as I scraped the paint off the leaking side and made it almost impossible to read the numbers. They are the same size so it should be fine.

Knowing all this info makes me more interested in doing it soon. I can order these parts and give it a go. Couple questions. When I pull these out will that "open the flood gates" so should I drain the oil first, or will it just leak more but I will have time to push the new seals in. Guessing the former. Last question. To put the new seal in does it just need to be pushed into place?

IMG_4201.jpgIMG_4202.jpg
 
Last edited:
...When I pull these out will that "open the flood gates" so should I drain the oil first, or will it just leak more but I will have time to push the new seals in.

It will leak some, depending on the design. It certainly "could" be a gusher... If I had to guess I'd say that you could pop the old seal out real quick, go have a sandwich, and pop the new one back in, and probably just clean up with a rag..... Were it me, and the oil did NOT need updating, I'd probably just put a pan under it and see what happens.

To put the new seal in does it just need to be pushed into place?


Yeah, it just pushes in, but you'll need more than your thumbs (probably...) You'll need a seal driver. It'll come out of the expensive set, since it has to go over a shaft... Most people just use a socket. Choose one that will rest on on, or as close as possible to the outside diameter of the seal, and it should tap in quite easily. It looks like a short socket would fit just fine, but a deep one makes it a lot easier to start and stay straight. (You do have some reasonable degree wiggle room on that).

All that paint on there might well explain why the seal failed. Especially if there's some slight axial movement in that shaft. Even if not, seals don't care much for being painted.
 
Did the transplant last night, and after checking for leaking today the operation seems to have been a success.

Notes: The tool recommended in the thread did not work as there was not enough clearance to get the hook around the seal. This is both because the seal was recessed and because of the lever shaft getting in the way of trying to put the hook in. Ended up using some hook tools to yank it out. This ended up destroying it in the process but I was putting a new one in so not a concern. The seal ended up being much harder than I was expecting, more of a hard plastic than a rubber, so it was a bit of a pain to lever it out but not to big a deal. There was only very slow oil leak after removing it so draining the oil was not necessary. At the back of the seal recess the shaft had a clip ring which was blocking the gap on the hole around the shaft which I think prevented most of the oil from leaking without the seal. Used a m16 deep socket to seat the new seal.
 
Back
Top