Carrying on from fixing my PM1228 spindle issue with the replacement spindle PM sent, I was happy to see the performance results that had been demonstrated by other owners. I'm working on making an electric turbo, now that technology has made batteries and electric motors available to successfully accomplish this in DIY form (Source, Electrified Boost forum).
I started the project by making my shaft and unlike the others working on a similar project, I took mine to the next level by making the shaft out of titanium and sourcing ceramic bearings. I have Ti connecting rods for an HO V6 I plan to build for a sleeper street/strip car and that's where the Ti shaft idea came from. I'm not sure why, but there must be a reason that Titanium bar stock frequently shows up as 3.94" pieces on ebay, although I managed to find a 1/2" piece in a 6" length.
I chucked it up in my adjustable ER40 collet and dialed it in to just under two tenths runout before turning it down to 10 mm and 5/16" diameter for the bearing and compressor wheel. I checked the lathe alignment first to near spot on at 1 foot out from the chuck with my alignment cut bar. I'm still learning but understood I needed to be careful with the Ti, so I lubed and cut slow with a live center in the tailstock, which took a lot of time.
As I cut the 5/16" section I noticed taper setting in at the inboard end and suspected flexing, but also considered the cutting bit since the machine had not been moved, or leaned on. A new bit did the trick and the tension on the micrometer spindle was the same at both ends of the shaft area when measuring and comparing. I was grinning big.
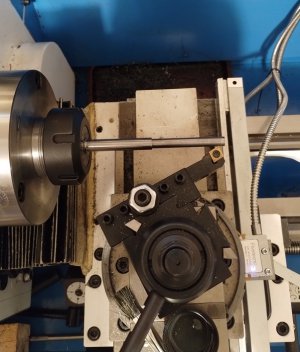
Finished the shaft and needed to do two things, taper the end for threading with a left handed die (haven't practiced threading yet) and then part it off. I loosened the tool post and started angling tool and wheeling in so that I could setup to put a small taper at the end of the shaft, just as seen in the picture. I wheeled the carriage in letting the shaft push the cutting bit outward as I prepared to parallel it and then bump it in for a slight angle to cover about a 1/4" of the tip. The post is loose and the tool angle not all that wide, but it has a fresh cutting point and when I decided to reverse the carriage, and wheel the cutting tool closer and pull it back again, the bit tip dug into that shaft and bent it outward leaving me with .005" runout in what was a perfect part. I couldn't believe I did that.
I initially thought it was ruined since a 4" diameter wheel would be spinning upwards of 60,000 rpm on it and then I remembered that crankshafts are straightened. I setup the dial indicator, located the high side and bent in the opposite direction until I got the runout under .001". That's good enough for my prototype build. I might have been able to get it near perfect if I'd switched to the 1/10" DI and used the DRO to measure tension applied.
Sometimes you just have to stop, think about stupid things and not do any of them.

