- Joined
- Feb 5, 2015
- Messages
- 662
A recent thread about re-buiding 18N Jacobs chuck reminded me of a project that I completed a while ago that involved modifying one of these excellent old chucks. I’m going to reproduce a few of the comments that I made and the original thread can be found here:
http://www.hobby-machinist.com/threads/jacobs-drill-chuck-repair-info.34325/#post-294108
I had recently obtained three Albrecht chucks and already owned a couple of them so the old 18N became redundant although it still had a lot of life left. I’d recently given a friend a massive ¾ drill chuck that came with some tooling I’d obtained from eBay as a lot buy.
My friend made a very nice live tailstock chuck from it. I was immediately envious and HAD to have one of my own. So what IS a live tailstock chuck anyway ?
A live chuck is a chuck that is free to rotate while its shank is stationary. The chuck has an internal shaft that is straight, not tapered, enclosed within a normal Morse tapered body. The internal shaft is guided within the body by several bearings.
One bearing (or a pair) centers the chuck with the Morse taper body and allows free rotation. Another bearing is required to accommodate axial thrust as will be shown below in a sketch of the internal details.
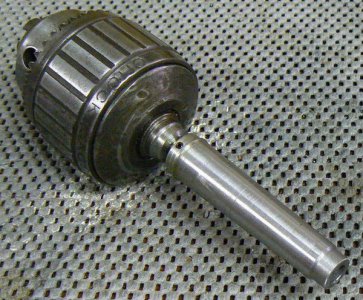
The tool, as I made it, is <ahem> somewhat lacking in fine workmanship as can be seen in the following photo:
A live tailstock chuck is useful for several applications, the most common is to grip and support the end of a workpiece while allowing the workpiece to freely rotate. Of course a center in the tailstock or a steady rest performs the same function, right ?
Yes, and probably a bit better than a live chuck in most cases but there are situations in which the live chuck is a better alternative or even the only alternative. Taking a light cut on worn commutators of armatures on generators and motors, for example, to expose a new conductive copper surface.
The bearing surfaces at the ends of the armature are usually hardened and centerless ground. There is no existing center and the hardness usually precludes center drilling and the use of a tailstock center.
One could use a steady rest except that the carriage travel would be severely limited – a live chuck in the tailstock provides considerably more freedom. This can often makes the difference in a task like the one described above.
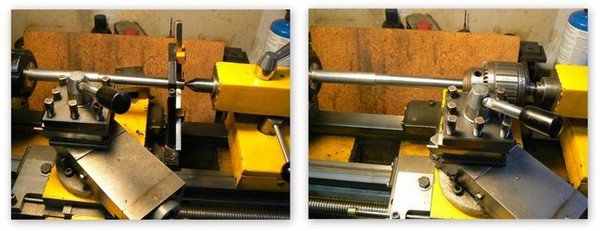
If you look carefully at the photo on the left, you’ll note that the carriage is against the base of the steady rest – the carriage cannot get any closer to the end of the shaft. (Note that a dead center is in the tailstock. It's not applicable to this post - the center happened to be installed and I simply forgot to remove it.)
On the right, using the live chuck, the carriage is free to move as far as the tailstock base. The cutting tool can actually reach the front face of the live chuck. That’s a significant improvement in carriage travel !
This particular 18N chuck had a MT-2 shank, fitting the tailstock of a small Emco 8 x 18 lathe that is partly depicted in the above photos. Because the MT-2 dimensions are fairly small, there was not much latitude in designing the internal parts.
Ball or roller bearings couldn’t be accommodated without reducing the diameter of the internal shaft of the chuck to a point that it would no longer be rigid enough to support work properly. I chose to use a long “oilite” sleeve bearing to best support the rotating shaft to keep the shaft diameter as large as possible.
The thrust bearing is simply a hardened 3/8 inch ball. A live tailstock doesn’t experience much (if any) axial thrust so this simple expedient is more than adequate. The ball is lubricated with a dab of wheel bearing grease. The oilite bearing is lubricated with spindle oil. This is the CAD sketch of the live chuck:
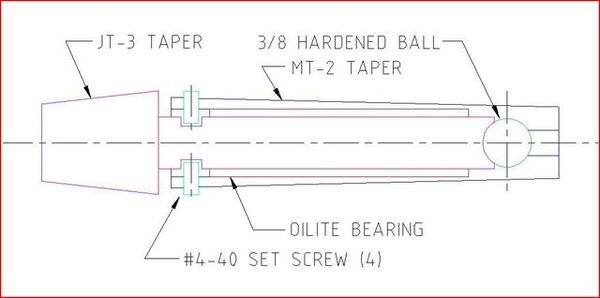
The small #4-40 set screws protrude into a groove on the internal shaft. In normal operation the screws don’t contact the stationary surface – they are there only to prevent the internal parts from separating.
Perhaps the usage of the live chuck as a work support, as described above would be uncommon. There is another application for a live chuck that might be frequently useful however. Some of my work is on a small scale and tapped holes can be as small as #0-80, although that is not common. Most tapped holes for small work range from #4-40 to #10-32 in my experience.
Smaller tapped holes require some detailed attention to prevent breaking taps. Perhaps breaking a tap that cost less than $5 U.S. isn’t a major concern but when the tap breaks off in a part that one has expended several hours of work … well, that IS a concern since removing the tap may not be possible.
There are a number of ways to safely tap small holes but most of them require manual methods and can be time-consuming. The live chuck can allow power tapping with taps as small as #6-32 if the chuck is well-aligned with the spindle axis. (Smaller taps have been successfully used with this technique but I don’t know if consistent performance is likely.)
I should note that there are many other methods that are useful for power tapping small holes – this is just one of them.
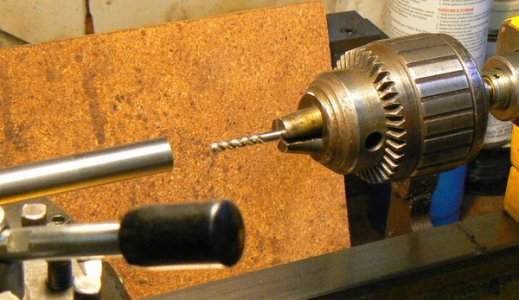
With the lathe turning at slowest spindle RPM and the pilot hole + tap lubed with cutting oil, the tapping process is initiated with the operator lightly gripping the body of the live chuck with his left hand (I used my right hand just for the purposes of this photo). The loosened tailstock is slowly fed into the work, engaging the tap while gently pushed by the operator’s right hand.
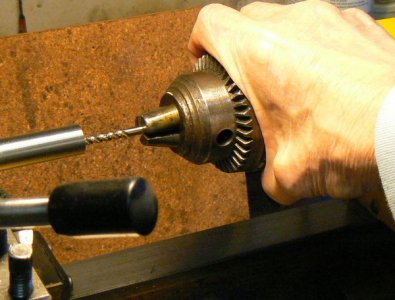
There is no need to be concerned about the depth of the tap because any resistance to the process will be immediately detected by the operator’s left hand. When the tap bottoms out in the pilot hole (or when flutes are jammed with chips), the live chuck will slip in the operator’s hand and freely rotate, preventing tap breakage.
Note: this is an appropriate time to suggest that power tapping should be done with spiral taps, not straight-fluted taps. Chips are cleared more effectively and breakage is minimized using this configuration.
Stopping the lathe and rotating the live chuck CW and CCW slightly to break the chips, the tap can be carefully withdrawn from the work while slowly retracting the tailstock. To be absolutely safe,you could loosen the live chuck from the tap and withdraw the tailstock, then unthread the tap by hand or with the help of a small tap wrench.
This process can also be used for reaming IF the amount of material to be removed is small – on the order of .001. This is always contingent on the material and hardness, of course.
http://www.hobby-machinist.com/threads/jacobs-drill-chuck-repair-info.34325/#post-294108
I had recently obtained three Albrecht chucks and already owned a couple of them so the old 18N became redundant although it still had a lot of life left. I’d recently given a friend a massive ¾ drill chuck that came with some tooling I’d obtained from eBay as a lot buy.
My friend made a very nice live tailstock chuck from it. I was immediately envious and HAD to have one of my own. So what IS a live tailstock chuck anyway ?
A live chuck is a chuck that is free to rotate while its shank is stationary. The chuck has an internal shaft that is straight, not tapered, enclosed within a normal Morse tapered body. The internal shaft is guided within the body by several bearings.
One bearing (or a pair) centers the chuck with the Morse taper body and allows free rotation. Another bearing is required to accommodate axial thrust as will be shown below in a sketch of the internal details.
The tool, as I made it, is <ahem> somewhat lacking in fine workmanship as can be seen in the following photo:

A live tailstock chuck is useful for several applications, the most common is to grip and support the end of a workpiece while allowing the workpiece to freely rotate. Of course a center in the tailstock or a steady rest performs the same function, right ?
Yes, and probably a bit better than a live chuck in most cases but there are situations in which the live chuck is a better alternative or even the only alternative. Taking a light cut on worn commutators of armatures on generators and motors, for example, to expose a new conductive copper surface.
The bearing surfaces at the ends of the armature are usually hardened and centerless ground. There is no existing center and the hardness usually precludes center drilling and the use of a tailstock center.
One could use a steady rest except that the carriage travel would be severely limited – a live chuck in the tailstock provides considerably more freedom. This can often makes the difference in a task like the one described above.

If you look carefully at the photo on the left, you’ll note that the carriage is against the base of the steady rest – the carriage cannot get any closer to the end of the shaft. (Note that a dead center is in the tailstock. It's not applicable to this post - the center happened to be installed and I simply forgot to remove it.)
On the right, using the live chuck, the carriage is free to move as far as the tailstock base. The cutting tool can actually reach the front face of the live chuck. That’s a significant improvement in carriage travel !
This particular 18N chuck had a MT-2 shank, fitting the tailstock of a small Emco 8 x 18 lathe that is partly depicted in the above photos. Because the MT-2 dimensions are fairly small, there was not much latitude in designing the internal parts.
Ball or roller bearings couldn’t be accommodated without reducing the diameter of the internal shaft of the chuck to a point that it would no longer be rigid enough to support work properly. I chose to use a long “oilite” sleeve bearing to best support the rotating shaft to keep the shaft diameter as large as possible.
The thrust bearing is simply a hardened 3/8 inch ball. A live tailstock doesn’t experience much (if any) axial thrust so this simple expedient is more than adequate. The ball is lubricated with a dab of wheel bearing grease. The oilite bearing is lubricated with spindle oil. This is the CAD sketch of the live chuck:

The small #4-40 set screws protrude into a groove on the internal shaft. In normal operation the screws don’t contact the stationary surface – they are there only to prevent the internal parts from separating.
Perhaps the usage of the live chuck as a work support, as described above would be uncommon. There is another application for a live chuck that might be frequently useful however. Some of my work is on a small scale and tapped holes can be as small as #0-80, although that is not common. Most tapped holes for small work range from #4-40 to #10-32 in my experience.
Smaller tapped holes require some detailed attention to prevent breaking taps. Perhaps breaking a tap that cost less than $5 U.S. isn’t a major concern but when the tap breaks off in a part that one has expended several hours of work … well, that IS a concern since removing the tap may not be possible.
There are a number of ways to safely tap small holes but most of them require manual methods and can be time-consuming. The live chuck can allow power tapping with taps as small as #6-32 if the chuck is well-aligned with the spindle axis. (Smaller taps have been successfully used with this technique but I don’t know if consistent performance is likely.)
I should note that there are many other methods that are useful for power tapping small holes – this is just one of them.

With the lathe turning at slowest spindle RPM and the pilot hole + tap lubed with cutting oil, the tapping process is initiated with the operator lightly gripping the body of the live chuck with his left hand (I used my right hand just for the purposes of this photo). The loosened tailstock is slowly fed into the work, engaging the tap while gently pushed by the operator’s right hand.

There is no need to be concerned about the depth of the tap because any resistance to the process will be immediately detected by the operator’s left hand. When the tap bottoms out in the pilot hole (or when flutes are jammed with chips), the live chuck will slip in the operator’s hand and freely rotate, preventing tap breakage.
Note: this is an appropriate time to suggest that power tapping should be done with spiral taps, not straight-fluted taps. Chips are cleared more effectively and breakage is minimized using this configuration.
Stopping the lathe and rotating the live chuck CW and CCW slightly to break the chips, the tap can be carefully withdrawn from the work while slowly retracting the tailstock. To be absolutely safe,you could loosen the live chuck from the tap and withdraw the tailstock, then unthread the tap by hand or with the help of a small tap wrench.
This process can also be used for reaming IF the amount of material to be removed is small – on the order of .001. This is always contingent on the material and hardness, of course.
Last edited:


