- Joined
- Dec 20, 2012
- Messages
- 9,422

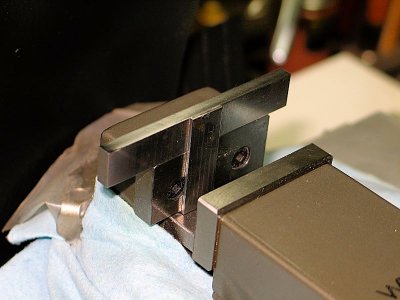
I wanted to share a tool that I’ve used for going on 15 years now. It is beat up from use but it is eminently useful and very accurate. This one is made for my Sherline mill and Wilton vise but the concept will transfer to any milling vise you have.
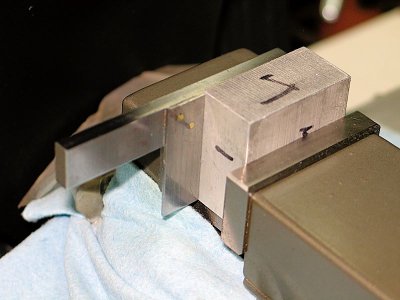
Almost all milling projects begin with squaring up rough sawn stock. The fastest and most accurate way to do that, at least in my opinion, is to cut all six sides with a flycutter. If you have squared more than a few pieces with a flycutter then you know that a tooling change is often required to do the ends … unless you have this square!
This little gem is a design by the late George H. Thomas that is unceremoniously allocated a single paragraph in his book, The Model Engineer's Workshop Manual. While it is a simple tool it does what no other square can do – get a work piece vertical when it is wider than the vise jaws (or even if it isn’t). Surprisingly, I have never seen this incredibly useful tool mentioned or pictured anywhere so I thought I would bring it to your attention.
Basically, it’s a simple T-square with an elongated body and a fixed blade that allows the user to move the blade within or beyond the confines of the vise jaws while the body of the square maintains contact with the top of the fixed vise jaw. You flycut four sides as usual then use the square to get one end vertical and fly cut it. Now flip the piece over, setting the freshly cut end flat on the bed of the vise, flycut the other end and you’re done.

The simple beauty of the design is that nothing interferes with the reference face of the work piece, which is free to fully register against the fixed vise jaw. The width of the work piece is limited only by the dimensions of the square you build.
How accurate is it? That depends on how accurate your reference square is when you make this T-square. I used a Tesa Toolmaker’s solid square, which has a DIN 875 Accuracy Class 00 rating (3 Microns) over its 4” length. As a result, the ends of a work piece typically show zero deviance when measured with a dial caliper and under 0.0001” when measured on a surface plate with a dial test indicator so it’s pretty good.
The basic idea is to take two pieces of precision ground stock and fasten them together with hammered brass rivets fairly tight but still moveable with some effort. You then carefully square the two pieces before silver soldering them together, and then hammer the rivets home.
This should be enough for most experienced hobby machinists to reproduce this tool but for the newer guys I thought I would include the more detailed description below.
Materials:
* Precision ground flat stock – I used Starrett carbon steel stock. You can use tool steel if you prefer but it isn’t necessary.
* Body: The length is not critical. I suggest making your body at least 1-2” longer than your vise is wide. For my Wilton MMV/SP-50 with 2” wide jaws the body is 3” long X ½” wide X 3/16” thick. So far, I haven’t exceeded it’s reach …
* Blade: The length of the blade should be just shy of the depth of your vise jaws. For my 1.5” high jaws the blade is 1-7/16” long X ½” wide X 1/16” thick.
* Brass round stock for rivets: 1/16” OD. This is not critical; I used this size to make it easier to hammer it into shape. The rivets are used primarily to hold the body and blade in place until it can be soldered. If I was to make a square for a larger vise I might use a larger brass rod.
* Silver solder and flux. I used Stay-Brite soft solder and Stay-Clear flux. Stay-Brite melts at 430° so you can use your propane torch for this project. It has a shear strength of 14,000 psi so it’s more than strong enough. At this time, a kit with solder and flux costs about $16.50 from: http://www.riogrande.com/Product/Stay-Brite-Solder-and-Stay-Clean-Flux-Set/503031
* It is useful to have a piece of brass rod, stick or acid brush to clear excess solder from the joint line. I just used the pointed end of a bamboo chopstick. You’ll also need some Sodium Bicarbonate or your favored pickling solution.
Procedure:
1. Cut your stock to length and clean up the ends with an end mill. Deburr carefully.
2. Center the blade on the body and align the top of the blade with the top of the body. It helps to put a spacer under the blade to prop it up so the blade lies flat on the body.
3. Clamp the body and blade lightly and square them with your reference square. Use the most accurate reference square you own as this determines the accuracy of the T-square.
4. Tighten the clamps firmly and drill two 1/16” through holes for your rivets. The location of these holes is not critical. I actually made a jig to hold the body and blade securely and the jig was held in the drill press vise. Note that these holes need to go straight in so don’t try drilling them with a hand-held drill.
5. Once the holes are drilled, lightly chamfer/counter-sink the holes on the surfaces that face out. You will expand your rivet heads into these chamfers so don’t make them too much larger than the hole.
6. We are going to pin the body and blade together but before we do we need to clean the area where these two pieces touch.
I suggest using either Scotchbrite or 400 grit sandpaper to remove any oxidation or surface contaminants, then wash with Dawn or contact cleaner, then wipe it down with lacquer thinner. Once cleaned, do not touch these areas with your fingers.
7. Cut two pieces of brass rod, about 1/16” longer than the thickness of the body + blade. Using needle-nosed pliers grasp the pin and lightly flare one end by gently tapping the edges with a hammer. I used a ball-peen hammer and anvil for this. Repeat for the second pin.
8. Insert the pins into their holes and begin tapping them to lock the blade and body together. Use light taps on both sides, working mainly around the edges of the pin; you are trying to fill the chamfers you made earlier. Do not make the pins too tight; you need to be able to move the blade slightly with some effort.
9. Bring your reference square into contact with the blade and body and move the blade until it is as square as you can get it. Once you are satisfied with the alignment, clamp one end of the body in a vise so you can solder it. I suggest a final wipe down with lacquer thinner at this point.
10. Note that solder will follow the heat. If the torch is on one side of the joint and the solder is applied to the joint on the other side the solder will flow toward the flame; this is what we want.
Gently heat the joint with your propane torch only from below the body and apply the liquid flux to both sides of the joint. Keep the flame moving under the joint and don’t try to get things hot too fast – you’ll boil the flux right out of the joint.
As you continue to heat the work, the flux will dry and then will suddenly liquefy. As soon as the flux liquefies move the flame to one side of the joint and apply solder to the joint line on the other side, away from the flame; the solder will follow the heat all the way across the joint. As soon as the solder begins to flow remove the torch.
11. If there is an excess of solder outside the joint you can gently heat the joint and push the excess off with the tapered stick (or an acid brush). If you can’t get all of it off then we’ll do it after the piece cools.
12. Let the piece cool for a few minutes. While you’re waiting, put several tablespoons of Sodium Bicarbonate in a small bucket or tub and fill it with very hot tap water. Soak the square in this solution for about 10 minutes. Follow this with a hot detergent soak for another 5 minutes (scrub it a few times), then another 5 minute soak in clean hot tap water. This should get most of the acid from the flux off your piece. There are many other ways to pickle a work piece; use what you know.
13. Once your square is washed and dried you can take a sharp chisel or graver and clean up any excess solder at the edges of the joint. It is important that the joint is completely clear of solder. I use a graver to make a slight undercut at the joint line to be sure the work piece can sit flush to the blade.
14. Finally, gently tap the rivets down until they are well seated. File or mill the excess flush with the surface and you’re done.
It’s tough to beat a tool that helps you work faster and more accurately without calling attention to itself … this is one of those tools.
Mikey

