Atlas 101.21400 used w/accessories, $1,500, plan to buy... thoughts?

I'll take it if you pass!
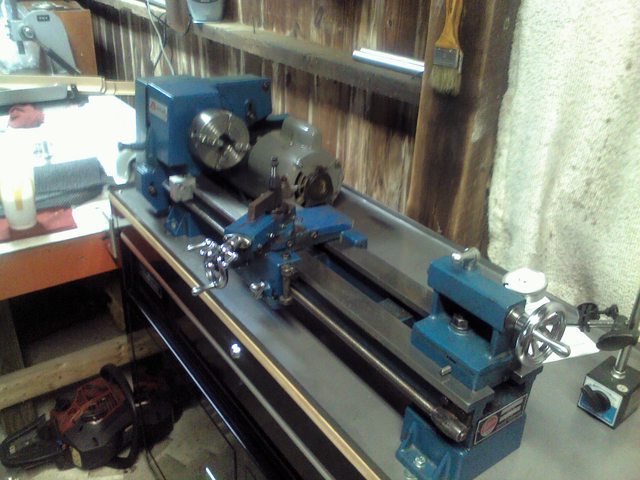
Already picked it up! Great little lathe. When you have a golden hammer, everything looks like a nail, now that I have a lathe... I've never noticed so many round parts.

Funny, the next day, I got a much delayed response from a MyFord Super 7 I was looking at as well... more $ for less stuff... and I got the impression it would be harder to find parts for if needed, even though it looks like a more robust lathe. Glad I went the Atlas 618 route.
 
I'll have to check... I really just go it all setup on my bench and tried turning a few things... haven't really dialed anything in yet, but I think it came pretty much ready to go... everything is very tight and smooth, no play in anyting.

After changing the gear box last nights to a feed rate of .0024" per revolution, my surface finish improved massively over manually cranking the feed rate wheel. I must have been feeding too fast. This was with a carbide insert on 6061 aluminum 1" diameter rod... I was in one of the faster settings... not sure exact RPMs, plan to hook up tachometer and a variable speed motor. I was also able to take a deeper cut. I may bump that up to the .0039" per/rev feed rate and see.... but wow, what a huge improvement. I just hope I don't wear out the half nuts and lead screw prematurely... previous owner reserved the automatic feed for threading only... but I'm not sure I plan to. Maybe just buy some extra half nuts if I can find them at a good price.

Power feed is nice, but it is good to develop some skill in maintaining a steady manual feed. It took some practice but I can get a good surface finish feeding by hand.
Also keep in mind when roughing the surface finish isn't that important so you don't really have to swap gears between your roughing and finish cuts unless you just want the practice of changing gears or just don't feel like cranking handles.

You will also probably find you will get a better surface finish with high speed steel blanks vs carbide, particularly with aluminum or brass.

I wouldn't worry too much about the half nuts, even though this is a hobby grade machine it will take years of heavy use to wear them out. You can usually find new sets for $60-80 if you will sleep better at night having a spare set. Somebody is also offering bronze half nuts instead of the original ZAMAK ones, not sure the benefit of bronze but they do look nice.
Plan to try HSS... just purchased a 60 grit aluminum oxide 6" grinding wheel so I'll give that a try. With power feed (mainly because it was a very consistent feed rate) the carbide tooling did leave a very smooth finish... now the chip management, or birds nesting of the cut offs was fun to deal with. Feeds, speeds and cutting tools is probably all over the map with what works for everyone.

Swapping gears wasn't too bad, if the tooth count is written on the gear :). But not something I would want to do very often, even for threading, I'll just break out the tap and dies first.

I haven't done much threading except for learning, tap and die is good enough for most things I do.

Little Machine Shop sells some pre sharpened HSS bits and blanks in different sizes, 1/4" should be fine but some like to go a little bigger 5/16" or 3/8". Not sure it really makes a difference on a lathe this size, but smaller is easier / faster to grind and cheaper. Pre sharpened are nice just to have something to get started with.

LMS tool bits


You can also find lots with used bits off of ebay, often very cheap and some are quite interesting. Sizes and prices can be all over the place 1/4" to 1", so you need to look closely at the description and photos. I picked up a couple pounds of bits off of ebay for about $10, that basically filled a small USPS prepaid flat rate box.
 
You're going to like the Atlas. I picked my Atlas 10100 Mk.2 lathe up several years ago with nothing but the motor, 4-jaw chuck & 1/2" drill chuck in the tail stock. It had the lantern style tool post (which I still have), it was clean and the estate sale price of $360 was affordable.

Make sure you get it leveled up correctly and cut a test bar to dial it in and remove any twist from the bed so that it doesn't cut a taper on longer pieces. I managed to get mine down to a few ten-thousandths on a piece of stock sticking 6" out of the 4-jaw unsupported. You'll be pleasantly surprised by how accurate it can be when set up properly.

I've used some of the pre-ground 1/4" HSS tool bits from LMS and have been happy with those as well as the small carbide insert sets you can find at Harbor Freight for around $20 with one of their coupon codes.

Z7tXju9l.jpg


I used it to successfully make a speed reduction pulley setup for a Delta DP220 drill press I picked up for free and restored. Worlds better than most of the off the shelf commercial stuff offered today...

WJMscxSl.jpg
 
You're going to like the Atlas. I picked my Atlas 10100 Mk.2 lathe up several years ago with nothing but the motor, 4-jaw chuck & 1/2" drill chuck in the tail stock. It had the lantern style tool post (which I still have), it was clean and the estate sale price of $360 was affordable.

Make sure you get it leveled up correctly and cut a test bar to dial it in and remove any twist from the bed so that it doesn't cut a taper on longer pieces. I managed to get mine down to a few ten-thousandths on a piece of stock sticking 6" out of the 4-jaw unsupported. You'll be pleasantly surprised by how accurate it can be when set up properly.

I've used some of the pre-ground 1/4" HSS tool bits from LMS and have been happy with those as well as the small carbide insert sets you can find at Harbor Freight for around $20 with one of their coupon codes.

Z7tXju9l.jpg


I used it to successfully make a speed reduction pulley setup for a Delta DP220 drill press I picked up for free and restored. Worlds better than most of the off the shelf commercial stuff offered today...

WJMscxSl.jpg
Nice looking lathe. So far, really like the Atlas 618, great to get me going. Capacity wise, I think it'll all I'll ever need... more features maybe in the future.. but for now, it's great.

I have so many carbide insert that came with it as well as some HSS blanks I'll probably be good for awhile... but I did see those in Harbor Freight the other day.

I'm getting my setup all organized at the moment... it'll be on a rolling tool chest and planning to buy a 1.5" thick birch cutting board to screw down to top of rolling cabinet and then the lathe on top. I'll level based on that. Obviously I won't be perfectly level based on where I need to roll it to in my shop but it should be ridged enough to now allow any twisting once leveled/shimmed originally. I think that's the critical part, everything is true relative to the headstock, tail stock and ways.

My next plan is to hook up a Consew CSM1000 variable speed 500watt brushless DC motor to make speed changes a bit easier... though, nothing really wrong with my current 1725 rpm motor and belt changes. May put that motor on my bandsaw to slow it down for metal cutting... and with a lathe, I can adapt a custom bushing/pully with the slightly off sized shaft.

I'll likely opt for a 3/8 link belt... that's the one odd thing, to change a belt on this unit, seems like a lot of work to take the head stock out.
 
I'll likely opt for a 3/8 link belt... that's the one odd thing, to change a belt on this unit, seems like a lot of work to take the head stock out.

I just installed a link belt on mine, 5 feet was perfect to replace both belts with just a few links to spare. As the actual set up will vary some you might want to go for 6 feet to be safe, and yes 3/8". I've seen some comment that their link belts stick up further than a vee belt causing it to rub on parts of the lathe, but this does not appear to be an issue on mine so perhaps related to your exact mounting of the motor, lathe and counter shaft. I can see that small changes in my setup could result in unwanted contact.

Installing the link belt is more of a chore than I expected, and there was much cursing involved, but still easier than disassembling the spindle as is required with standard vee belts.

I'd suggest you break and reassemble the link belt a few times so you get the process down before you are wrapped up in the lathe. I thought it was going to be easier than it was, and learning when the pulleys / spindle are fighting you does not help.


Your plan to mount yours to a thick board is a good one. Mine is currently mounted on a 1" plywood board. I added several feet on the bottom side to make it easier to move on the bench top. I think I used 8, 6 around the sides and 2 in the middle to help keep the weight evenly distributed. Obviously you want to avoid twist but on a lathe this size that is not nearly so much of an issue as with a larger / longer lathe. Screwing the lathe down securely but not overly snug can help prevent changes in the wood from imparting twist. I left one of the two screws on the tail stock end with just a bit of play as I have seen others suggest.
Sounds good... hopefully 5ft is enough, that is what I have. Considering I planning on a variable speed motor, I may not need the extra arm/belt tension pulley setup if I go directly from motor pully to spindle pulley... though, for now, I plan to keep the factory belt tension apparatus.... thanks for the tip on the link belt... I already realized the difficulty when adding and remove links just to "see" when it arrived... I can see ANY tension on it would make it difficult to impossible since I didn't realize TWO links/tabs overlap to make the connection.... needle nose pliers should help.

I wasn't even thinking about wood movement... I ended up getting a 1.75" solid birch board, laminated cutting board, which I was going to bolt down in several places to rolling tool chest... maybe two sheets of laminated plywood might be better... even MDF since it won't move as much. Though being my board is laminated from a bunch of small strips of birch, it's less likely to move during seasons as it's not just a solid, one piece board off the tree.
 
Nice looking lathe. So far, really like the Atlas 618, great to get me going. Capacity wise, I think it'll all I'll ever need... more features maybe in the future.. but for now, it's great.

I have so many carbide insert that came with it as well as some HSS blanks I'll probably be good for awhile... but I did see those in Harbor Freight the other day.

I'm getting my setup all organized at the moment... it'll be on a rolling tool chest and planning to buy a 1.5" thick birch cutting board to screw down to top of rolling cabinet and then the lathe on top. I'll level based on that. Obviously I won't be perfectly level based on where I need to roll it to in my shop but it should be ridged enough to now allow any twisting once leveled/shimmed originally. I think that's the critical part, everything is true relative to the headstock, tail stock and ways.

My next plan is to hook up a Consew CSM1000 variable speed 500watt brushless DC motor to make speed changes a bit easier... though, nothing really wrong with my current 1725 rpm motor and belt changes. May put that motor on my bandsaw to slow it down for metal cutting... and with a lathe, I can adapt a custom bushing/pully with the slightly off sized shaft.

I'll likely opt for a 3/8 link belt... that's the one odd thing, to change a belt on this unit, seems like a lot of work to take the head stock out.

Still not sure why Atlas made the 618 belt changes such a PITA, one of the reasons I picked up the Mk.2 was the ease of belt changes. Might I make a suggestion, make sure you get a metal chip tray between the lathe and the wooden bench top. The small Atlas lathes let a bit of oil pass thru that winds up at the base of the lathe. The metal top on mine in the pics is presisely for that reason, as over time the oil will have an effect on the wood.

Mine is sitting on a HF roll away tool cabinet at present. I haven't decide whether I'll keep the roller casters or make some leveling feet for it to ensure the best stability. I had my lathe leveled, but didn't have it dialed in until after cutting a test bar. Can't say enough about checking the alignment with a test cut on a 1 inch bar. I used the 2 collar method and got it down to 0.0005 inch over the 6 inch length of bar that was sticking out of the 4-jaw unsupported. Take light cuts to minimize deflection caused by tool pressure against the work and use a micrometer to check your progress for best results. I was able to reduce the amount of taper the lathe cut after initial setup considerably, ven though the Starrett level said everything was good the test bar REALLY tells the tale of how the lathe is interacting with the work.
I do plan to paint the wood top to help with moisture absorption and mitigate any wood movement as well as oils, etc... but I do have some 1/16" thick aluminum sheet and could add. I have noticed the oil below the head stock and spindle assembly.... Once I get everything mounted I'll certainly dial it all in, thanks for the suggestion on the "2 collar method"... I'll be looking that up. I have a decent digital level that is very sensitive, but not sure it's up to the task for fine adjustments... but it's all I have for now.
 
Back
Top