Beauty in The Beast: Webb 5BVK Barn Find/Conversion

Small update on a Saturday evening.
The following components are on their way - arriving in just a few days:
First up - the keyboard. I opted for the trifecta: cheap, waterproof, and flexible.
https://www.amazon.com/gp/product/B06WWM5TC6/ref=ppx_yo_dt_b_asin_title_o00_s00?ie=UTF8&psc=1

Next - mouse. Here I also went seamless/waterproof - but added wireless. Don't mind the keyboard wire - but don't want it on a mouse.
ref=ppx_yo_dt_b_asin_title_o03_s01

Grabbed a monitor for $99 - here I opted for frameless and 24".
Is that big enough?
Is that too big?
I have no idea - but its my starting point.
https://www.amazon.com/gp/product/B09MZMGG1S/ref=ppx_yo_dt_b_asin_title_o03_s00?ie=UTF8&psc=1

And for the brains of the operation - I got this.
They had a flash sale that made it $150.00 - so I clicked and grabbed it.
https://www.amazon.com/gp/product/B0B9X842VR/ref=ppx_yo_dt_b_asin_title_o03_s01?ie=UTF8&th=1

I opted not to buy a monitor arm and key board holder yet - I want to have a closer look at the machine to consider what's going to work best/be cleanest to install.

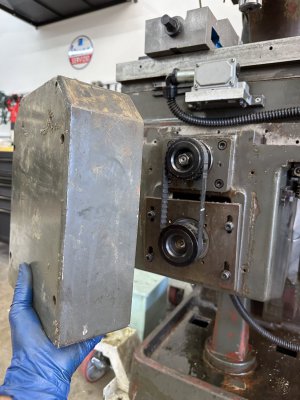
Speaking of which: the other thing I am planning on is removing the box from the side of the machine - and mounting it to the wall.
The box is big - and it opens at the back - making it something you have to walk around to get at.
I have a perfect spot next to the machine - and it will buy me some space/allow better layout I think.

Means I will be shopping for some conduit to carry my lines to the machine.
Off to look at my options on that front.

-CM
 
Small update on a Saturday evening.
The following components are on their way - arriving in just a few days:
First up - the keyboard. I opted for the trifecta: cheap, waterproof, and flexible.
https://www.amazon.com/gp/product/B06WWM5TC6/ref=ppx_yo_dt_b_asin_title_o00_s00?ie=UTF8&psc=1
Those foldable keyboards are a bit of a pain to use. They don't type like a normal keyboard, and I killed mine by getting oil on it.
https://www.amazon.com/gp/product/B06WWM5TC6/ref=ppx_yo_dt_b_asin_title_o00_s00?ie=UTF8&psc=1
Next - mouse. Here I also went seamless/waterproof - but added wireless. Don't mind the keyboard wire - but don't want it on a mouse.
ref=ppx_yo_dt_b_asin_title_o03_s01
Never seen one of those before.
https://www.amazon.com/gp/product/B098DHZTWQ/ref=ppx_yo_dt_b_asin_title_o03_s01?ie=UTF8&psc=1
Grabbed a monitor for $99 - here I opted for frameless and 24".
Is that big enough?
Is that too big?
I have no idea - but its my starting point.
https://www.amazon.com/gp/product/B09MZMGG1S/ref=ppx_yo_dt_b_asin_title_o03_s00?ie=UTF8&psc=1
Not too big, mine is either a 24 or 27 I can't remember
https://www.amazon.com/gp/product/B09MZMGG1S/ref=ppx_yo_dt_b_asin_title_o03_s00?ie=UTF8&psc=1
And for the brains of the operation - I got this.
They had a flash sale that made it $150.00 - so I clicked and grabbed it.
https://www.amazon.com/gp/product/B0B9X842VR/ref=ppx_yo_dt_b_asin_title_o03_s01?ie=UTF8&th=1
Should work fine.
 
The last of the items is scheduled to arrive on Monday.
I have enough to keep me busy until then - the project list is always longer than the spare time.

Part of what I liked about keeping my existing servo motors is - they will allow me to operate the machine manually - as well as CNC.
I've also been collecting the items required to upgrade my manual operation as well.
Done quite a bit of machining with my hands on the timing belts fine tuning.
Look forward to now applying what I learned to make this a more viable manual mill in parallel.

Jim - I can gather information, photos, etc. - as needed.
Just let me know what info will help.

Tks.
-CM

Well it looks like it time for me to put together a schematic, and and send a link to the software. I had to go back and read this entire thread to figure out where we were.

You may need to buy another relay board, about $8 from Amazon.

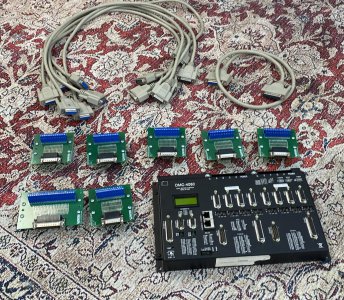
When you get all of the stuff together, put it on the bench and take a picture so I can see a quick inventory of what's there.
 
I had to go back and read this entire thread to figure out where we were.
Oh man. I had to do the same a few weeks ago - it was a pain - and its my thread!
Thank you.
You may need to buy another relay board, about $8 from Amazon.
Ok
When you get all of the stuff together, put it on the bench and take a picture so I can see a quick inventory of what's there.
Got it.
I'll also post some info about the other control's wiring, e.g. power draw bar or power spindle lock - at the same time.
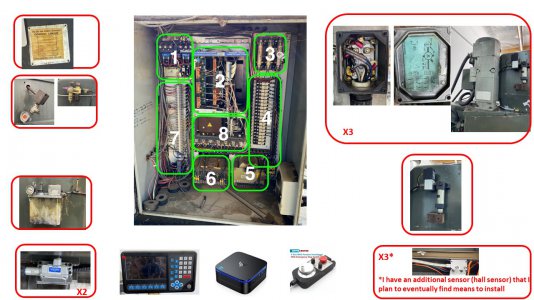
Sounds like you already found the original pictures of the cabinet innards. I'll repost that as well.

*you've previously mentioned - back on page 3 or something - that the using flood coolant on this machine was an impractical mess, or something along those lines.

Are you going to recommend I put some kind of mist system on it?
The controls have a "flood" and "mist" setting.
I could potentially revive it.
That said - I find that the base's reservoir gets filled with all sorts, including swarf and way oil...
Interested on your thoughts for mist or other coolant based on your own experience with a similar machine.
 
Are you going to recommend I put some kind of mist system on it?
The controls have a "flood" and "mist" setting.
I could potentially revive it.

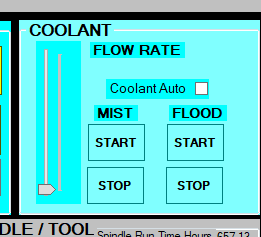
The software has a flood/mist control. Operates manual or automatic from G code.
1679584349965.png
I need to get some pictures of my current setup. It's a homebuilt fogless mist system. I'll be in the shop later today.
 
Great.
Like where this is going!

I’m traveling for the weekend.
So when ever time permits.

Looking forward.
Tks.
 
Jim - I've assembled a set of images that may help us with layout design.
This is basically all the components that will be in play - I think.
It is missing the buttons/switches that would operate some of the components - like draw bar, or mist system.
I do however have those and can photograph if required.
I also did not include the monitor/keyboard/mouse - but assume they will just plug into the mini computer...

Does this help?
Would you like additional information/ images that might simplify the process?
Just let me know.

Thanks,
CM
Slide1.JPG
 
While Jim schemes up a scheme for the conversion to CNC - I've started experimenting with manual controls upgrade.
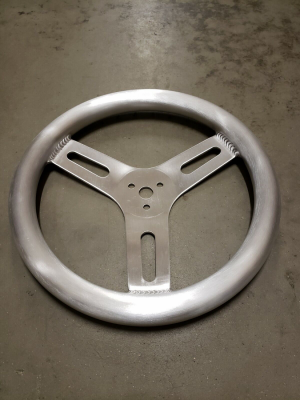
It involves my first use of a Jacobs chuck on my lathe, the boring of holes in some original covers, and two dune buggy steering wheels...

Background:
The mill came from the factory as a CNC.
A 1980 Kitt from Night Rider kinda CNC - but none the less... CNC.
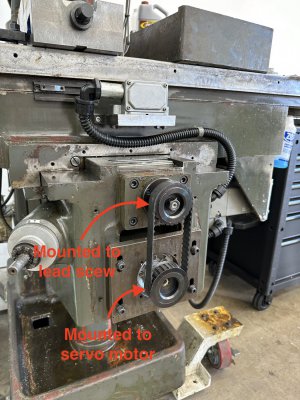
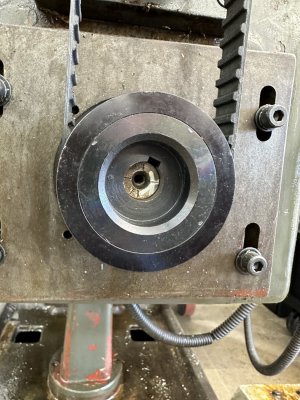
Some nice quality servo motors connected by timing belts turn cogs mounted to the ends of the lead screws.
But, unlike a Bridgeport (type), these cogs are mounted to the base, and remain stationary.

IMG_2379.JPG

You can see from the pic above - when the table moves out - it clears the top cog by only a fraction of an inch/few mm.

So my plan is to mount the handles to the lower cog (servo motor).
This raised two issues.
1. Using the lower cog means a really big handle would be nice - to make it easy to access.
2. However - going to CNC - I need to be careful with the weight of that wheel. A 12" or 13" cast wheel would put a lot of strain on the motor/create inertia issues as well.

There are covers that goes over these cogs.
I've had them off the X & Y axis - so that I could turn the cogs by hand.
Less than brilliant experience - but I've done a lot of machining that way.

IMG_2380.JPG

So the plan is to use these wheels (below) - very light - aluminum
1680414244920.png

Plan is to fabricate some adapters - the size of the cog shaft at one end, and with the 3 hole pattern of the steering wheel (handle) at the other.
I want them to spin with minimal wobble - so I need the two ends of the adapter to be as parallel as possible.
One will face the wheel, one will seat on the end of the cog's shaft and be keyed.

IMG_2381 3.JPG

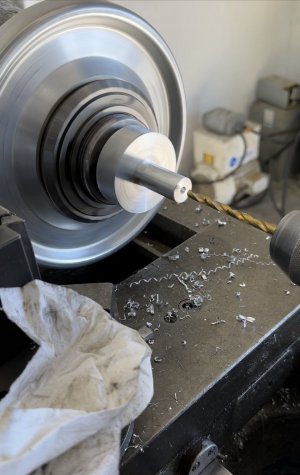
Using the Jacobs chuck - I was able to work a piece of aluminum - flipping it but remain concentric.
It was a pleasure to work with such tight tolerance tooling.
IMG_F16284824EC2-1.jpeg

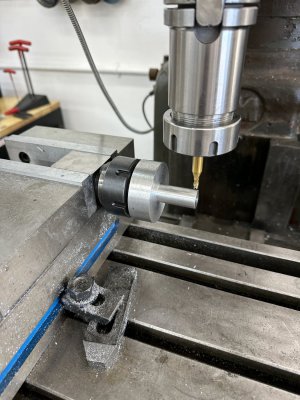
Before I cut the tail off - I'm using it to hold the part so I can cut a keyway.
IMG_2391.JPG

If this has too much flex, I will re-cut and opt to seat on the larger inner cog surface.
Though not sure I can use the key if I go that way.
Will see how this first one operates.
More pics to follow as I finish and assemble.

-CM
 
Back
Top