Cast Iron Repair and Needle Scaler

Junkmaster

Active User
Registered
Joined
Sep 3, 2012
Messages
51
First: Cast Iron Repair

The main belt cover for the VN-12 is cracked. Over the years people didn't fix it, they just pushed paint into the crack. The cover is a little bent so the crack has opened about 1/16th of an inch. I've removed the paint using dental picks and paint remover.

I'm trying to decide how to fix the cover. Here are the options I know, I'm open to other suggestions.

  1. Fill crack with JB Weld clamp it so that the crack closes. Pray a lot while the epoxy hardens.<== I'm leaning towards this one
  2. Plug it with bondo and sand it smooth.
  3. Braze it <== I have the tools to braze, but no experience brazing cast iron. I will have difficulty pre-heating the whole cover.
  4. Forget it, paint over it.
  5. Chunk it in the trash, we don't need no stink'n belt cover.

I don't have access to an arc welder. I've heard that it is a chore to arc weld cast iron correctly (meaning I can't afford to have it done).

Second: Needle Scaler

http://www.harborfreight.com/air-needle-scaler-1108.html

I found an Needle Scaler on the "Open Box" shelf at Harbor Freight for $14.00. I bought it and tried it on the base of the machine. It took paint off like a champ.
The paint is old and cracked and comes off reasonable easy with scraper also.

Is there any problem with using a needle scaler on the cast iron? A needle scaler seems like something the Navy would use on ships to clean up rust and old paint.

Evan R.
 
I used a needle scaler on the Champion Drill Press I did you can see it here. http://www.hobby-machinist.com/show...ing-The-Champion-Forge-Camel-Back-Drill-Press

I use it on all the machines I redo. You could get some 3/32 NICAd 55 and weld it up you won't need any pre or post heat. Just tack it at both ends and weld about a inch and move to another spot. That all I use for cast besides brazing and I don't preheat for that either. But I do bury it in sand and let it cool slow.

Paul
 
I buy/sell/use/collect antique woodworking tools. I've seen a lot of brazed cast-iron. If you're going for strength instead of looks then that is the way to do it. Unfortunately I've never seen one that looked like it wasn't brazed by a dyslexic drunken monkey, but hey - paint covers all sins.
 
Unless it is in a highly stressed area, braze will be the most permanent unless you weld. It's not difficult. It must be clean, but there is no need to preheat the entire piece. You can use flux coated rod, plus a little dip flux to boot. For strength, you need to get it in the crack itself, which will be the hardest part to clean. And as a plus, if you can get to both sides, do so. You can then grind and clean off the side that shows and proceed with the fill, prime and paint as desired.
 
Just for insurance, I'd consider drilling a small hole at the end of the crack. That might keep it from going any farther from the stresses of brazing.
 
from a "fixer of things": if you can braze, you can do it. . . but as stated drill a small hole at the end of the crack to keep it from continuing. clamp it together, v-groove the crack about 25% deep and braze away. like above, use fluxed rod and dipped flux also. try to find a way to cool it fairly slow. maybe a pile of beach sand would work. . .

i love needle scalers. i sold many of them for paint removal, rust removal. . . but i would not use it on anything thats got a crack until the crack is repaired.

remember, this is a hobby forum, means that we're mostly not pofessionals just dudes with lots of experence.

oh ya, i forgot, its broke now, it can't get much worse than that :))

show us pictures when its started, and when its finished. we all love pix.
 
Keith at Turn Wright Machine Works has some great videos of brazing cast iron. He's a firm believer in NEVER welding cast iron. Since your part is not structural and just a cover I wouldn't see the need to be as ridiculously thorough as Keith is but he's a great source of information on brazing, including cleaning up the crack and drilling those relief holes that davidh and Hawkeye mention as well as pre-heating.

http://www.youtube.com/watch?v=117Q9odITF8&feature=relmfu
 
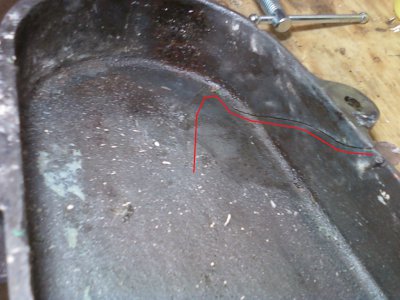
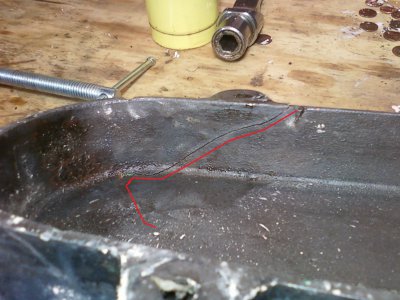
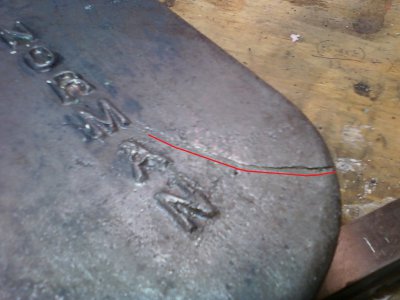
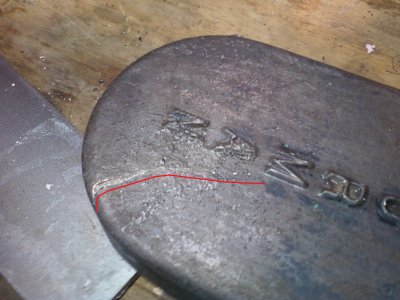
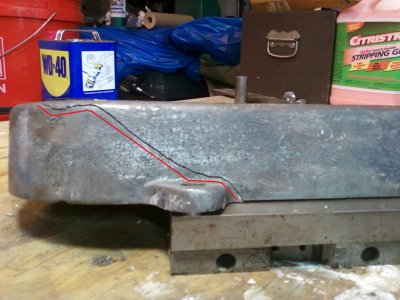
Here are some photos. The crack is obvious in some images, not so obvious in others. I put a red line that pretty much follows the crack. I'm going to braze it. Mainly because I've never done that before and I'd like to try it.
Photo0359.jpgPhoto0358.jpgPhoto0357.jpgPhoto0356.jpgPhoto0355.jpg

Photo0359.jpg Photo0358.jpg Photo0357.jpg Photo0356.jpg Photo0355.jpg
 
Evan, in case you don't want to do it yourself. Bob Wright on here (aametalmaster) is a pro welder and could do it for you. One other guy is Dennis Turk on the Yahoo Southbend group who does very fine work.

What happens with those large covers is probably that some idiot serviced the machine and threw it on the floor. I have seen other cracked ones. I had an extra but sold it. You never see them for sale on Ebay.

Brazing and grinding it flush makes it good as new, just dont drop it again.
 
Here are some photos. The crack is obvious in some images, not so obvious in others. I put a red line that pretty much follows the crack. I'm going to braze it. Mainly because I've never done that before and I'd like to try it.

Brazing is very akin to soldering, both in the process and the finished appearance.
If I was doing it I would work from the inside, so as to make a good finish on the outside easier to achieve.
I'd 'V' and clean the crack and clean at least 1/2" either side of it as well.
You don't need to heat the whole casting, but you will need to heat the area you're going to braze and for some way around it too, or you'll find the brazing rod will melt before the temperature of the casting has risen enough for the brass to adhere and it will just sit as blobs on top.
You might also want to take into account that the heat will open the crack as the metal expands, which could distort the shape of the casting, so some clamping might be in order.

As with most things, time spent in preparation will be amply repaid.


M
 
Back
Top