- Joined
- Dec 29, 2012
- Messages
- 394
Having a pile of old "dead" Lead Acid batteries I was looking for ways to revitalize them.
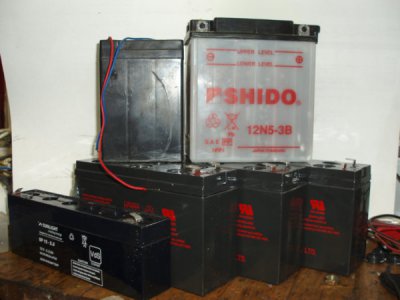
Long time ago I have build a “battery desulfator” that supposed to desulfate battery cells and give them a new life.
As the desulfator I have builded, gets its power from the battery itself, there was a problem in revitalizing batteries that have a nominal voltage under 10 volts. If a battery has a voltage around 12 volts is probably in working order and you can charge it. On the other hand, all dead batteries have low voltage for the device to work efficiently. So I was looking for a charger that revitalizes batteries and at the same time charges them.
My research brought me to a devise called “Capacitance Charger”.
It is a very simple circuit, it claims to be very efficient but needs VERY CAREFUL HANDLING as:
it gives HIGH VOLTAGE THAT CAN KILL and
if left unattended it overcharges the battery!!
Living dangerously, I decided to build and test it!
CIRCUIT DESCRIPTION
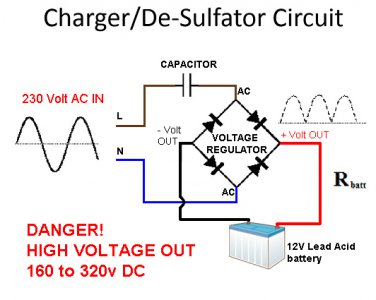
The basic circuit is very simple as it uses MAINS VOLTAGE, a motor-run capacitor and a bridge regulator.
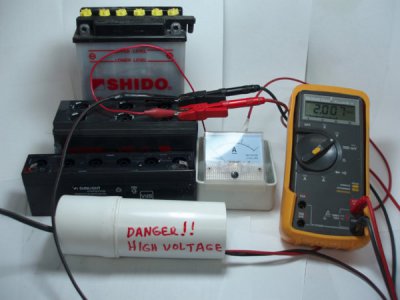
In reality it looks like this
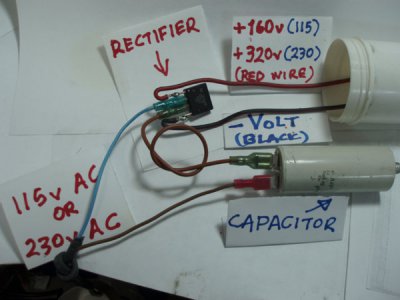
NOTE that all components are insulated and go in a plastic container to protect the operator of the charger!
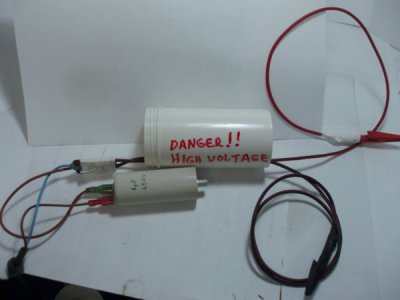
Note that I do not use the classic alligator clips of a normal battery charger but small fully isolated clips!
Container sealed and charger ready to use.
HOW IT WORKS
The role of the capacitor, in line to mains voltage, is to limit the current going into the rectifier and to the battery. Amazingly, it does this without any power loss (like in a resistor).
A crude rule-of-thumb is to use 20uF of capacitance for each Amp of charging current you want to deliver to the battery or battery pack.
If a lead acid battery is left for too long in a discharged state it becomes unusable through a process called Sulfation. This Wikipedia article describes it in greater detail.
As the DC out from the charger is not smoothed, it gives pulses of positive charge at a frequency twice that of the AC current (120 Hz in USA, 100Hz in Europe). These pulses, in theory, dissolve the crystals formed on the surface of the plates in the battery and gradually a dead battery comes back to life.
It is essential though to Monitor the battery voltage as it is charging and know ahead of time what voltage is required for a full charge.
BASIC INFORMATION FOR FLOODED LEAD-ACID BATTERIES:
CHARGING
80% charged is 2.38 volts per cell (14,28 Volts for a 12 Volt battery)
Bubbling and gassing starts to occur at 80%.
100% charged is 2.58 volts per cell (15,48 Volts for a 12 Volt battery).
Vigorous bubbling and lots of gassing occurs at 100%.
DISCHARGING
When a Lead Acid battery is 80% discharged you measure 1.75 volts per cell (10,5 Volts for a 12 Volt battery pack).
At the beginning of the charge cycle, using the capacitive charger, the power going into the battery pack is the highest. As the battery pack charges, the power going into it drops until it settles out at some nominal value and the battery reaches a full charge.
CAUTION!
NEVER TOUCH the poles or leads of charger while it charges!
LETHAL VOLTAGES
You must monitor the process as you might boil away batteries if you do not switch off the charger after battery is fully charged.
TESTING THE CHARGER
In order to monitor Voltage and current, to avoid overcharging the battery, I connected a DC Amp meter and my multimeter to monitor charging as you see in the previous picture.
Before starting any charge procedure make sure that the battery is filled to maximum with distilled (de-ionized) water!
Take all usual precaution measures here as you deal with acid: Plastic gloves, eye protection, etc.
Refilling SLA's (Sealed Lead Acid Batteries), is like refilling a car battery, only on a smaller scale!
Use a small flat head screwdriver to pry off the cover, There is usually a slot that the screwdriver will fit in.
Take the Cell Vents Off (those small loosely fit rubber caps) and using a small syringe (or any device which can suck up and dispense water into narrow places) fill slowly the cells with de-ionized water. (A more detailed procedure for SLAs here.
After preparing my batteries I started charging.
Measured voltage of a dead SLA battery 2 Volts!

As expected, when I powered on the charger initial voltage starts high and drops quickly. My SLA batteries started at 135 volts!
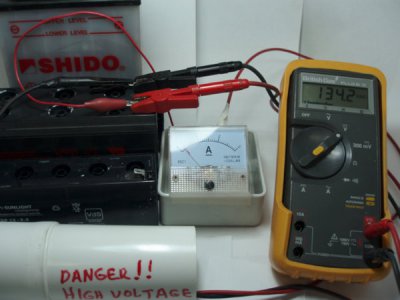
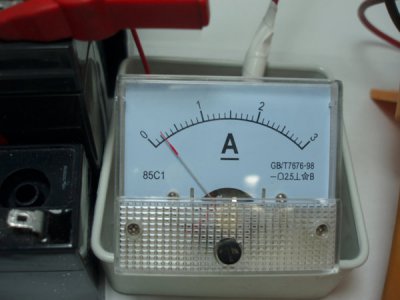
My charger, using a 6uF capacitor provides 0.2 Amps.
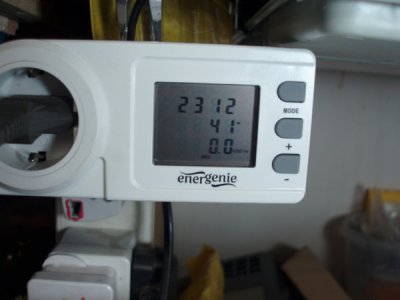
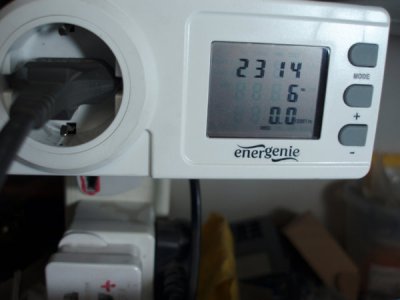
Initial energy consumed by the charger was high (41 Watts).
Gradually voltage drops to “normal” levels (around 12 volts) and battery starts charging.
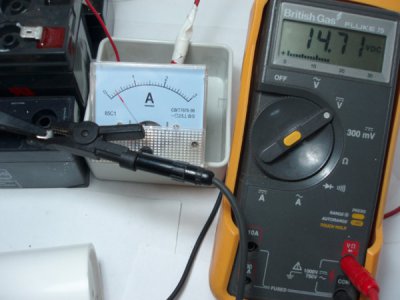
Depending on the battery capacity and status, charging takes different time. Small capacity SLAs charge fast and you need to monitor them so they not exceed 15,4 volts (100%).
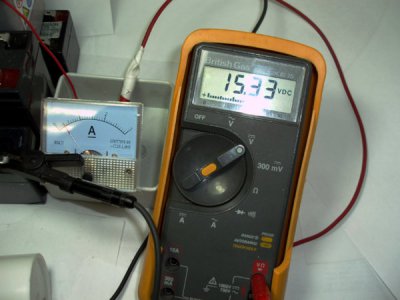
Charging classic “Flooded” Lead Acid Batteries (FLAs) took more time as charging voltage rose very slowly. For instance charging a dead motorcycle battery at 0,2Amps went from 80v initially down to 12,7 volts in half an hour…
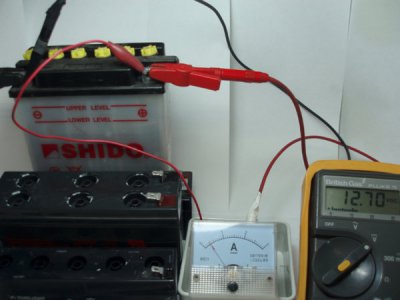
…and then took another hour to reach 13,4 Volts.
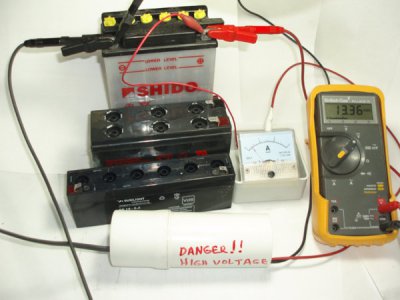
The energy consumption during charging was negligible, just 6 watts.
CHARGING RESULTS
24 hours after charging I measured the voltages of each battery. As 3 of my SLA batteries were badly damaged (cracked and swollen) by overcharging due to an overenthusiastic Uninterrupted Power Supply (UPS) that overcharged them…
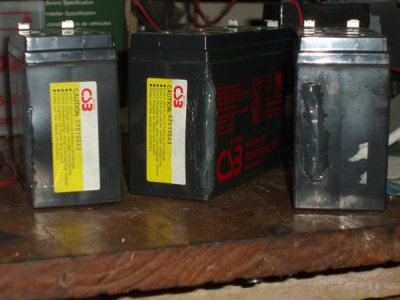
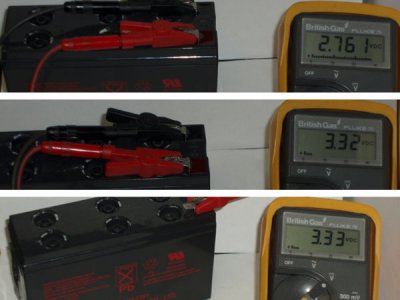
Their charging results with my Capacitive Charger were disappointing. Some cells were getting hot (too hot) and the electrolyte inside sounded boiling. For that reason I never finished the charging procedure with my 3 UPS SLAs.
After 24 hour they had no charge as you can see below.
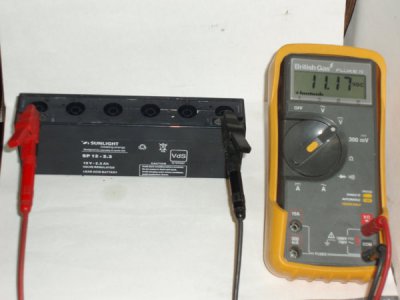
A smaller SLA removed a year ago from my burglar alarm behaved better. After 24hours
it had some 11,17 volts.
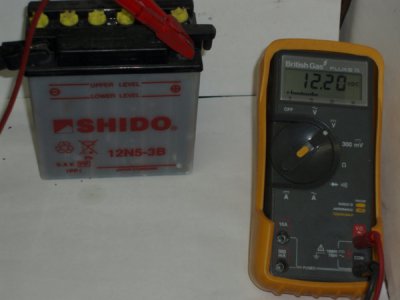
Best performer proved to be the flooded type “dead” motorcycle battery! After 24 hours it still had 12,2 volts.
CONCLUSION
I never expected miracles out of the capacitive charger! I am very happy though as 2 of the batteries follow a revitalization path. I still need to experiment with larger capacity “dead” batteries to come to a final conclusion but for such a procedure I need to make a more elegant charger capable of delivering a wide range of power not just 0,2 Amperes!
I already have some ideas in my head and I will start building it instantly.
Thanks for reading and...
Stay tuned!
Petros

Long time ago I have build a “battery desulfator” that supposed to desulfate battery cells and give them a new life.
As the desulfator I have builded, gets its power from the battery itself, there was a problem in revitalizing batteries that have a nominal voltage under 10 volts. If a battery has a voltage around 12 volts is probably in working order and you can charge it. On the other hand, all dead batteries have low voltage for the device to work efficiently. So I was looking for a charger that revitalizes batteries and at the same time charges them.
My research brought me to a devise called “Capacitance Charger”.
It is a very simple circuit, it claims to be very efficient but needs VERY CAREFUL HANDLING as:
it gives HIGH VOLTAGE THAT CAN KILL and
if left unattended it overcharges the battery!!
Living dangerously, I decided to build and test it!
CIRCUIT DESCRIPTION
The basic circuit is very simple as it uses MAINS VOLTAGE, a motor-run capacitor and a bridge regulator.

In reality it looks like this

NOTE that all components are insulated and go in a plastic container to protect the operator of the charger!

Note that I do not use the classic alligator clips of a normal battery charger but small fully isolated clips!
Container sealed and charger ready to use.

HOW IT WORKS
The role of the capacitor, in line to mains voltage, is to limit the current going into the rectifier and to the battery. Amazingly, it does this without any power loss (like in a resistor).
A crude rule-of-thumb is to use 20uF of capacitance for each Amp of charging current you want to deliver to the battery or battery pack.
If a lead acid battery is left for too long in a discharged state it becomes unusable through a process called Sulfation. This Wikipedia article describes it in greater detail.
As the DC out from the charger is not smoothed, it gives pulses of positive charge at a frequency twice that of the AC current (120 Hz in USA, 100Hz in Europe). These pulses, in theory, dissolve the crystals formed on the surface of the plates in the battery and gradually a dead battery comes back to life.
It is essential though to Monitor the battery voltage as it is charging and know ahead of time what voltage is required for a full charge.
BASIC INFORMATION FOR FLOODED LEAD-ACID BATTERIES:
CHARGING
80% charged is 2.38 volts per cell (14,28 Volts for a 12 Volt battery)
Bubbling and gassing starts to occur at 80%.
100% charged is 2.58 volts per cell (15,48 Volts for a 12 Volt battery).
Vigorous bubbling and lots of gassing occurs at 100%.
DISCHARGING
When a Lead Acid battery is 80% discharged you measure 1.75 volts per cell (10,5 Volts for a 12 Volt battery pack).
At the beginning of the charge cycle, using the capacitive charger, the power going into the battery pack is the highest. As the battery pack charges, the power going into it drops until it settles out at some nominal value and the battery reaches a full charge.
CAUTION!
NEVER TOUCH the poles or leads of charger while it charges!
LETHAL VOLTAGES
You must monitor the process as you might boil away batteries if you do not switch off the charger after battery is fully charged.
TESTING THE CHARGER
In order to monitor Voltage and current, to avoid overcharging the battery, I connected a DC Amp meter and my multimeter to monitor charging as you see in the previous picture.
Before starting any charge procedure make sure that the battery is filled to maximum with distilled (de-ionized) water!
Take all usual precaution measures here as you deal with acid: Plastic gloves, eye protection, etc.
Refilling SLA's (Sealed Lead Acid Batteries), is like refilling a car battery, only on a smaller scale!
Use a small flat head screwdriver to pry off the cover, There is usually a slot that the screwdriver will fit in.
Take the Cell Vents Off (those small loosely fit rubber caps) and using a small syringe (or any device which can suck up and dispense water into narrow places) fill slowly the cells with de-ionized water. (A more detailed procedure for SLAs here.
After preparing my batteries I started charging.
Measured voltage of a dead SLA battery 2 Volts!

As expected, when I powered on the charger initial voltage starts high and drops quickly. My SLA batteries started at 135 volts!

My charger, using a 6uF capacitor provides 0.2 Amps.

Initial energy consumed by the charger was high (41 Watts).

Gradually voltage drops to “normal” levels (around 12 volts) and battery starts charging.

Depending on the battery capacity and status, charging takes different time. Small capacity SLAs charge fast and you need to monitor them so they not exceed 15,4 volts (100%).

Charging classic “Flooded” Lead Acid Batteries (FLAs) took more time as charging voltage rose very slowly. For instance charging a dead motorcycle battery at 0,2Amps went from 80v initially down to 12,7 volts in half an hour…

…and then took another hour to reach 13,4 Volts.

The energy consumption during charging was negligible, just 6 watts.

CHARGING RESULTS
24 hours after charging I measured the voltages of each battery. As 3 of my SLA batteries were badly damaged (cracked and swollen) by overcharging due to an overenthusiastic Uninterrupted Power Supply (UPS) that overcharged them…

Their charging results with my Capacitive Charger were disappointing. Some cells were getting hot (too hot) and the electrolyte inside sounded boiling. For that reason I never finished the charging procedure with my 3 UPS SLAs.
After 24 hour they had no charge as you can see below.

A smaller SLA removed a year ago from my burglar alarm behaved better. After 24hours
it had some 11,17 volts.

Best performer proved to be the flooded type “dead” motorcycle battery! After 24 hours it still had 12,2 volts.

CONCLUSION
I never expected miracles out of the capacitive charger! I am very happy though as 2 of the batteries follow a revitalization path. I still need to experiment with larger capacity “dead” batteries to come to a final conclusion but for such a procedure I need to make a more elegant charger capable of delivering a wide range of power not just 0,2 Amperes!
I already have some ideas in my head and I will start building it instantly.
Thanks for reading and...
Stay tuned!
Petros
Last edited:
