How Do I Deepen Weld Fusion?

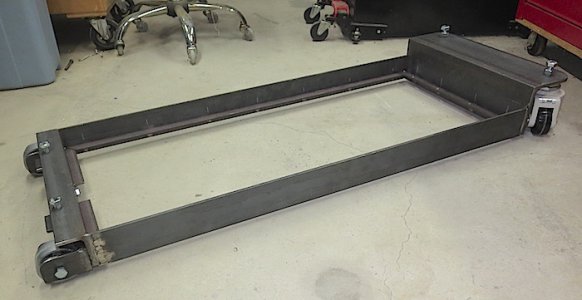
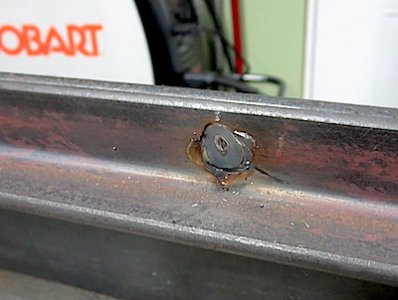
I guess I should post the finished thing. I welded the angle brackets to the frame with plug welds (is that what they are called?). I drilled 7/16 holes about every 6-inches in the angles, clamped them to the frame and filled them up with hot stuff. I couldn't help putting the wheels on it and rolling it around. Who makes anything with wheels and doesn't prematurely put the wheels on to roll it around?

plug weld_0488.JPG Dolly_0491.JPG
 
To get a full penetration on this material with MIG, make a U shaped weld preparation, and leave not more than about 1/16th" of material at the base of the U to the other side of the weld.
Try first with a piece of scrap. Make sure you have enough current to form a small bead on the other side, and make a several passes to fill the prep area. The first needs to be small and just a bit wider than the gap, gap should be between 1/16th " and 1/8th", more towards the 1/8th ". The filler should blend into the parent material on both sides. Then place the subsequent runs. Good practice would have the root back gouged and ground, or for a small weld like this ground out and welded from the other side, unless you cannot get at it such as with small diameter pipe work. If you get a good bead on the back of the root weld, then you need not do anything more, it will be satisfactory and of sufficient strength.

Good welding will have a reinforcement left on it to make up for the HAZ (Heat Affected Zone). Providing the weld is larger than the parent material then you should achieve close to full strength.
 

Attachments

  • Weld Prep.pdf
    173 KB · Views: 6
Franko: Just wanted to let you know that I cut up a 1/8" wrought iron steel handrail last weekend and rewelded it to fit another area and the weld runs/joints were so short that I could not strike an arc with the stick welder so I busted out my mig and thought wow this is easy and I can weld and I laid beautiful beads and then when I ground them down (because it has to look pretty and feel nice to hold because it is a handrail) I saw that the base metal had not even fused that all I had done was lay a bead on top. So my guess is that it is back to square one to establish a puddle then drag or push it. But quite frankly a mig has got two knobs which need to be both set right to work right and the right heat and the right wire speed to not build up too much fill metal at the expense of not heating up the base metal. In a way, to me, it is more complicated than stick welding.

Quite frankly, I think if I can get this stick thing down, it will be good for me.

But I got to get the seeing the puddle but not hurting my eyes thing down first.
 
Last edited:
If it made a good bead but didn't penetrate at all, I'd think that it may be the iron isn't weldable. It may be like trying to weld cast iron. Or, it could be you didn't have hot enough arc.

I don't know how you would establish a bead with a MIG without piling up a gob of filler.
 
Franko,
First of all a disclaimer I am not a welder buy I have found that welding inside is a lot easier with a strong worklight of 500w or more directed on the joint will make seeing the weld a lot easier especially with the poor eyes which with I am equipped. Outside, I have a piece of material fastened to the back of my helmet with Velcro that shields the inside of the viewing area from extraneous light. Also I have found that a manual helmet i.e fixed shade gives better visibility at the expense of the auto darkening.
John
 
turnittupper: GoodOnYaM8! I was at the Airgas store yesterday looking for just that sort of helmet shield. No luck so my guess is that I will have to fashion one myself. Any chance you might post up a picture?
 
Last edited:
Leave your setup like it is and use 2 passes. 1st hot and fast with a short back and forth stitch motion parallel to the gap. Then a cooler weave motion to fill the bevel and make a cap. Anything thicker than .250 will always benifit from multiple passes.

Sent from somewhere in East Texas Jake Parker
 
Franko: I guess what I am saying is that establishing a molten "bead" with a mig machine is easy. But establishing a molten "puddle" of base metal below that bead is harder for me, and quite frankly the existence or nonexistence of a molten puddle of base metal is obscured by the fill metal bead, which in my case can sometimes look pretty but provides about as much strength as Scotch tape over a butt joint.

I agree with you, and quite frankly I am tired of piling up a bunch of filler. I may try FCAW-G (100% CO2 gas) or FCAW-S (self shielding with no gas) but it's $90 to buy the replacment rollers to run it in my machine. Should only be $45 for your machine. Here is a great article on FCAW vs the GMAW ER70S solid wire that we typically use in our wire feed machines:

http://www.lincolnelectric.com/en-u...o/Pages/flux-cored-wire-selection-detail.aspx
 
Last edited:
E350,
You bought a fabulous wire welder and a very capable stick welder. What you are lacking is both practice and experiance. So, before you spend any more money let me explain some things that you are doing wrong.

First, all welds require a gap, except for fillet and lap welds. The weld is deposited between the metal, not on top of the metal. Welding is not a process of melting and refreezing steel. It is a process of liquifying steel, and allowing two liquid surfaces to recystalize into hopefully a single homogenous structure with similar grain sizes throughout. This depth of penetration (called dillution with the base metal)is very small, less than a 64 of an inch is usually adequate. Think of this not as a smooth plain, this liquid zone, but a zone of liquid metal surrounded by an area of jagged crystals of unmelted steel. The crystals grow along this boundery, interlocking with the unmolten crystals of steel. Like a zipper.

Second, did you purchase the book "New Lessons in Arc Welding?" It is loaded with experiance and explains how to properly gap and bevel weld joints.
It has practice exercises. Until you practice all of the exercises and burn at least a hundred pounds of rod and wire, you will continue to get poor quality welds. This is as good a book as you will ever need for improving your skills. Is a hundred pounds enough? Probably not.

Third, buying more wire and gizmos and expecting them to work any better with out investing any more time in learning them is not going to give you better results.

These are mistakes that you have made.
The 7018's that you purchased are not forgiving and are not for the inexperianced welder and not easy to learn with. The 7018 rods you purchased have an intense focused arc, designed for deep bevel joints, Narrow multipass stringer beads on high strengh difficult to weld steels. They require high currents to maintain high multipass temperatures and to burn out wagon tracks from previous stringer beads so that the weld deposit will pass xray and radiographic tests. It is not designed for cap or weave passes.

I suggested a much more forgiving 7018, It is designed for the type of welding you are doing, ok, ???? I think your welding supplier is unloading excess stock onto an unsuspecting customer, you. You will like the rod I suggested. Go to Home Depot or Lowes and get some Lincoln 6011's They are an extremely easy to use rod for general work and for learning. OK,,,,,,,,,,

You bought an expensive multiprocess wire welder. If I were you, I would learn how to spray and pulse weld with it. You should buy 90% argon and 10% CO2. This gas will allow you to short circuit steel up to 1/8 inch all positions. Spray steel up to 1/2 inch flat and some horizontal, and pulse unlimited positions unlimited thickness with one wire. E70 s3 wire. There are restrictions, learn your limitations, you have the other Lincoln book I suggested. It tells you about limitations and restrictions on highstrength steels.

Remember the Gap!

Chuck
 
chuck: Thank you for your detailed responses. They are truly appreciated. My guess is that, even though I will admit that I am particularly good at making mistakes, it is conceivable that some or all of your advice may help others who come across these threads. I have been reading the first book and I still have the second in my cart.

I didn't know that I needed to gap what was essentially an outside corner joint of 1/8" to 1/8" mild steel plate. I assumed that the wire would cause a puddle to form collapsing the edges into each other and into the filler electrode.

Points taken.
 
Back
Top