- Joined
- Dec 13, 2012
- Messages
- 466
Re: Buying a new mill
Here's what I did to replace the spindle seals on my PM45-M.
The first thing you need to do is to unplug your machine and THEN remove the electrical cover.
There are 4 screws you need to remove that are connected to the top cover of the mill.
See the picture below.

Once that is done you will need to remove the 4 screws from the flange of the motor.
I had to use a ball end allen wrench to do this since the motor fins were in the way. Yours may be different.
Once they are removed you need to lift the motor straight up. You may have to bang on the motor with your hand
to break it loose. Once you get it off you are rewarded with this view.
Note the key for the shaft stayed in the hole and not the motor shaft on mine.
Don't leave the motor balanced on the top of the column like in the photo. I did that just for the photo. It's VERY
easy to knock it off!

Next you remove the 6 screws holding the cover on. They are all the same length to don't worry about
keeping track of which screw went in which hole.
There are dowels used to align the cover so you will need to lift it more or less straight up. I used a couple pieces
of bar stock that fit into the bolt holes. I put them in opposite corners and pushed the ends toward the center while lifting.
It takes a little wiggling and work but it does come off.
This is what the underside of the cover plate looks like.

And this is what it looks like inside with some semi transparent oil.
The seals are pressed in at the point where the spline protrudes. The only time oil can even get to the seals
is when the head is rotated or when it's splashed while running.

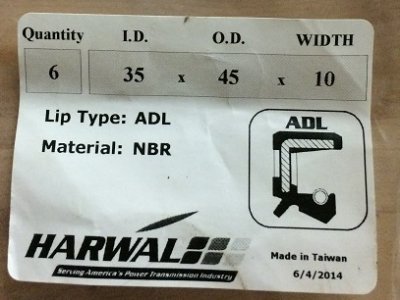
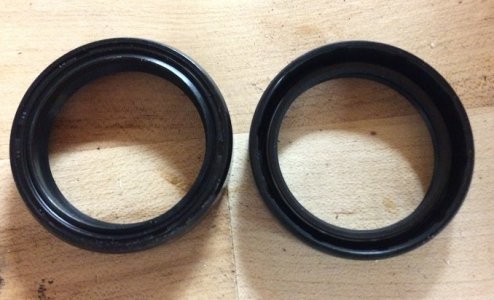
Here are the seals I received from Matt. The picture on the right shows a comparison between the new and old.
As you can see from the old seal I had to destroy it to remove it. I used a sharp chisel and hammer at two points
around the seal to cut it. This created enough room for me to give a pair of needle noses pliers enough grip to remove them.
There is another one under the first, so I did the same thing twice.


Here's a closeup where you can see my new seals in place

While I was at it I siphoned out all the oil to replace it. I didn't find any metal chips or sand in there.
The shiny parts that look like metal filings are just where the casting was showing through the paint.

Then I filled it back up with some DTE medium oil and closed it up. I just used the reverse of the procedure I used to take it apart.
I did have one difficulty replacing the cover and that was getting the long shaft with the gear to line up. What I did was to once
again use a piece of round stock that just fit into the hole. This gave me the leverage I needed to line up and rotate the shaft to
position it properly.

While I had it empty I removed the drain plug to see if I could identify the threads but to no avail.
I used a SAE and metric set of thread gauges but nothing matched. It's close to a 1/4" NPT.
I could actually start a 1/4" NPT fitting in the hole so I'm sure you could run a NPT tap in there
to open the hole.
The access it easy enough for the plug so I'm not going to worry about it.
All in all it took me about 1 1/2 hours. With this information you can probably do it faster.
I hope this helps someone.
Gary
Here's what I did to replace the spindle seals on my PM45-M.
The first thing you need to do is to unplug your machine and THEN remove the electrical cover.
There are 4 screws you need to remove that are connected to the top cover of the mill.
See the picture below.
Once that is done you will need to remove the 4 screws from the flange of the motor.
I had to use a ball end allen wrench to do this since the motor fins were in the way. Yours may be different.
Once they are removed you need to lift the motor straight up. You may have to bang on the motor with your hand
to break it loose. Once you get it off you are rewarded with this view.
Note the key for the shaft stayed in the hole and not the motor shaft on mine.
Don't leave the motor balanced on the top of the column like in the photo. I did that just for the photo. It's VERY
easy to knock it off!
Next you remove the 6 screws holding the cover on. They are all the same length to don't worry about
keeping track of which screw went in which hole.
There are dowels used to align the cover so you will need to lift it more or less straight up. I used a couple pieces
of bar stock that fit into the bolt holes. I put them in opposite corners and pushed the ends toward the center while lifting.
It takes a little wiggling and work but it does come off.
This is what the underside of the cover plate looks like.
And this is what it looks like inside with some semi transparent oil.
The seals are pressed in at the point where the spline protrudes. The only time oil can even get to the seals
is when the head is rotated or when it's splashed while running.
Here are the seals I received from Matt. The picture on the right shows a comparison between the new and old.
As you can see from the old seal I had to destroy it to remove it. I used a sharp chisel and hammer at two points
around the seal to cut it. This created enough room for me to give a pair of needle noses pliers enough grip to remove them.
There is another one under the first, so I did the same thing twice.
Here's a closeup where you can see my new seals in place
While I was at it I siphoned out all the oil to replace it. I didn't find any metal chips or sand in there.
The shiny parts that look like metal filings are just where the casting was showing through the paint.
Then I filled it back up with some DTE medium oil and closed it up. I just used the reverse of the procedure I used to take it apart.
I did have one difficulty replacing the cover and that was getting the long shaft with the gear to line up. What I did was to once
again use a piece of round stock that just fit into the hole. This gave me the leverage I needed to line up and rotate the shaft to
position it properly.
While I had it empty I removed the drain plug to see if I could identify the threads but to no avail.
I used a SAE and metric set of thread gauges but nothing matched. It's close to a 1/4" NPT.
I could actually start a 1/4" NPT fitting in the hole so I'm sure you could run a NPT tap in there
to open the hole.
The access it easy enough for the plug so I'm not going to worry about it.
All in all it took me about 1 1/2 hours. With this information you can probably do it faster.
I hope this helps someone.
Gary
Last edited by a moderator:


