-
Welcome back Guest! Did you know you can mentor other members here at H-M? If not, please check out our Relaunch of Hobby Machinist Mentoring Program!
You are using an out of date browser. It may not display this or other websites correctly.
You should upgrade or use an alternative browser.
You should upgrade or use an alternative browser.
[How do I?] How to make a serrated roller?
- Thread starter 7milesup
- Start date
- Joined
- Jan 7, 2016
- Messages
- 3,273
Ok, I have a number of straight knurling wheels coming from eBay. I might have to make a new tool holder for them (see previous post with YouTube video). I also have a couple of 60-degree chamfer end mills coming from the 'Bay too.
- Joined
- Feb 7, 2013
- Messages
- 2,486
Good luck with your project!Ok, I have a number of straight knurling wheels coming from eBay. I might have to make a new tool holder for them (see previous post with YouTube video). I also have a couple of 60-degree chamfer end mills coming from the 'Bay too.

- Joined
- Jan 7, 2016
- Messages
- 3,273
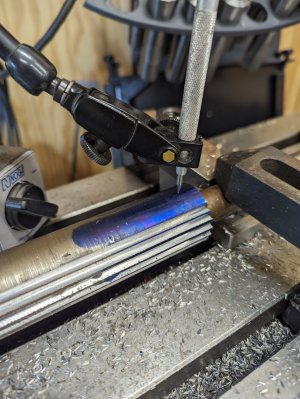
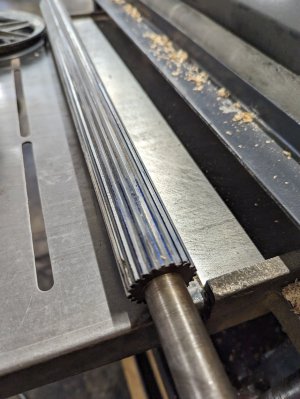
Well, I finished the new infeed roller. I ended up just making serrations in it using a straight end mill. It seems to work quite well and is very robust compared to the original rubber infeed roller due to the original having a 3/4" through shaft with the rubber then applied to the end with a 1.375" overall diameter.
A deeply knurled roller would work very well, too, but I wanted to utilize a 'squeeze" type of knurler instead of a bump style, but that would have required me to make one (I want to make one vs. buy, which is on my project list). I needed this planer up and running now so I can finish my house trim.
As with any project, I learned a number of lessons which, if the lessons are not too expensive, that is half of the fun, right?
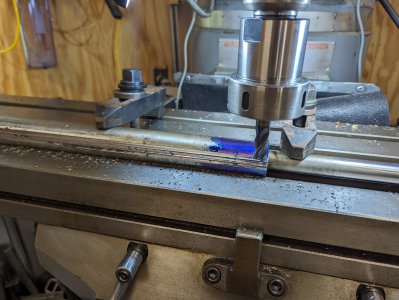
1.) I started with a chamfer end mill, thinking that would be the best route for making the deep part of the knurling. I learned that either chamfer bits are not to be used utilizing the tip to plow the groove, or my initial cut was too deep because I broke the tip off almost immediately.
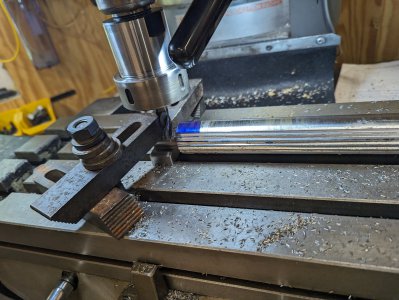
2.) Think through how to set up the machining operation and, as the project progresses, how it will affect your setup. I ended up utilizing @Firstram's idea in post #17, but as I continued to machine the part, at some point, it was going to drop into the T-slot of the mill table and mess up with my original setup.
3.) Try and remember what I have bought previously. Yeah, it seems that I have so much "stuff" that I clean forgot I have numerous V blocks. That would have been great if I remembered them from the get-go.
4.) I did not have an indexer but utilized a drawing I made up in Solidworks to determine the spacing. After about the fifth serration, my FEA (Feel and Eye Analysis) started to drift off. It was not a huge deal for this application, but it could have been better.
5.) I made the serrations "backward." DOH! The roller should have been turned 180 in the setup. The sharp end of the serrations is backward, so that was a really stupid mistake. That being said, there is a lot of bite with the roller anyhow, and it is a huge improvement over the stock rubber roller. I may make a new one at some point, but for now, it works great.
That was a lot of words, but thanks for reading.
A deeply knurled roller would work very well, too, but I wanted to utilize a 'squeeze" type of knurler instead of a bump style, but that would have required me to make one (I want to make one vs. buy, which is on my project list). I needed this planer up and running now so I can finish my house trim.
As with any project, I learned a number of lessons which, if the lessons are not too expensive, that is half of the fun, right?
1.) I started with a chamfer end mill, thinking that would be the best route for making the deep part of the knurling. I learned that either chamfer bits are not to be used utilizing the tip to plow the groove, or my initial cut was too deep because I broke the tip off almost immediately.
2.) Think through how to set up the machining operation and, as the project progresses, how it will affect your setup. I ended up utilizing @Firstram's idea in post #17, but as I continued to machine the part, at some point, it was going to drop into the T-slot of the mill table and mess up with my original setup.
3.) Try and remember what I have bought previously. Yeah, it seems that I have so much "stuff" that I clean forgot I have numerous V blocks. That would have been great if I remembered them from the get-go.
4.) I did not have an indexer but utilized a drawing I made up in Solidworks to determine the spacing. After about the fifth serration, my FEA (Feel and Eye Analysis) started to drift off. It was not a huge deal for this application, but it could have been better.
5.) I made the serrations "backward." DOH! The roller should have been turned 180 in the setup. The sharp end of the serrations is backward, so that was a really stupid mistake. That being said, there is a lot of bite with the roller anyhow, and it is a huge improvement over the stock rubber roller. I may make a new one at some point, but for now, it works great.
That was a lot of words, but thanks for reading.