

-
Welcome back Guest! Did you know you can mentor other members here at H-M? If not, please check out our Relaunch of Hobby Machinist Mentoring Program!
You are using an out of date browser. It may not display this or other websites correctly.
You should upgrade or use an alternative browser.
You should upgrade or use an alternative browser.
How to test TIR when you don't have a gauge pin?
- Thread starter koenbro
- Start date
- Joined
- Dec 12, 2016
- Messages
- 495
Drill rod (available at McMaster) is generally pretty accurate as it is ground to size.
- Joined
- Apr 14, 2014
- Messages
- 3,151
As mmcmdl suggests I would use dowel pins. Those from McMaster are ground to within +.0001" to +.0003". Over the years I've purchased several sizes and lengths just for this purpose. I most often use either a 1/2" or 1" pin 4" long. I doubt that there are many members using lathes that are more accurate.
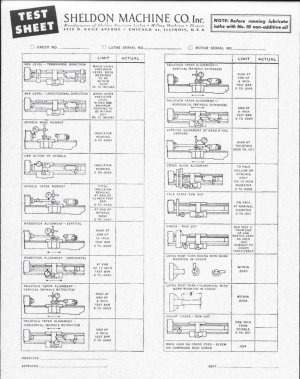
Attached is a copy of an inspection sheet that came with every Sheldon lathe. Note the acceptable runout is generally .0001" to .0003". That's new from the factory.
Attached is a copy of an inspection sheet that came with every Sheldon lathe. Note the acceptable runout is generally .0001" to .0003". That's new from the factory.
Attachments
- Joined
- Feb 23, 2016
- Messages
- 424
As mmcmdl suggests I would use dowel pins. Those from McMaster are ground to within +.0001" to +.0003". Over the years I've purchased several sizes and lengths just for this purpose. I most often use either a 1/2" or 1" pin 4" long. I doubt that there are many members using lathes that are more accurate.
Attached is a copy of an inspection sheet that came with every Sheldon lathe. Note the acceptable runout is generally .0001" to .0003". That's new from the factory.
Drill rod (available at McMaster) is generally pretty accurate as it is ground to size.
Can you guys give an example of a McMaster product? For example, would this 98381A727 be good?
- Joined
- Feb 23, 2016
- Messages
- 424
I have now taken the third measurement, as close to the chuck as possible without crashing the indicator using three different broken endmills in three different collets. One of the mills has some engravings on it but the last one (0.25") has no visible markings.
The setup is:
PM ER40 chuck ("Very High Quality collet chuck")
PM ER40 metric collet set. ("Precision Ground Clamping Surfaces, max runout .0005″")
RegoFix HiQ ER40 Bearing collet nut. Torqued by hand, factory spec is ~130 lb-ft
I understand tolerance may stack up, but 1.8 thou is a lot, isn't it?
I am now looking at the PM documentation of the collet chuck to see if I can adjust it. Can you please point to a video or a write-up of this method? I have no idea what you are talking about. I do appreciate your willingness to help a beginner.
The setup is:
PM ER40 chuck ("Very High Quality collet chuck")
PM ER40 metric collet set. ("Precision Ground Clamping Surfaces, max runout .0005″")
RegoFix HiQ ER40 Bearing collet nut. Torqued by hand, factory spec is ~130 lb-ft
I understand tolerance may stack up, but 1.8 thou is a lot, isn't it?
Looks like you have an adjust tru back plate . Dial it in at the collet . That's the best it can get .
I am now looking at the PM documentation of the collet chuck to see if I can adjust it. Can you please point to a video or a write-up of this method? I have no idea what you are talking about. I do appreciate your willingness to help a beginner.
Last edited:
- Joined
- Jan 4, 2021
- Messages
- 1,787
Or a drill blank, 3/8" is plenty.Dowel pins are not always round, especially when tenths are concerned. I recommend a gage pin instead 23055A99. It's 2x the price but probably the same shipping.
However, why not use this as an opportunity to acquire more tooling? A set of Gage Pins is very handy (start with the 0.251" — 0.500" set), and not extravagantly expensive if you go for import. This one on Amazon has a better than average plastic case (and a 10% discount):

You loosen the 3 bolts holding the chuck to the back plate, then lightly snug them back up. The 4 screws around the perimeter are used to dial the part in. It's just like dialing in a 4 jaw chuck except you don't crank down on the adjustment screws. It's a finesse thing, snug is good! Once you're happy with the runout, tighten the 3 mounting bolts a little more. They don't need to be over tightened either.I have now taken the third measurement, as close to the chuck as possible without crashing the indicator using three different broken endmills in three different collets. One of the mills has some engravings on it but the last one (0.25") has no visible markings.
The setup is:
PM ER40 chuck ("Very High Quality collet chuck")
PM ER40 metric collet set. ("Precision Ground Clamping Surfaces, max runout .0005″")
RegoFix HiQ ER40 Bearing collet nut. Torqued by hand, factory spec is ~130 lb-ft
I understand tolerance may stack up, but 1.8 thou is a lot, isn't it?
Can you please point to a video or a write-up of this method? I have no idea what you are talking about. I do appreciate your willingness to help a beginner.
You may as well pull the chuck off the lathe and disassemble it to make sure everything is clean before you start. Give the mating surfaces a light coat of oil before reassembly!
- Joined
- Feb 1, 2015
- Messages
- 9,605
You are probably not on center horizontally. The perceived runout will be less on the smaller diameter. I would set the indicator up to read the top side and use the cross slide to find the high spot and then make the runout measurement.I found an old, broken (crashed) Tormach threadmill with a 0.5" shaft, so I repeated the experiment, and it is, sadly, more believable. Interestingly the runout is lower on the thinner neck even though it's farther from the chuck.
- Joined
- Nov 25, 2015
- Messages
- 8,298
sorry, but I don't like the pins you are using. 2 things I have issues with.I have now taken the third measurement, as close to the chuck as possible without crashing the indicator using three different broken endmills in three different collets. One of the mills has some engravings on it but the last one (0.25") has no visible markings.
The setup is:
PM ER40 chuck ("Very High Quality collet chuck")
PM ER40 metric collet set. ("Precision Ground Clamping Surfaces, max runout .0005″")
RegoFix HiQ ER40 Bearing collet nut. Torqued by hand, factory spec is ~130 lb-ft
I understand tolerance may stack up, but 1.8 thou is a lot, isn't it?
I am now looking at the PM documentation of the collet chuck to see if I can adjust it. Can you please point to a video or a write-up of this method? I have no idea what you are talking about. I do appreciate your willingness to help a beginner.
1, the weldon cut out is on the edge of the collet
2, the pin is not long enough, ER collets need a deep take, and you are just shy of what I would call a proper bite.
so the 2 combine to give me no confidence in your setup.
next, ER collets are a little finicky. I find that you must clean the taper out with your finger to make sure its clean, and the collet.
Then when installing them, I like to spin the part / collet while just touching, to make sure it feels right, if it loosens, then tightens, go back to the loose... so it can pull it in further.
- Joined
- Feb 23, 2016
- Messages
- 424
I removed the chuck and checked the spindle nose which was within 0.0001". Cleaned all mating surfaces, then put the chuck back without a collet/nut and noticed the runout. I futzed with the 4 adjustment screws until I dialed it down to about 0.0001". Problem solved.
This was an incredibly useful learning exercise. Thank you for walking me along; also grateful @qualitymachinetools for the documentation on the PM website.
Can't believe I am the only beginner here, hope this will help others. Here is the process and the results:
This was an incredibly useful learning exercise. Thank you for walking me along; also grateful @qualitymachinetools for the documentation on the PM website.
Can't believe I am the only beginner here, hope this will help others. Here is the process and the results:
Last edited: