Horizontal mill arbors are very expensive to buy, mainly because they have to be precision made to turn the cutter accurately. You can make your own arbors and have the accuracy also with a little care when making.
I need a 22 mm arbor for some gear cutters I bought to make a gear.
The piece of steel must be set up to do all the turning in a single setup. This insures everything is concentric and will be true. (I somehow lost the picture of machining the arbor, but it is simple turning.) This is a picture of the finished arbor.
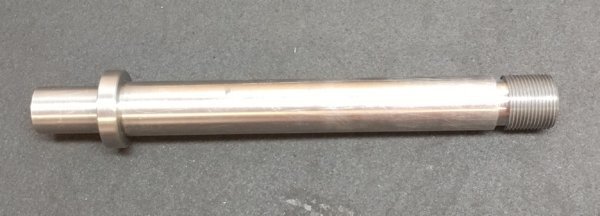
One end of a piece of bar stock , longer than needed was chucked in the 3 jaw chuck and the other end was center drilled and set with the tail stock. All surfaces in the photo were turned and the threads were cut without ever removing the bar from the setup. When finished, the excess material that was chucked was cut off. This gave me a straight, concentric, and true arbor. All size tolerances were kept within .0005". This was the easy part of this project. The stub that goes in the milling machine collet is .750" diameter and 1" long. The section for the cutter is 6" long and sized so the 22 mm cutter is a snug sliding fit. The threaded end is 1" long and the threads are 18 TPI on the 22 mm diameter.
Next is the more difficult part but is just a matter of paying close attention and holding tolerances. The spacers used to fill the spaces around the cutter on the arbor must be very accurate. To buy these six spacers, the cost is almost $100. This is because they are high precision and hardened and ground. Being hardened and ground is not necessary but the precision is important. I made my spacers with the same bar stock used to make the arbor. I cut several pieces of bar stock about 1 1/2" long. These were chucked in the 3 jaw and drilled then finish bored to be a snug sliding fit on the arbor I made earlier. Next I need to machine the ends perfectly square to the bore. To do this I made an expanding mandrel to hold the spacers.
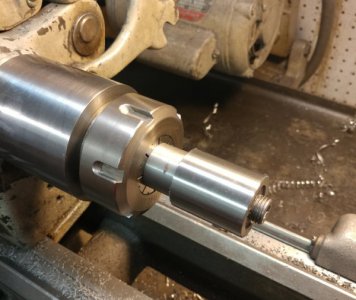
The above photo is the mandrel mounted in an ER 40 collet chuck and a spacer mounted on it. To make the mandrel, I machined a stub on a pice of stock to fit the collet. Next the short bar was machined to a slip fit to the spacer bore. Then the end was drilled the length of the mandrel and the end tapped for 1/4 NPT pipe plug. The last part is to cut two slots in the mandrel 180 degrees apart. The mandrel only has to expand .001" to grip the spacers.
The spacer turns true when mounted on the mandrel and now the end faces can be machined square to the bore. This is probably the most important thing when making an arbor.
By leaving the spacer hang over the end of the mandrel, I can part of various lengths of spacers and then use the mandrel to face the spacer ends ( which must have a smooth finish).
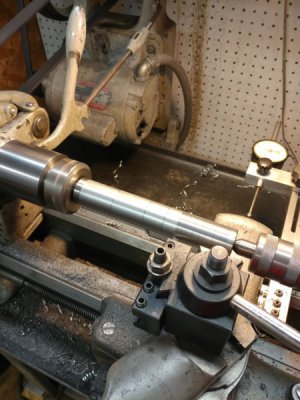
The above photo shows the spacers on the arbor held by the nut and a finish cut is taken on all the spacers and nut to make them all true on the OD and have a polished finish.
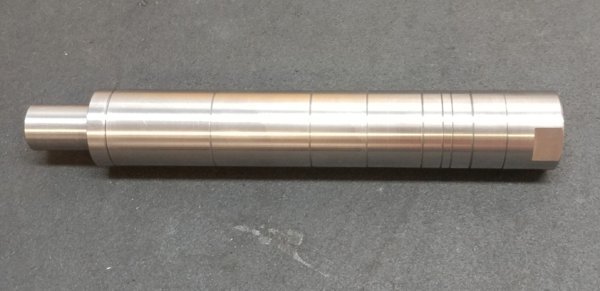
This photo is the finished arbor ready to use.
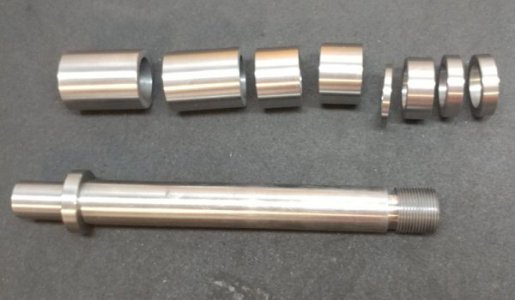
This photo shows the finished parts.
It isn't necessary, but I took the time to put a small chamfer on the ends of each spacer. It looks nice and makes it easier to see the size of the spacers (with sharp edges the spacers seams are hard to see and this is safer as the sharp edges are dangerous).
This same process is used to make any sized arbor. You just have to make another mandrel the proper size.
This arbor cost me $8 for the bar stock and I have a high quality arbor. I priced an arbor to buy and it was a little over $200. I like $8 better and mine works just as well.
I need a 22 mm arbor for some gear cutters I bought to make a gear.
The piece of steel must be set up to do all the turning in a single setup. This insures everything is concentric and will be true. (I somehow lost the picture of machining the arbor, but it is simple turning.) This is a picture of the finished arbor.

One end of a piece of bar stock , longer than needed was chucked in the 3 jaw chuck and the other end was center drilled and set with the tail stock. All surfaces in the photo were turned and the threads were cut without ever removing the bar from the setup. When finished, the excess material that was chucked was cut off. This gave me a straight, concentric, and true arbor. All size tolerances were kept within .0005". This was the easy part of this project. The stub that goes in the milling machine collet is .750" diameter and 1" long. The section for the cutter is 6" long and sized so the 22 mm cutter is a snug sliding fit. The threaded end is 1" long and the threads are 18 TPI on the 22 mm diameter.
Next is the more difficult part but is just a matter of paying close attention and holding tolerances. The spacers used to fill the spaces around the cutter on the arbor must be very accurate. To buy these six spacers, the cost is almost $100. This is because they are high precision and hardened and ground. Being hardened and ground is not necessary but the precision is important. I made my spacers with the same bar stock used to make the arbor. I cut several pieces of bar stock about 1 1/2" long. These were chucked in the 3 jaw and drilled then finish bored to be a snug sliding fit on the arbor I made earlier. Next I need to machine the ends perfectly square to the bore. To do this I made an expanding mandrel to hold the spacers.

The above photo is the mandrel mounted in an ER 40 collet chuck and a spacer mounted on it. To make the mandrel, I machined a stub on a pice of stock to fit the collet. Next the short bar was machined to a slip fit to the spacer bore. Then the end was drilled the length of the mandrel and the end tapped for 1/4 NPT pipe plug. The last part is to cut two slots in the mandrel 180 degrees apart. The mandrel only has to expand .001" to grip the spacers.
The spacer turns true when mounted on the mandrel and now the end faces can be machined square to the bore. This is probably the most important thing when making an arbor.
By leaving the spacer hang over the end of the mandrel, I can part of various lengths of spacers and then use the mandrel to face the spacer ends ( which must have a smooth finish).

The above photo shows the spacers on the arbor held by the nut and a finish cut is taken on all the spacers and nut to make them all true on the OD and have a polished finish.

This photo is the finished arbor ready to use.

This photo shows the finished parts.
It isn't necessary, but I took the time to put a small chamfer on the ends of each spacer. It looks nice and makes it easier to see the size of the spacers (with sharp edges the spacers seams are hard to see and this is safer as the sharp edges are dangerous).
This same process is used to make any sized arbor. You just have to make another mandrel the proper size.
This arbor cost me $8 for the bar stock and I have a high quality arbor. I priced an arbor to buy and it was a little over $200. I like $8 better and mine works just as well.
