- Joined
- Feb 5, 2015
- Messages
- 662
I'm not sure if this is a good place to post this but the idea might be useful for marking tooling -
My youngest sister makes a living as a custom jewelry designer/maker. She visited recently and asked me to make a personalized jewelry chasing hammer for her birthday. These are weird-shaped little hammers weighing only a few ounces that are used for delicate work.
She provided dimensions suitable for her hand, the desired weight of the head and directed me to a number of web sites where the shapes of the handles are depicted. (The handle is not a part of this post, just mentioned in passing.)
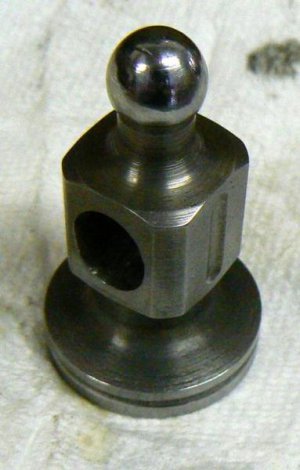
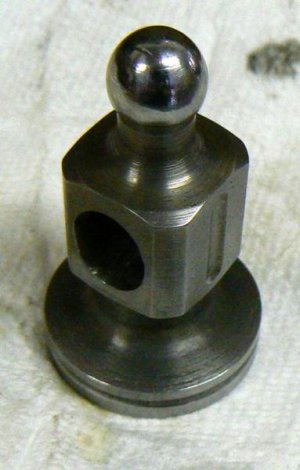
A specific request was that the head be marked with my name and the date. I’ve searched the forum and the internet and have yet to come up with an answer suitable for my capabilities. The workpiece is shown below. It is pre-hardened 4140 and fairly small – the body is 0.700 square and the head is about 1 inch diameter, the ball at the end is 0.400 diameter. The socket for the handle is semi-elliptical and THAT part was done on a rotary table and definitely not much fun. (A vinegar patina was added at my sister's request.)
A promising idea seemed to be electro-etching the head in a salt solution using a high current DC power supply. I’ve tried this on several samples of low carbon steel and the etching part works fine. The problem is producing the lettering mask ! Note that this is not suitable for non-ferrous materials.
The process requires that areas that are not to be etched be protected, incidentally. There are a few (overpriced ?) simple etching tools available from internet suppliers. They seem to require some special masking material that can be processed on a laser printer, which I don’t have, with some graphics software, which I don't have. (I’d likely never use this thing again if I bought one.) Also they do not produce raised letters, the letters are etched rather than the background metal.
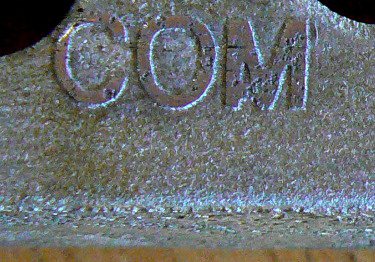
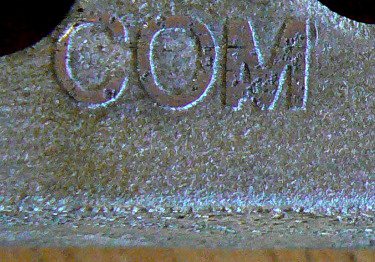
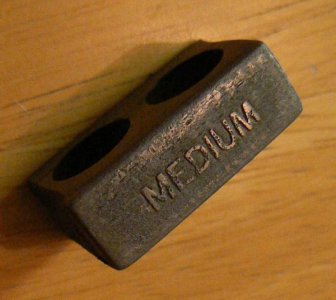
It’s my desire to mark this part with resources/materials commonly available in the shop. I have no confidence in my ability to do a good job using small steel stamps by hand (tried it). At a suggestion, I ordered and received a sheet of various size dry transfer letters from Chart Pak (pricey stuff). This is a greatly enlarged photo of the first trial of the process on a piece of carbon steel scrap. The scrap piece is approximately the same size as the hammer head that will eventually be marked. I learned several things from this short experiment.
First, the process is very simple. Clean and dry the steel part thoroughly (don't touch the clean surface) then rub on the transfer letters. Mask off anything that shouldn't be etched (I used shellac because it's fairly easy to remove after etching with denatured alcohol from the paint store).
Attach the part to the POSITIVE side of a power supply with modest current capability (a five volt supply from a computer would be more than adequate). Connect a sacrificial piece of steel to the NEGATIVE terminal of the power supply.
Mix the electrolyte, in this case 1 cup water, 1 teaspoon kosher salt and one capful of white vinegar. I used a "pyrex" measuring cup for the "etchant tank" and mixed everything well (obviously the container cannot be electrically conductive).
Place the work and the sacrificial piece in the container with the side to be etched directly facing the sacrificial item and an inch or two away. While monitoring the current, I adjusted the voltage on my lab power supply to achieve 1 amp current flow (arbitrarily) and noted the time.
Pulled the part out after fifteen minutes and washed with clean water. The raised letters were clearly visible but the background had been etched away only lightly. Put the part back in the pyrex container and etched for another fifteen minutes, producing the results shown above, about 3 - 5 mils high. On my laptop screen, the image is scaled up about ten times so the etched result looks considerably "rougher" than the actual part.
Nevertheless, it is still apparent from inspecting the real part that a good surface finish is required ! This part was only lapped on a sheet of 220 grit wet/dry. I think that taking it down to 600-800 grit and then lightly buffing will do the trick.
The remaining challenge - and a big one - is getting the transfer letters located and aligned on the hammer head with my shaky motor movements.
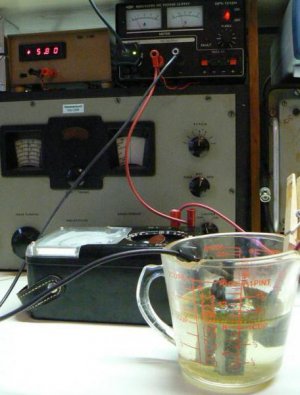
Tried this again because I wondered how etching time affected the quality of the result. First, here’s a photo of my primitive etching setup. I have to say that I'm liking the results so far.
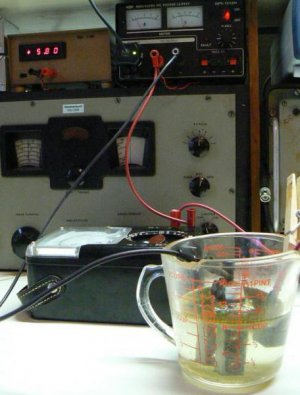
The variable power supply at upper right in the photo is adjusted for about one amp current as measured by the analog VOM (lying down on the lab bench). As noted in the last post, this was an arbitrary setting. The applied voltage for one ampere of current was around five volts (in THIS setup with THIS solution) but this doesn’t seem to be very critical. Taking the part out and rinsing it periodically will give a good idea of etch time - this isn't rocket science at all.
This is the result, magnified about seven times. In actual size, the marking is not so pronounced, incidentally, it is more subdued.
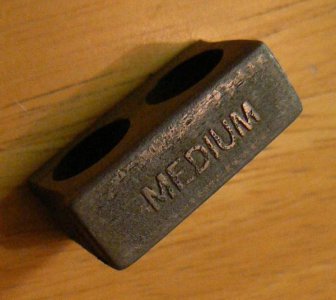
The test piece is the same low carbon steel scrap used before. Variables were more/less the same except for the etching time – from 30 minutes I changed it to 45 minutes. I think that it looks pretty good although the depth of the background etch seemed to be only a few mils more. The copper coloring may be a result of the lighting under which I photographed this part.
This simple process seems tolerant of solution ingredients. I’ve not tried currents over one amp but if the power supply is not variable like the one used here then I suspect that the etch time could be varied to compensate. I like the results. The residue left in the etching container can be safely discarded down the sink without environmental harm.
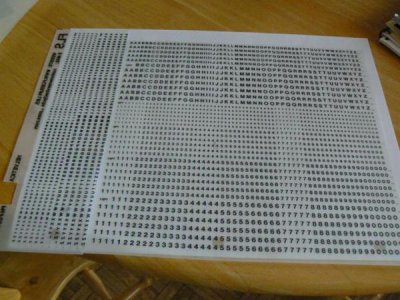
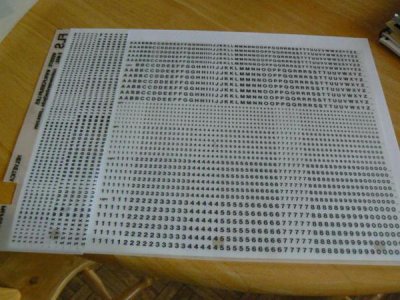
This is more arty/crafty than shop-practical, masking is required, takes a while and small parts are most suitable BUT for my particular marking problem it seems appropriate. This is what the dry transfer letters from “Chartpak” look like:
My youngest sister makes a living as a custom jewelry designer/maker. She visited recently and asked me to make a personalized jewelry chasing hammer for her birthday. These are weird-shaped little hammers weighing only a few ounces that are used for delicate work.
She provided dimensions suitable for her hand, the desired weight of the head and directed me to a number of web sites where the shapes of the handles are depicted. (The handle is not a part of this post, just mentioned in passing.)
A specific request was that the head be marked with my name and the date. I’ve searched the forum and the internet and have yet to come up with an answer suitable for my capabilities. The workpiece is shown below. It is pre-hardened 4140 and fairly small – the body is 0.700 square and the head is about 1 inch diameter, the ball at the end is 0.400 diameter. The socket for the handle is semi-elliptical and THAT part was done on a rotary table and definitely not much fun. (A vinegar patina was added at my sister's request.)

A promising idea seemed to be electro-etching the head in a salt solution using a high current DC power supply. I’ve tried this on several samples of low carbon steel and the etching part works fine. The problem is producing the lettering mask ! Note that this is not suitable for non-ferrous materials.
The process requires that areas that are not to be etched be protected, incidentally. There are a few (overpriced ?) simple etching tools available from internet suppliers. They seem to require some special masking material that can be processed on a laser printer, which I don’t have, with some graphics software, which I don't have. (I’d likely never use this thing again if I bought one.) Also they do not produce raised letters, the letters are etched rather than the background metal.
It’s my desire to mark this part with resources/materials commonly available in the shop. I have no confidence in my ability to do a good job using small steel stamps by hand (tried it). At a suggestion, I ordered and received a sheet of various size dry transfer letters from Chart Pak (pricey stuff). This is a greatly enlarged photo of the first trial of the process on a piece of carbon steel scrap. The scrap piece is approximately the same size as the hammer head that will eventually be marked. I learned several things from this short experiment.

First, the process is very simple. Clean and dry the steel part thoroughly (don't touch the clean surface) then rub on the transfer letters. Mask off anything that shouldn't be etched (I used shellac because it's fairly easy to remove after etching with denatured alcohol from the paint store).
Attach the part to the POSITIVE side of a power supply with modest current capability (a five volt supply from a computer would be more than adequate). Connect a sacrificial piece of steel to the NEGATIVE terminal of the power supply.
Mix the electrolyte, in this case 1 cup water, 1 teaspoon kosher salt and one capful of white vinegar. I used a "pyrex" measuring cup for the "etchant tank" and mixed everything well (obviously the container cannot be electrically conductive).
Place the work and the sacrificial piece in the container with the side to be etched directly facing the sacrificial item and an inch or two away. While monitoring the current, I adjusted the voltage on my lab power supply to achieve 1 amp current flow (arbitrarily) and noted the time.
Pulled the part out after fifteen minutes and washed with clean water. The raised letters were clearly visible but the background had been etched away only lightly. Put the part back in the pyrex container and etched for another fifteen minutes, producing the results shown above, about 3 - 5 mils high. On my laptop screen, the image is scaled up about ten times so the etched result looks considerably "rougher" than the actual part.
Nevertheless, it is still apparent from inspecting the real part that a good surface finish is required ! This part was only lapped on a sheet of 220 grit wet/dry. I think that taking it down to 600-800 grit and then lightly buffing will do the trick.
The remaining challenge - and a big one - is getting the transfer letters located and aligned on the hammer head with my shaky motor movements.
Tried this again because I wondered how etching time affected the quality of the result. First, here’s a photo of my primitive etching setup. I have to say that I'm liking the results so far.

The variable power supply at upper right in the photo is adjusted for about one amp current as measured by the analog VOM (lying down on the lab bench). As noted in the last post, this was an arbitrary setting. The applied voltage for one ampere of current was around five volts (in THIS setup with THIS solution) but this doesn’t seem to be very critical. Taking the part out and rinsing it periodically will give a good idea of etch time - this isn't rocket science at all.
This is the result, magnified about seven times. In actual size, the marking is not so pronounced, incidentally, it is more subdued.

The test piece is the same low carbon steel scrap used before. Variables were more/less the same except for the etching time – from 30 minutes I changed it to 45 minutes. I think that it looks pretty good although the depth of the background etch seemed to be only a few mils more. The copper coloring may be a result of the lighting under which I photographed this part.
This simple process seems tolerant of solution ingredients. I’ve not tried currents over one amp but if the power supply is not variable like the one used here then I suspect that the etch time could be varied to compensate. I like the results. The residue left in the etching container can be safely discarded down the sink without environmental harm.
This is more arty/crafty than shop-practical, masking is required, takes a while and small parts are most suitable BUT for my particular marking problem it seems appropriate. This is what the dry transfer letters from “Chartpak” look like:


