-
Welcome back Guest! Did you know you can mentor other members here at H-M? If not, please check out our Relaunch of Hobby Machinist Mentoring Program!
You are using an out of date browser. It may not display this or other websites correctly.
You should upgrade or use an alternative browser.
You should upgrade or use an alternative browser.
Mbfrontier's Logan 200 Rehab
- Thread starter MBfrontier
- Start date
- Joined
- Dec 14, 2013
- Messages
- 167
Thanks, wa5cab.
- Joined
- Dec 14, 2013
- Messages
- 167
Although I was pleased with the finish on my parts after new spindle bearings and sharp tooling I felt that I should be able to remove more material in a single cut without chatter. I remembered running into a thread on another website where someone added a bearing and Belleville washers to the back of the headstock to preload the front spindle bearing to address chatter. After a lot of searching I was finally able to find the thread I was looking for. Full disclosure, I claim no credit for this modification and thank the OP for emailing me a copy of his documentation on this modification.
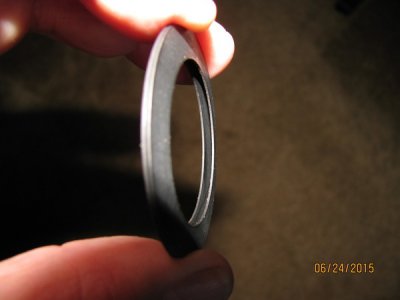
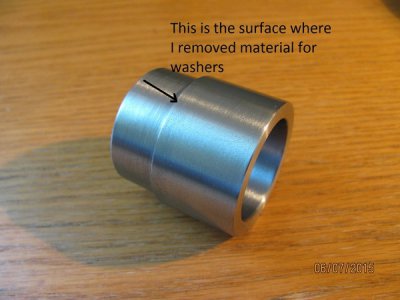
The modification is a 6007 series sealed bearing with a snap ring added to the end of the headstock with Belleville washers (I used (qty 8) part # 94065K85 from McMaster-Carr) between the rear spindle spacer and the added 6007 bearing. There are 5 Belleville washers in each pack and I ordered 2 packs. The OP bought from MSC part # 87780730 for a qty. of 10 at half the price but they were out of stock with 8+ week lead time. The 6007 bearing has a larger ID so the inner race of the bearing doesn't touch the spindle and its' only purpose is to preload the front bearing and the OD is the same as the rear spindle bearing. The original rear spindle bearing remains in the headstock. I had to remove .050 in. from the inner spindle spacer to provide clearance so the two bearings would not touch each other (Yet another removal and reinstall of the spindle). The rear spindle spacer has to be modified so the end tightens to the inner race of the original bearing and the shoulder tightens the Belleville washers against the inner race of the added 6007 bearing to add preload. This required removing material from the shoulder of the outer rear spindle spacer to allow room for the Belleville washers. The spacers on my lathe must have been made during an earlier mod because the rear spindle keyway was partly covered by the rear spindle spacer so spacers on other lathes may be different sizes. The washers are in this configuration <<<<>>>> and they are touching at the OD and a space at the ID.
Here's a picture showing the washer orientation.
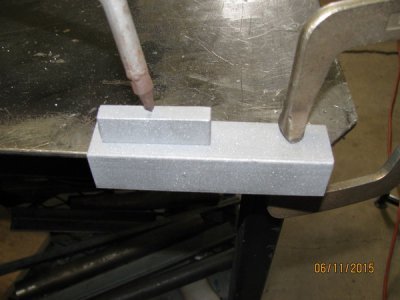
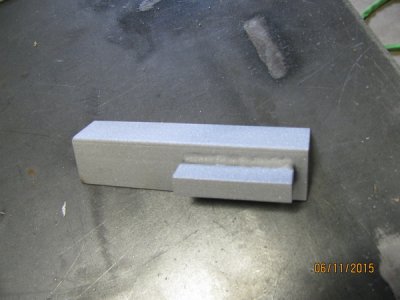
The original author of this mod used a v-block clamped to the spindle with a cutter clamped to the v-block to cut a landing for the bearing snap ring that is perpendicular to the spindle. I don't have a v-block so I made a tool that worked pretty well. It consists of a piece of angle iron with a block welded to it that I clamped one of my tool holders to. I clamped this tool to the spindle with a hose clamp to cut the snap ring landing using a flat cobalt cutting bit. Here's some pictures of it.
Here's a picture of the tool with the QCTP tool holder and cutting bit clamped to the spindle while cutting the landing by turning the chuck by hand and tapping the tool with a hammer at the low spot to move the cutter in. I used a piece of masking tape to protect the spindle.
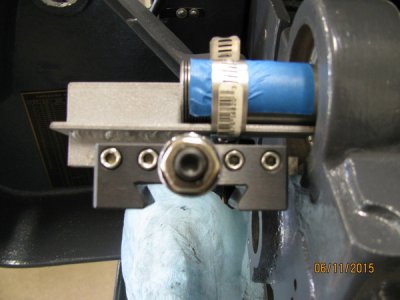
As you can see the set screws on the left of the tool holder are clamped to the tool and the set screws on the right hold the flat cutting bit. I took enough material off the headstock until the cutting bit just touched the low spot.
I made a spare rear spindle spacer to swap out with the original while I trial fitted the Belleville washers to what I thought would be the right amount of preload. I started fitting six washers by removing material from the rear spindle spacer shoulder to allow the washers to be compressed without bottoming out. This took several attempts before I ended up with 8 washers. I spun the spindle by hand until it had a slight drag from spinning free (Kentucky windage I guess).
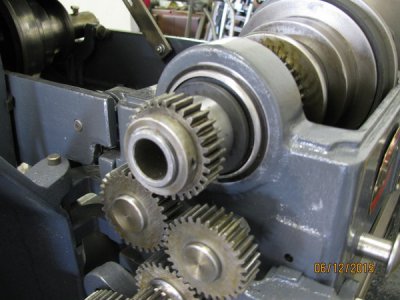
Here's a picture of the added bearing with 8 Belleville washers completed.
Here's a picture of where I removed material from the rear spindle spacer to make room for the washers.
This total mod cost me in the $50.00 range and has been an improvement in the depth of cut chatter free operation. It doesn't turn the lathe into a one ton machine but there was improvement on my machine. I have made .020 in. cuts with good results after this mod. Your mileage may vary.
I purposely kept the OP's name and userID out of this write-up because I feel I don't have any right to speak for or imply any intent of the person responsible for developing and documenting this mod. My only contribution was making my own holder for cutting the landing on the headstock. If anyone would like to contact the OP for a copy of his write-up you can send me a PM and I will give you the link.
That's it for now.
The modification is a 6007 series sealed bearing with a snap ring added to the end of the headstock with Belleville washers (I used (qty 8) part # 94065K85 from McMaster-Carr) between the rear spindle spacer and the added 6007 bearing. There are 5 Belleville washers in each pack and I ordered 2 packs. The OP bought from MSC part # 87780730 for a qty. of 10 at half the price but they were out of stock with 8+ week lead time. The 6007 bearing has a larger ID so the inner race of the bearing doesn't touch the spindle and its' only purpose is to preload the front bearing and the OD is the same as the rear spindle bearing. The original rear spindle bearing remains in the headstock. I had to remove .050 in. from the inner spindle spacer to provide clearance so the two bearings would not touch each other (Yet another removal and reinstall of the spindle). The rear spindle spacer has to be modified so the end tightens to the inner race of the original bearing and the shoulder tightens the Belleville washers against the inner race of the added 6007 bearing to add preload. This required removing material from the shoulder of the outer rear spindle spacer to allow room for the Belleville washers. The spacers on my lathe must have been made during an earlier mod because the rear spindle keyway was partly covered by the rear spindle spacer so spacers on other lathes may be different sizes. The washers are in this configuration <<<<>>>> and they are touching at the OD and a space at the ID.
Here's a picture showing the washer orientation.

The original author of this mod used a v-block clamped to the spindle with a cutter clamped to the v-block to cut a landing for the bearing snap ring that is perpendicular to the spindle. I don't have a v-block so I made a tool that worked pretty well. It consists of a piece of angle iron with a block welded to it that I clamped one of my tool holders to. I clamped this tool to the spindle with a hose clamp to cut the snap ring landing using a flat cobalt cutting bit. Here's some pictures of it.


Here's a picture of the tool with the QCTP tool holder and cutting bit clamped to the spindle while cutting the landing by turning the chuck by hand and tapping the tool with a hammer at the low spot to move the cutter in. I used a piece of masking tape to protect the spindle.

As you can see the set screws on the left of the tool holder are clamped to the tool and the set screws on the right hold the flat cutting bit. I took enough material off the headstock until the cutting bit just touched the low spot.
I made a spare rear spindle spacer to swap out with the original while I trial fitted the Belleville washers to what I thought would be the right amount of preload. I started fitting six washers by removing material from the rear spindle spacer shoulder to allow the washers to be compressed without bottoming out. This took several attempts before I ended up with 8 washers. I spun the spindle by hand until it had a slight drag from spinning free (Kentucky windage I guess).

Here's a picture of the added bearing with 8 Belleville washers completed.

Here's a picture of where I removed material from the rear spindle spacer to make room for the washers.
This total mod cost me in the $50.00 range and has been an improvement in the depth of cut chatter free operation. It doesn't turn the lathe into a one ton machine but there was improvement on my machine. I have made .020 in. cuts with good results after this mod. Your mileage may vary.
I purposely kept the OP's name and userID out of this write-up because I feel I don't have any right to speak for or imply any intent of the person responsible for developing and documenting this mod. My only contribution was making my own holder for cutting the landing on the headstock. If anyone would like to contact the OP for a copy of his write-up you can send me a PM and I will give you the link.
That's it for now.
- Joined
- Jul 27, 2013
- Messages
- 295
Shazzam!
Nice work, Mike!!! This is the same mod I reference in my rehab thread, undoubtedly by the same crafty gent.
http://www.hobby-machinist.com/threads/redlinemans-logan-200-rescue.17903/ Post #3.
I took the trouble to machine the drive end of my headstock while I had it all apart, as depicted therein. It would be neat if you could use your vast CAD skills to whip up a drawing of the modification (with part references) for those of us who like to look at drawings. I take the liberty of assuming for you those vast skills. I hope I am not being presumptuous, and would be glad to assist in the drawing regard if I have been!
I might wager that everyone doing a rebuild might just as well plan on this mod right from the get go. Can't hurt.
Bravo!
- Joined
- Dec 14, 2013
- Messages
- 167
Hey, Redlineman. Sorry, ProEngineer with parametric design, 3D modeling, finite element analysis, and selective laser sintering would be no help to my drawing abilities.  The last time I did any real dimensional drawings (not a stick figure sketch on a napkin) was in the last century in high school.
FWIW, there isn't much clearance between the added bearing and the spindle bearing. Before I cut the snap ring landing I measured into the rear bearing bore on the headstock to the outer race of the spindle bearing and determined I would have approx. .020 in. clearance between the two bearings so I thought the clearance between the bearings would be adequate. That changed when I had to remove more than .020 in. to have a flat snap ring landing all the way around the rear bearing bore. I removed approx. .035 in. on the front portion of the bearing bore boss before the cutter revealed it was scraping the back portion. That's what caused me to remove the inner spindle spacer to take off .050 in. which moved the rear spindle bearing in enough for clearance. Any more than that would have bumped up against one of the steps on the spindle. I'm not sure if the inner spindle bearing was made by someone other than factory. Worst case scenario would have been to make a washer to space the added bearing out enough to clear the inner bearing. Fortunately, I didn't have to do that. There's not a lot of room to play with. If you didn't take much off the rear of your head stock you should be OK.
Last night I had a dream about a VFD and 3 phase motor. Maybe it was a nightmare.
That's it for now.
The milling on your headstock looks very nice. Certainly, the time to do it is when everything is apart the first time.I took the trouble to machine the drive end of my headstock while I had it all apart, as depicted therein.
FWIW, there isn't much clearance between the added bearing and the spindle bearing. Before I cut the snap ring landing I measured into the rear bearing bore on the headstock to the outer race of the spindle bearing and determined I would have approx. .020 in. clearance between the two bearings so I thought the clearance between the bearings would be adequate. That changed when I had to remove more than .020 in. to have a flat snap ring landing all the way around the rear bearing bore. I removed approx. .035 in. on the front portion of the bearing bore boss before the cutter revealed it was scraping the back portion. That's what caused me to remove the inner spindle spacer to take off .050 in. which moved the rear spindle bearing in enough for clearance. Any more than that would have bumped up against one of the steps on the spindle. I'm not sure if the inner spindle bearing was made by someone other than factory. Worst case scenario would have been to make a washer to space the added bearing out enough to clear the inner bearing. Fortunately, I didn't have to do that. There's not a lot of room to play with. If you didn't take much off the rear of your head stock you should be OK.
I agree if there isn't much material that is removed to get a flat surface. Over .035 may be a problem.I might wager that everyone doing a rebuild might just as well plan on this mod right from the get go. Can't hurt.
Last night I had a dream about a VFD and 3 phase motor. Maybe it was a nightmare.
That's it for now.
- Joined
- Dec 14, 2013
- Messages
- 167
Correction, in my last post I said :
I'm not sure if the inner spindle spacer was made by someone other than factory.
I meant to say:I'm not sure if the inner spindle bearing was made by someone other than factory.
I'm not sure if the inner spindle spacer was made by someone other than factory.

