- Joined
- Nov 5, 2019
- Messages
- 223
Let me first say I'm aware of most of the problems when using a drill press as a mill. This post is intended to show some of the things I did to deal with these issues. This is used for very light milling in soft materials such as aluminum, brass, plastic and the occasional 12l14. I normally keep the cuts to .005-.010 per pass.
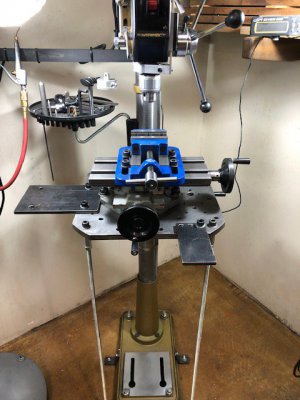
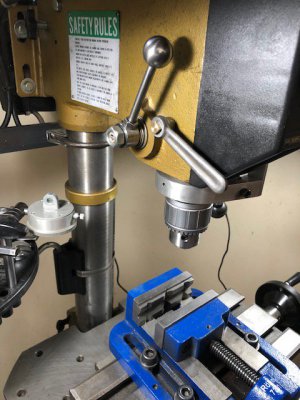
The victim of this abuse is my 30yr old Powermatic 12 speed drill press. The first thing I did was bolt it to the floor and also bolted the column to the wall via an arm. The table is an old 1/2" thick fixture plate that is in a fixed position and also anchored to the floor. The table is rock solid. I picked kind of a happy medium for the table height and am able to ge t most jobs done using stubby and regular length drills and end mills.
Now for the problems:
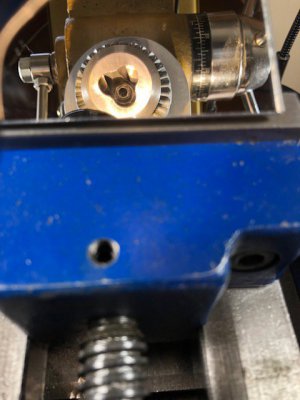
THE CHUCK WILL FALL OFF
Absolutely true, happened the first time I tried milling. The original fix was simply to use some red Loctite on the JT33 taper and it never came off again. After 30yrs my original chuck had seen better days and it wasn't that good when new. I replaced it with a 1/2" Vertex chuck from amazon. With the jaws open on the original chuck you could look straight through it, but this new chuck has a bottom similar to a hand held drill chuck with a hole in it for a bolt/screw. The hole was about 5mm so I opened it up to 1/4". While I had the quill/spindle assembly out I replaced the bearings and drilled and tapped a 1/4-20 hole in the end of the spindle taper. Now the chuck is bolted and Loctited onto the spindle.
THE BEARINGS ARE NOT MADE FOR A SIDE LOAD
Again true, but now that I've changed the bearings I could probably do it in less than an hour. The bearings are cheap at less than $20 for two. The original 30yr old bearings actually felt ok yet, but I had it apart so might as well change them. Bottom line, if they fail I'll just change them.
END MILLS SHOULD NOT BE HELD IN A DRILL CHUCK
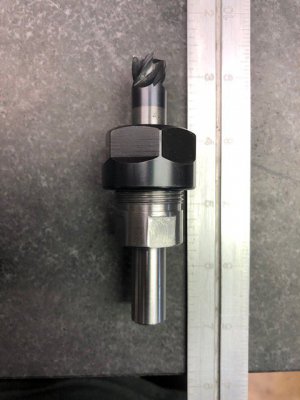
True also, but I've been using end mills in a drill chuck for a couple of years now and never had one loosen or helix out of the chuck. I did decide to address this though. i fired up the lathe and made myself a short as possible ER20 collet chuck for end mill use with a 1/2" arbor.
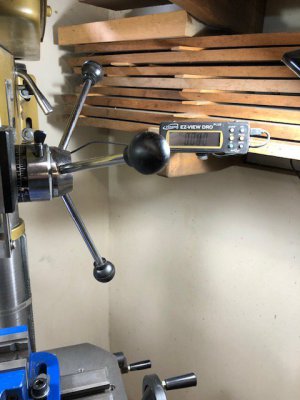
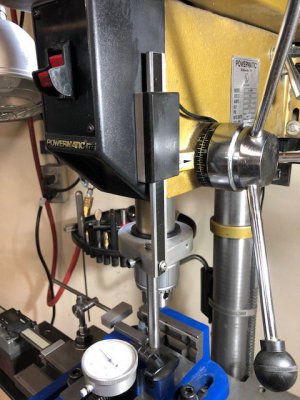
To lock the spindle in place when milling, I took off the spring return assembly and replace it with a handle that now locks the quill. The quill on these machines just runs through a bored hole in the cast iron so it's not the most precise fit. There was quite a bit a play in the quill when fully extended. I took out the set screw that keeps the quill from spinning via the slot in the side. This screw just had a couple of flats machined on it that fit into the slot. I replaced it with a brass one I made that has a round nose on it that fits the slot. It still functions as original but now you can tighten it down and eliminate all the slop in the quill.
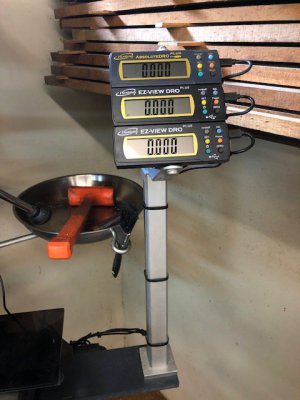
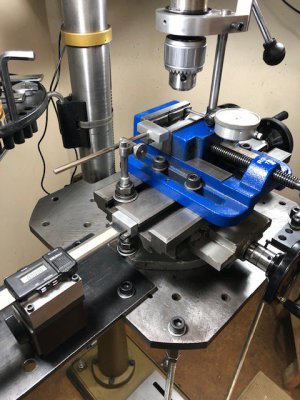
Some other mods are a DRO on the z axis, a couple of steel plates on the side and front of the table for mounting a 12" Mitutoyo digital readout. I attached the readout to a magnetic base. I also made a indicator holder for tramming the vise plus a vise stop.
I've tried various different types of end mills and very sharp 4 flute carbide seems to work the best. Someday maybe I'll buy a mill but for now this gets me by. I do have access to a Bridgeport if I need to get serious. I would really like a bench top Precision Matthews but the cost is pretty high and takes months to get.
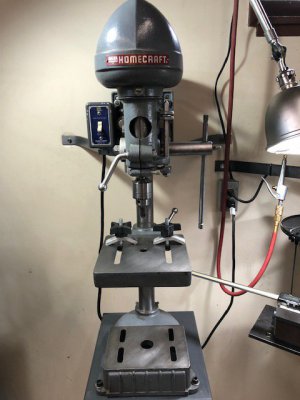
I still have my good old Delta homecraft drill press for misc drilling. This was a yard sale find for $20. Every surface on it was rusted but it was all there. Cleaned it up, rewired the motor and switch, new belt and it runs perfectly.
Again I must say this is for very light machining on soft materials, so don't beat me up too bad
Have a great day!
The victim of this abuse is my 30yr old Powermatic 12 speed drill press. The first thing I did was bolt it to the floor and also bolted the column to the wall via an arm. The table is an old 1/2" thick fixture plate that is in a fixed position and also anchored to the floor. The table is rock solid. I picked kind of a happy medium for the table height and am able to ge t most jobs done using stubby and regular length drills and end mills.
Now for the problems:
THE CHUCK WILL FALL OFF
Absolutely true, happened the first time I tried milling. The original fix was simply to use some red Loctite on the JT33 taper and it never came off again. After 30yrs my original chuck had seen better days and it wasn't that good when new. I replaced it with a 1/2" Vertex chuck from amazon. With the jaws open on the original chuck you could look straight through it, but this new chuck has a bottom similar to a hand held drill chuck with a hole in it for a bolt/screw. The hole was about 5mm so I opened it up to 1/4". While I had the quill/spindle assembly out I replaced the bearings and drilled and tapped a 1/4-20 hole in the end of the spindle taper. Now the chuck is bolted and Loctited onto the spindle.
THE BEARINGS ARE NOT MADE FOR A SIDE LOAD
Again true, but now that I've changed the bearings I could probably do it in less than an hour. The bearings are cheap at less than $20 for two. The original 30yr old bearings actually felt ok yet, but I had it apart so might as well change them. Bottom line, if they fail I'll just change them.
END MILLS SHOULD NOT BE HELD IN A DRILL CHUCK
True also, but I've been using end mills in a drill chuck for a couple of years now and never had one loosen or helix out of the chuck. I did decide to address this though. i fired up the lathe and made myself a short as possible ER20 collet chuck for end mill use with a 1/2" arbor.
To lock the spindle in place when milling, I took off the spring return assembly and replace it with a handle that now locks the quill. The quill on these machines just runs through a bored hole in the cast iron so it's not the most precise fit. There was quite a bit a play in the quill when fully extended. I took out the set screw that keeps the quill from spinning via the slot in the side. This screw just had a couple of flats machined on it that fit into the slot. I replaced it with a brass one I made that has a round nose on it that fits the slot. It still functions as original but now you can tighten it down and eliminate all the slop in the quill.
Some other mods are a DRO on the z axis, a couple of steel plates on the side and front of the table for mounting a 12" Mitutoyo digital readout. I attached the readout to a magnetic base. I also made a indicator holder for tramming the vise plus a vise stop.
I've tried various different types of end mills and very sharp 4 flute carbide seems to work the best. Someday maybe I'll buy a mill but for now this gets me by. I do have access to a Bridgeport if I need to get serious. I would really like a bench top Precision Matthews but the cost is pretty high and takes months to get.
I still have my good old Delta homecraft drill press for misc drilling. This was a yard sale find for $20. Every surface on it was rusted but it was all there. Cleaned it up, rewired the motor and switch, new belt and it runs perfectly.
Again I must say this is for very light machining on soft materials, so don't beat me up too bad
Have a great day!
Attachments
-
 7F4F5361-248D-4D79-9910-C1892A179FCA.jpeg58.8 KB · Views: 233
 -
 2884677A-26C1-4C13-A7BB-F430729CD3A6.jpeg54.3 KB · Views: 215
 -
 3C70A10F-4536-4160-86BF-A87B6EC7B4D0.jpeg68.4 KB · Views: 205
 -
 16C46286-D5A4-438C-B8A3-4239942E643C.jpeg80 KB · Views: 223
 -
 3A8F97F0-3C5B-4BCD-8F72-5A0BA6CCB5A3.jpeg83 KB · Views: 217
 -
 DE0AC036-93E3-47C5-97B0-CE40F02A3547.jpeg78.5 KB · Views: 198
 -
 EE97A941-DE75-4C1F-AC7C-8419D4E1AC57.jpeg55.9 KB · Views: 204
 -
 0B249BA3-BFE2-4340-86CF-C0C915EFF1CD.jpeg49.4 KB · Views: 212