- Joined
- Nov 29, 2023
- Messages
- 10
I have taken apart my spindle because it was running hot and thankfully the bearings still look good. Now I have to put it back together again, which I would prefer to do the right way so I don't destroy the bearings myself. I did find something in the manual, but it doesn't quite fill in all the gaps for me.

Thankfull, I did not loosen nut 140, so I hope the play will be good after remounting it.
Some questions I have (and hopefully can be answered:
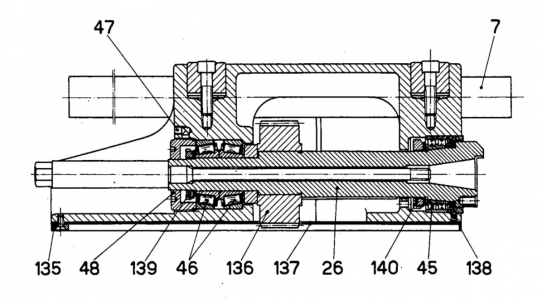
Milling Spindle Head
Spindle Bearing
The front-bearing is composed of a double row cylinder roller bearing 45, type SKF MN 3010 KX/SP
The back-bearing has two taper roller bearings 46, type 100.035 / 100.072 (accuray 2 microns) made by La Pr´ecision Industrielle, Rueil-Malmaison (France)
These bearings are adjusted on mounting the milling machine. No readjustment is necessary until after a long time of run.
Dismantling of the Spindle
Previously the milling spindle head has to be taken off, taking into consideration the following
instructions
in order to avoid a damage of the packing by the gear wheel. The dismantling of the spindle is
- Unscrew totally the set screw 57 (see page 25) and pull out the taper packing strip
- Remove the strip 135 after having loosened 3 screws
- Remove the milling spindle head towards the table, raising said head as much as possible
done as follows:
Taking Up Radial Play within the front bearing
- Remove the coverplate 137 held by six screws
- Unscrew the locking screw 138
- Loosen screw 47 and unscrew entirely cover 48
- Take off nut 139 held by the safety washer on the spindle
- Push out carefully the spindle, striking its back-end slightly with a lead hammer
Taking up radial and axial plain in the rear-bearing
- Determine the exact amount of radial play by means of a dial having a division of 0,002. (00004 in.)
- Remove the spindle 26 (see ”Dismantling the spindle”)
- Tighten the nut 149 according to the radial play to be adjusted. A safety washer connects the ringnut 149 with the spindle.
The slight taper of the inner race of bearing 45 obstructs a regular advance of the nut 140.
To obtain the desired result, the nut should be struck concentrically by means of a tube placed on the spindle to cause a slight displacement of the inner race of the bearing 45 on the taper of the spindle 25, and nut 140 then retightened. By repeating this operation several times it will be found possible to turn nut 140 through the desired angle. Keep a careful check on the advance of mut 140, as it is difficult to restore the inner race of the bearing 45 if it is once moved too far forward on the taper.
The advance of nut 140 is calculated, in respect of the radial play which has to be adjusted, as follows:
Advance of nut 140 = bearing play to be adjusted in mm x 14 Pitch of nut 140 = 1,5 mm.
Example: A radial play of 0,01 mm has to be adjusted. Advance of nut 140 = 0,01 mm x 14 = 0,14 mm or a rotation of 36° 36’ corresponding to a length of 20,5 mm on the full diameter of nut 140 (diam. 70 mm).- Lock the nut 140 by means of the safety washer
- Replace spindle 26 and test again the radial play of the front-bearing; it should be 0,002 mm (.00008”) in order to obtain faultless running conditions. This test shall be made with ball bearings 46 in position and with roller bearing 45 absolutely dry.
- Loosen screw 47
- Screw in the cover 48 (pitch 1,25 mm) according to the amount of play which has to be adjusted
- Firmly tighten screw 47 and test again the axial play of the back-bearing; it should be 0,01 mm (.0004”) to obtain faultless running conditions. This test shall be done with taper roller bearings 46 absolutely dry.

Thankfull, I did not loosen nut 140, so I hope the play will be good after remounting it.
Some questions I have (and hopefully can be answered:
- How can I test the radial and axial play after assembling everything?
- Should I expect I have to take apart and reassemble everything a few times?
- Won't tightening cover 48 also affect radial play in bearing 46? If so, How should I handle this?
- The manual says I have to test with the bearings completely dry, so I guess this means I absolutely have to prevent turning the bearings as long as they are not lubricated yet.
- Anything else I overlooked in order to get this spindle back to it's former glory (and not destroy it)?

