Troyke missing one part, who can make it for me?

bulgie

H-M Supporter - Silver Member
Joined
Dec 3, 2020
Messages
146
Hi all, after looking for a long time for a US-made rotary table I could afford, I pulled the trigger on this Troyke R-9 on ebay. He was asking $315 with no "make offer" button but I offered $250 anyway and he accepted. Under $400 with shipping and tax. Not a steal for sure but I'm happy, it cleaned up nice (Thank you Evaporust!). Super smooth and no apprentice marks.

Seller's pic on ebay:

ebay1.JPG

The guts inside were amazingly perfect, and it adjusted up beautifully, zero play with no tight spots. I was able to adjust the backlash to maybe one minute of arc, could have gone tighter but I hear that increases wear. It's tight, but still turns easily enough with the handwheel. It's my first rotab, so maybe I'm easily impressed, but I am blown away by the quality.

R-9 'guts'.jpg

I knew it was missing the part with the minutes graduations (and has the wrong handle mounted) but I bought it anyway, so I can't go crying to ebay about it. For most of what I want to do I won't need it. But I want to make one anyway, or maybe one of you can pop one out easily? 3d printed? If I dare to dream, an OEM replacement out there in someone's shop?

Troyke R-9 missing part.jpg

The pic is not mine, it's a still from a Youtube video. Dorky mark-up by me. His table is identical to mine though.

I can make one out of steel in a half-hour, except for the graduations, no idea how to do that. I thought about turning a shallow groove around the circumference and inlay a printed strip, might do that. Open for suggestions.

The "donut" has 240 graduations, zero to 60 minutes repeating 4 times for 4°, which is how far the table moves with one full turn of the handle.

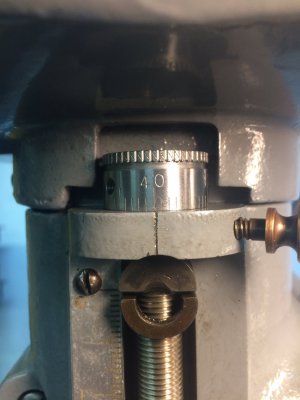
Here's mine cleaned up and mounted to my benchtop mill-drill:

mounted on the mill.jpg
close-up.jpg

Last question, anyone know when it was made? Is the Lot No. 2146.11 any clue? There's also a 46 stamped in the ring on the bottom that threads onto the table's stem, pulling it down. I'm a retro kinda guy so I love the old-fashioned font and logo, would not trade this for a new one.

Thanks all
Mark in Seattle
 
Graduation lines are easily made on a lathe, or even a vertical mill. On a lathe, you'd hold a sharp v-point tool in the toolpost and move the carriage to a stop as you index the spindle rotation. On a mill you'd lock the spindle and use the quill to move it up and down, using your RT to rotate/index the part. Basically, you only need about 0.010" total depth of cut, and you pull up a chip each time. At the end, you have to turn or file the OD of the part with a super sharp tool to remove the burr at the end of the groove. You can use hammer-punch stamps to add numbers if you need them.

Someone posted the idea of using a 100 tooth saw blade mounted to the left end of the spindle as an indexing mechanism, which worked great for me (just a piece of spring steel as an indexing tongue). You can also just wrap a paper strip around your chuck with indexing lines and tape a pointer onto the top of the headstock (for 100 or 200 divisions it's accurate enough). I now have a pantograph engraver so it's even easier.

I'd offer to engrave it for you but I'm in the process of moving and don't think I'll have time.
 
You could make the graduations yourself, given you now have an RT. One of the beauties of an RT is it is capable of reproducing itself to greater accuracy than the original.

You can set your donut at the center of the RT and offset to one side. Mount a lathe tool in the spindle and scribe a line down the side of the donut. You need a scribe line every 1.5º. To hit those angles accurately, make a temporary donut with eight graduations spaced at 45º intervals. This will allow you to set the RT at positions .5º apart. If you have a problem dividing the donut into eight equal divisions, you can carry it to one further level with a second temporary donut, requiring only four divisions to be able to index both odd and even degrees. Each iteration increases the precision by a factor of 90:1 and a 1º error in the second donut would result in a 40 arc-second error in the first donut and an insignificant error in the final part. but you should only need to do one iteration.

For that matter, if you don't have a lathe, you can make the donut entirely on the mill using the RT.

As to scribing the digits, that can be more tricky, given the size of the donut. one way would be to coat the surface with a resist and scratch the numbers in. The steel can then be etched using an electrochemical process. https://www.hobby-machinist.com/threads/etching-steel-using-a-2-5-watt-diode-laser.76262/ A more professional marking could be done with a CNC mill a 4th axis but then I would just make the whole part on the CNC mill.
 
Here's a pix of a setup I put together for a dial on a 8530 Clausing mill. It's on a Southbend 9A. Dial is printed from the internet and mounted to a disc of sheet aluminum. Took about half a day to put it all together.
8E84F156-69E4-4B54-9DD3-2493738437BC.jpegDE7E7CE3-4CC0-4FEC-9405-7938D67F904B.jpegB703265B-0930-4852-8C5A-709CEFCE174B.jpeg83CDFF5E-FEE1-4738-81CC-F59AB10D2140.jpeg
 

Attachments

  • 07F086D8-1BD2-44B8-B617-DCF59E7DADCA.jpeg
    07F086D8-1BD2-44B8-B617-DCF59E7DADCA.jpeg
    167.4 KB · Views: 17
Cleans up nice.

I really hate those number stamps. They're hard to get right on a flat surface when the position isn't critical. In this case, the placement is important and the curved surface is working against you. If you go that route, get the smallest numbers you can find. Take the time to make a fixture. The 1 needs less force than the 8 and you may need to be able to wack it several times. There's nothing worse than slightly overlapping 8s. Also, you'll need a calibrated hammer and elbow... Try it on a setup piece.

An alternative would be to make the graduations and use a pTouch label for now and get it engraved later.
 
Thanks all, great advice. I knew I could make the lines using the RT, but it's the numbers I was afraid of.

I know about the calibrated elbow for stamping with a hammer. I used to stamp serial numbers in an "artisanal" product I made in an earlier life. Just a few hundred of them, maybe a thousand — I forget what number I got to, this was in the '80s. The clientele didn't mind a little evidence that it was hand-made, it was part of the charm. ;) So I never invested in a jig to make them straight and evenly-spaced. And I was 40 years younger then, much better eyesight than now.

I have a tilting mill table made in India with the angle numbers hand-stamped, and it looks really lame — I don't want that look. Not in my donut after I go to the effort of engraving 240 lines in it. I'd be more likely to print the numbers on a strip of paper on a laser printer, wrap it around the circumference and coat it with clear epoxy. Not trying to fool anyone into thinking it's original, but that doesn't mean I have to settle for the kind of number stamping I'd be able to do, with my hand-eye coordination as it is now, let's just say not quite Clickspring.

I have a 60-tooth bicycle chain sprocket that I could tie in to the left end of my lathe spindle. Immobilizing it with a length of chain should be easy enough, one end of the chain bolted to the door over the gears, tightened at the other end with a toggle clamp to make it quick to loosen, to advance one tooth at a time. Then I'd just need to interpolate 3 more lines between each of those first 60. Halfway between the first set to get 120, then halfway again for the other 120.

But now I have a RT, so probably easier on the mill than the lathe, would you agree? But to do it on the mill (Rong-Fu RF-30 clone), how do I immobilize the spindle?
 
Number stamps are very difficult to get good results. Fixtures and calibrated elbows (practice) are mandatory as mentioned. Fixtures are particularly important with round dials, but even with my pantograph I engrave “flat” rather than messing around with a 3D form and follower (unless I’m engraving longer than two digits of text).

Remember that stamps displace metal, though. They always raise a burr around the edge of the number, which is what makes the result look so much worse than engraving.

The results look infinitely better if you take the time to carefully sand, file, or turn off the burr. If you turn it off, just be very careful to indicate in the part in a four jaw, use a very sharp tool, and feed in with the compound at an angle to let you feed just in slowly and accurately.

I’ve seen stamped dials on this forum that looked like they were engraved.
 
Well I took the easy route, sorry to disappoint those who wanted me to engrave it. I'm not going to use it enough to benefit from a really nice dial, and I have other projects calling to me.

I made the dial 3.007" diameter, which is where one-minute lines are exactly 1 mm apart, then stuck down 240 mm worth of self-adhesive mm scale, like they sell to woodworkers for their table saw fence etc.. At that diameter, the zero and the 240 lined up just right.

Time will tell how durable it is. probably not very! But the stick-on tapes I bought came in a 5-pack, and it was really easy to do so it'll be easy to re-do.

Knurled a screw for locking it down, with some brass down in the hole so the screw doesn't mar the piece it tightens against. I am happy, for now at least, it is done. Thanks to all who contributed. I especially loved seeing those pics of properly engraved dials. Maybe someday!

minutes ring.jpg
 
I made the dial 3.007" diameter, which is where one-minute lines are exactly 1 mm apart, then stuck down 240 mm worth of self-adhesive mm scale

Brilliant. Love it. That came out looking great! Reminds me of Hardinge dials.
 
I like it, but why didn't you put the numbers the other way round?
 
Back
Top