Using 3-phase Switch With 1-phase 220v Motor

Wobbles

Active User
Registered
Joined
Jul 20, 2014
Messages
182
I recently bought a Grizzly G2905 1-hp motor to go in my lathe. (BTW... These are on sale right now for $115.) Anyway I felt uncomfortable with the wiring solutions presented because Grizzly re-connects a single wire to get the motor to reverse direction.

My lathe has the Furnas R-44 type switch designed for use with 3-phase, and it looked like the purchase of a $50 R-1 switch might be required. Then a much simpler, safer, and far less expensive solution dawned on me. By inserting a 2-pole air conditioner relay into the circuit to control the motor current, the "motor reversing switch" is left only to swap the capacitor connection and control the coil in the relay. Best of all, two-pole, 15-20A relays of this type are available on Ebay in the $8 range.

The relay I purchased has a 110VAC coil and the contacts are rated for 3x the motor current, since I imagine that the "starting" load can be quite a bit higher than the listed "running" current.

Maybe this will help someone.
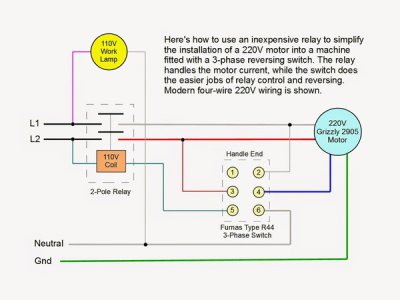
Motor%2BWiring.jpg
 
Just make sure the amperage is within spec. All the rat should work, you just have an unused leg in the switch, no problem
Bernie
 
Why not just let the Furnas drum switch do it all? Inside the lid is the diagram for connecting that switch for single phase use. Why complicate your set up with another component to fail. You do not have any over current protection shown, so the relay shows no purpose the switch contact won't cover.

The top two contacts of the drum switch interchange leads 5 & 8, black & red, starting winding for forward/reverse, and the third, bottom contact, turns the motor run winding off and on.
 
Well, the motor change-over is all completed now, but I have to report that all the major "glitches" I ran into are all connected with the Grizzly 2905A motor. These included....

• Different motor shaft diameter. 5/8 on the Grizzly and 3/4 on the OEM motor.
• Grizzly motor not punched for US conduit entry. A single-gang wiring box was grafted onto the end of the motor without difficulty, but the height of the box just barely fit into the motor cabinet on my 1950's Logan lathe.
• Mounting pad on the new motor did not match the motor mounting plate.
• A new schematic with 2 alternate wiring schemes was provided inside the motor box shipping container. That slowed me up quite a bit until I figured out that it didn't apply to the 2905 motor.

Doesn't sound like much, but I was so focused on the wiring that these other items threw me for a loop. All together, they probably accounted for an extra 10 hours of install time.

On the brighter side of things, thanks to the wisdom on this forum, the wiring was up-graded to the newer 4 conductor 220V single phase. I used NEMA L14-20 twist lock plugs and receptacles. What a great insight that was.

Another change that is very nice is that 3 electrical boxes (manual disconnect, 3-phase contactor, & VFD) that were previously on the rear of the motor cabinet have been reduced to one. And that single box is now located in the kick space between the 2 cabinets. This allows the lathe to be pushed up flush against the wall, saving another 6" of aisle space.

Photos are on their way.


Would I do it again or recommend this action to other members: Probably not. Since my motor is inside a cabinet under the lathe bed, all the work was concentrated at low levels. Even though major pieces were built on the bench and then offered to the lathe, it still meant about 4 hours on my knees drilling. crimping, and checking things with the meter. And although I only had about $140 in the motor and contactor, the price nearly doubled when wire, crimps, connectors and other hardware were added in.
 
Last edited:
Back
Top