- Joined
- Feb 5, 2015
- Messages
- 662
(posted on another forum some time ago and edited)
This post is intended for HSM readers, NOT those that make their living at this trade. I am not a welder, just a garage hack … so take my comments and recommendations with a pound of salt (or two). This subject has been covered many times but I thought that one more opinion wouldn't hurt and this IS my first Miller so I'm proud of it, LOL !
When I was 22 years old, just out of the Army, I bought a new Sears Craftsman 230 amp buzz box and squeezed it into the trunk of my used Pontiac "Tempest". The machine cost about two week's wages at the time and gave good service for decades. The design was unusual at the time for a "farm" machine because welding current was completely adjustable within two heat ranges (rather than conventional fixed "taps") from 30 amps to 230 amps. Along with the O/A rig that I purchased a few years later, my welding needs were mostly covered. If important work was required, I managed to get help from friends.
On my fiftieth birthday my wife gave me another Craftsman welder - this time a 115 volt MIG welder with argon cylinder. I thought that MIG operational costs could be less than the O/A torch and that the process was capable of the same type of work but faster and that HAZ could be restricted. I had some problems with out-of-position stick welding and friends suggested that MIG welding was more tolerant. I didn't expect great things from the little MIG welder and encountered no reason to change that opinion.
Work anticipated was related to my new (at the time) dirt bike and those of my friends. I didn't want an open flame or excessive heat, due to the extensive use of plastic on modern off-road motorcycles not to mention inflammable substances. I thought that localizing heat would permit me to do useful work (with thermal shielding around the work area) and it worked out fairly well. But frankly, not much repair work is required on modern off road motorcyles - unlike the British and Japanese motorcycles that I owned in my youth.
When I was 55 I retired and moved to Eureka, on the north coast of California. I moved my possessions, making a trip each weekend towing a fully-loaded dirt-bike trailer behind my fully-loaded SUV. But first I used the MIG welder with .030 flux-core wire to reinforce the trailer bed with steel straps so that I could move heavier objects. I reluctantly decided not to move the old Craftsman buzz box - it was almost as heavy as a half trailer-load of furniture, LOL.
I didn't anticipate needing the stick welder in retirement so I gave it to a friend. That was a BAD decision because I lost the capability of welding anything thicker than 5/32 - the realistic limit of the 115 volt MIG without pre-heating. If I expended large amounts of oxygen, acetylene, time and sweat, I could join heavier sections of mild steel with the help of the O/A torch.
I needed either another buzz box or a higher power MIG welder. Nobody sells used buzz boxes around 200 amps capacity around here it seems. The old ones are too darned handy I suppose, so I started considering the purchase of a better MIG welder. Lots of useful information originated from several welding forums and some off-road vehicle forums that I visited.
I'll make the assumption that most who are reading this post are interested in the class of welder most useful to the average HSM, rather than those who own and use industrial equipment. I hope that some of the following information might be useful to guys who are in the position I was when I started this exercise.
Anyone considering (or already owning) a welder should be familiar with the concept of "duty cycle". Welding machine manufacturers define this as the portion of a ten minute interval that can be spent welding (the rest of the time is required for the welder to "rest" and cool off). A 30% duty cycle at 115 amps implies that one can weld at 115 amps (average) for three minutes before the welder needs to cool for the next seven minutes.
It's important to be aware of this when comparing welders intended for home use IF heavy materials (or aluminum) are to be welded. A certain machine may be "specified" at 140 amps, for example, but this doesn't mean that it can produce 140 amps for an appreciable amount of time. One must note the duty cycle to determine how long the machine can safely operate at 140 amps and compare to personal needs/time available against similar machines.
Industrial welders are specified differently (60% duty cycle?). They are out of the reach of most of us and happily we do not have applications that require three-phase, 440 volt monsters. I've looked, with GREAT envy, at the numerous high quality, high capacity welding and cutting equipment owned by members of welding forums where I did some of my cost/performance research.
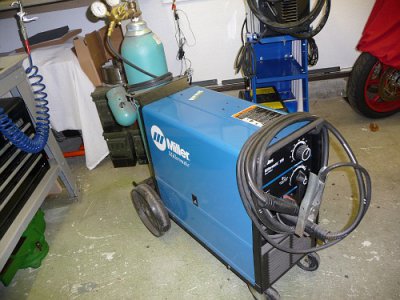
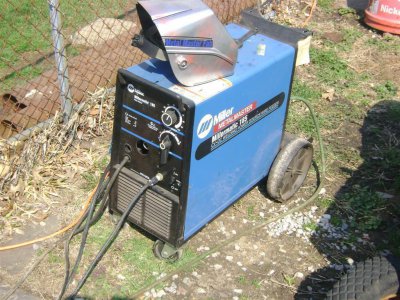
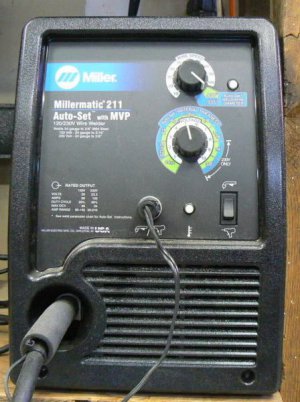
After six weeks of consideration, I felt that my needs could be served with a Millermatic 211 which has several features that are convenient for home use. Happily since the introduction of this machine a few years ago, the price has declined steadily. My local Miller dealer agreed to meet the best internet pricing and did so.
Fortunately for hobbyists (and those requiring a welder occasionally) many mainstream industrial welder manufacturers are extending their product lines to include machinery that is within the reach of people like me: Miller, Hobart, Lincoln, ESAB and others (not to mention the re-branded Asian imports). Choice of machinery depends on a lot of things: personal experience (brand loyalty), machine and parts availability, local dealer support and so forth. I can't compare other machines in the class of the Miller 211 because I haven't operated them and because I'm not experienced enough to recognize subtleties in performance. But traditionally successful manufacturers are sure to produce good equipment at the same cost level as this Miller welder.
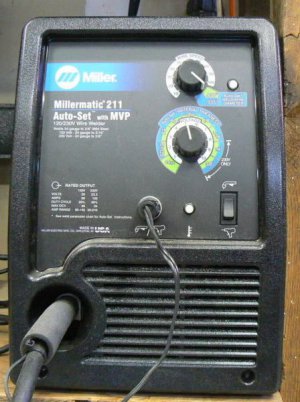
The "Auto-set" feature included in some recent Miller designs is convenient for those who only weld occasionally. Here's the set up procedure: the wire diameter loaded in the machine is selected by rotating the wire-speed dial to the correct wire size (at which time a LED will light, indicating that the "Auto-set" function is enabled). Rotate the voltage control until its pointer aligns with the thickness of the work material and the setup process is mostly done. Based on my brief experience with mild steel and 75% Argon 25% CO2, the "AutoSet" function works well (samples later).
One can make fine adjustments by varying the material thickness setting or by switching to full manual control, allowing control of both voltage and current. At the extreme end of the adjustment range (very thin material), weld quality is dependant on the skill of the operator - no amount of clever internal microprocessor/switching circuitry can compensate for lack of skill when joining metals of very thin cross-section. The wire feed selector control is color-coded (for wire diameter) and .030 wire diameter wasn't indicated for the thinnest material thicknesses. I confirmed this to my satisfaction by blowing a few holes through .031 material with .030 wire, LOL. That is common sense and should have been obvious - if one were using a stick welder, a 1/4 diameter rod to weld 1/8 plate wouldn't be the first choice, right?
When using the "Autoset" feature, note that the thickness graduations on the front-panel voltage adjustment dial are in sheet metal gauges (up to 1/8 inch) NOT in decimal thickness. Most HSM are more familiar with decimal measurements than with sheet metal gauges. How much trouble would it have been to add the decimal thickness dimension to the silk-screen pattern on the front panel of the welder? Many others must have made this complaint because the machine now comes with a little key-chain gadget that "measures" the work thickness in sheet metal gauge.
To me, this seems like the tail wagging the dog and a failure to identify the target market for this machine. My comment is predicated on a simple internet search of the model number … most of the hits seem to be garage welders. At some point we might expect to see machines in home garages with bits of masking tape stuck to the front panel identifying decimal thicknesses for those who use the "Autoset" feature, LOL.
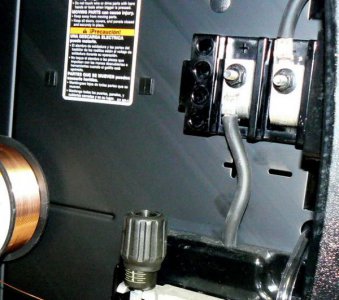
The machine pigtail has a threaded 4-pin connector on the loose end. The connector can be linked to either a standard 115 VAC plug or to a 230 VAC NEMA 6-50P plug, both are included. The welder detects the input voltage, no switches or internal wiring changes are required - attach the plug and insert into the appropriate outlet. I suspect a lot of home welders are going to be familiar with my next complaint: the NEMA 6-50P adaptor plug that comes with the welder won't fit standard 30 amp clothes drier outlets. I had to purchase additional parts to make an adaptor for the adaptor, LOL. The Miller dealer hadn't mentioned this problem but probably it is so common that I'm the only one that didn't know.
The manufacturer's assumption seems to be that a dedicated 6-50R receptacle will be available when the machine is operated from 220 - 250 VAC. However, operating the 211 from a 30 amp drier circuit shouldn't be a problem, the machine draws 24 amps maximum from the 230 VAC line and the welder duty cycle adds considerably to the safety margin. On this subject, here's another item of interest contained in section 4-9 of the manual, which deals with "extension cords". Operating from 115 VAC, the maximum length of 14 AWG is 27 feet at the input of the welder, while the same gauge wire can be 53 feet long when operating from 230 VAC.
Please note that I'm not suggesting that other welding machines can satisfactorily and safely function from a 30 amp clothes-drier outlet. There are considerations involving local electrical codes, manufacturer recommendations and the MANY on-site variables that make installations unique. Differences in welder technologies have led to higher efficiencies but manufacturers' recommendation should never be ignored. And never replace the 30 amp breaker with a higher current unit, of course.
My opinion is that many buyers would be better-served with an adaptor that accommodates a 10-30R receptacle (in addition to the 6-50R). This is based on the viewpoint of one who needs to operate the welder from existing house outlets. It's normal, I think, for a 30 amp clothes drier outlet to be located in or near the garage. Many homes also have a 50 amp circuit dedicated to an electric range however most kitchens are not located close to garages.
The welder is turn-key operational (except for changing gas mixture) with the Miller "Spoolmate 100" spool gun. Plug in the spool gun, set the front-panel switch from the MIG gun position to the spool gun position and you're good to go. I've no personal knowledge of this but posts on welding forums suggest that the lower amperage Millermatics are not completely turnkey and may require an additional wiring harness and switch at extra cost.
There are two options that the spool gun offers: aluminum welding (naturally) and MIG brazing. Both operations use 100% argon gas so it's simple to change over from steel welding to either aluminum welding or MIG brazing by simply switching tanks and guns, provided that the spool gun is loaded with the appropriate filler. The little 115 VAC Craftsman welder that has been replaced by the Miller has now been loaded with .030 flux core. That makes the small cylinder redundant so my intention is to refill this cylinder with 100% argon for the rare occasions when a process other than normal mild steel welding is required.
I've become recently interested in the MIG brazing process because of flexibility and low power consumption. Consider attaching any of the following materials to one another: cast iron (or cast steel), HSS, brass, copper, perhaps some stainless alloys, mild steel, bronze … any material that can be brazed can be brazed QUICKLY with this process and with less heat input and less distortion than using the O/A torch - or so I have read. (BTW I'm not suggesting that brazing a cast material to another material without pre-heating is a good idea.)
If I ever get the process going, I'll post what I experience. For those who may also be curious, an internet search about MIG brazing and auto body construction or auto body repair should yield lots of hits on the topic. I should note that the process is prevalent in Europe but hasn't achieved popularity in the U.S. yet. Maybe that's why the brazing wire is difficult to obtain and expensive. (If anyone has suggestions for a good material source I'd appreciate hearing about them.)
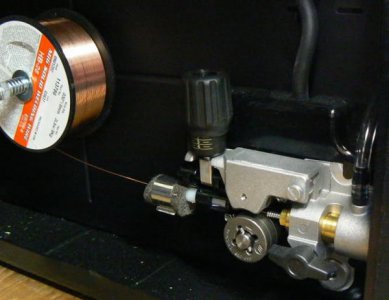
The internals of this welder appear to be manufactured with precision and quality, all parts are metal and the "human engineering" is thoughtful. No threading/unthreading to release/unrelease devices that must routinely be accessible to the operator. Lift the wire tensioner and the entire top of the wire feed mechanism pops up. Twist the feed roll 1/4 turn backward and the roll can be reversed to accommodate different wire diameters. Snap the MIG gun connection or the control connector out/in by hand then click the top of the feed mechanism in place. Done. There is a "solid" feel to the movement of all adjustments and mechanisms that inspired my confidence when the Miller dealer walked me through the set-up procedure.
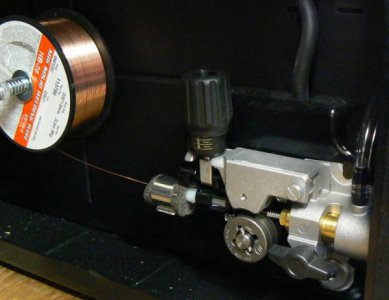
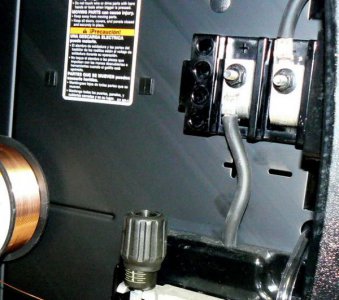
No adjustment requires more than a few seconds except changing wire spools or changing polarity. A small wrench (a spin-tight is better) is required to back off the wire spool friction nut a turn or two until it can be spun off by hand when replacing spools. Ditto for reversing the welding polarity; both of these processes take less than fifteen seconds. The longest part of the setup process is the time required to unpackage the spool of welding wire and guide the wire through the drive and up to the gun. The welder is delivered with an adaptor for an eight-inch wire reel which I removed to accommodate a two pound roll, perhaps "friendlier" for most hobbyists.
There is a setup chart inside the side cover that provides information for various wire diameters and mild steel work thicknesses for both gas and flux core wire (and aluminum welding with 100% argon). The "Auto-set" feature has been satisfactory for me so far - using normal materials and gas - but the suggested setup conditions on the side panel provide a good starting point for manual optimization.
The day that I brought the welder home, my wife wondered aloud why the Miller 211 was required, what could it do that the little Craftsman MIG couldn't do? That was a difficult question to answer because the Miller was not yet wired to 230 VAC. If it HAD been connected to 230, I could demonstrate the difference in thickness capability. I decided to give her a brief demonstration of how much better I could weld with a modern machine, using the 115 VAC adaptor plugged into a standard outlet.
I cut a strip of 1/2 x 1/8 mild steel about 4 inches long and clamped it into the adjustable-angle drill press vise that I use for welding small items. Asking her to turn away, I welded a nice bead across the test strip. After removing my helmet I found that I had welded the test coupon TO THE VISE JAW - not one of my best moments. (On the bright side, after removing the jaw from the vise, I found that I couldn't break the test strip weld from the hardened jaw - I had to mill it off with a solid carbide end mill.)
Other than confirming operation, using the 115 VAC adaptor, I didn't use the new welder for several weeks (lacking the parts to make a 230 VAC hookup). I ordered parts from the internet because of temporary local unavailability in my small town; the price was OK but some time passed before the bits and pieces arrived. After wiring up, I started thinking about the WELDING part of this evaluation and concluded that my skills and experience weren't adequate to the task of reviewing the machine with complete credibility. (Shaky neuropathic hands, limited eyesight and lack of practice didn't help either, ha-ha.)
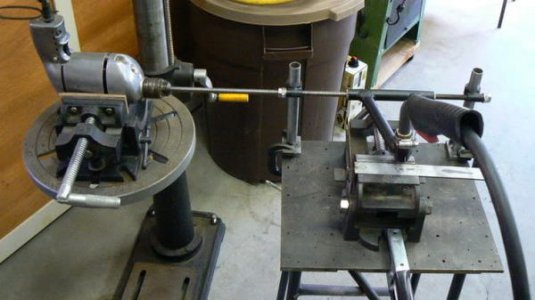
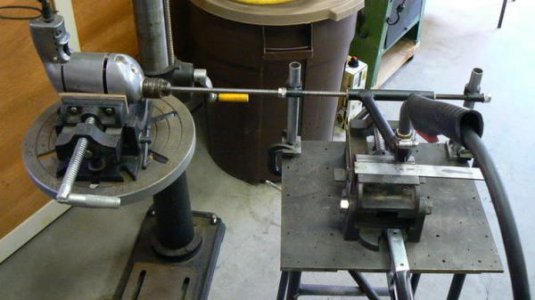
I decided that a mechanical helper that emulates some of the movements of an experienced welder might help (consistent gun travel speed and wire stick-out, for example). A device to hold the MIG gun and move it at a constant speed along a test coupon, a fixed distance away from the weld joint would be helpful. Bits and pieces that make up the mechanism are to be found in any shop: an old 3/8 drill motor, SCR speed controller, a length of threaded rod, a few matching nuts, some conduit or pipe and various scraps.
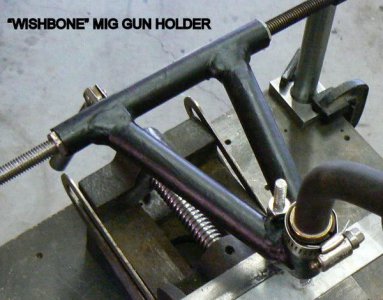
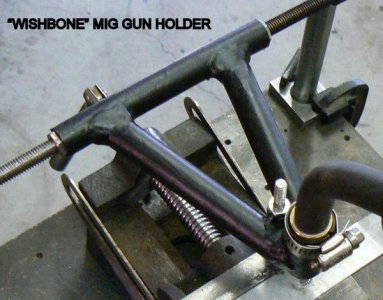
I'm going to call this simple device a "robot" because I can't think of another one-word description. Fabrication began with a "wishbone" MIG gun holder made from electrical conduit. Thin-wall conduit was rough-cut to length and free-hand ground for fit-up before firing up the welder for its first project. I used the "Autoset" function of the welder and filling gaps due to my sloppy workmanship required dialing down the welder material thickness setting (from the measured 20 gauge conduit wall thickness) to 22 gauge so that I could stitch across the gaps. After grinding off the high spots of the profile, a finish pass could be made with the welder voltage cranked up a bit to achieve a nicer appearance.
I had never welded thin materials with my old Craftsman MIG, although the machine worked OK for the heavy wall Cr-Mo tubing used on motorcycle frames. I had little confidence in that small welder for this type of application and it has not proved useful for other tasks involving material thinner than about .045. I've made four or five small woodworking machine stands with inexpensive galvanized electrical conduit using an O/A torch, which is great for filling gaps but time consuming (using proper ventilation, of course).
I'd opine that filling gaps and achieving a decent-looking finish pass with the Miller 211 is almost comparable to using an O/A torch for those - like me - with less than professional skills. Here's the "wishbone" that holds the MIG gun - as noted above, there were fills to be stitched across followed by a finishing pass:
It occurred to me that this mechanism might have other useful purposes. One example might be guiding an O/A cutting torch, since I have never been able to produce a straight line by hand. (I have no plasma cutter, should I have one?) Angling a workpiece, with respect to the torch guide, could easily produce chamfered weld preps for heavy work when required.
Another potential usage might be laying straight-line beads for fabricating thin wall structural members quickly and consistently. This could be very useful - structural shapes get more expensive every year, especially since they are not locally available and I must pay shipping costs. I'm considering fabricating a shop-crane, maybe a parabolic shape made from sheet metal - light and strong - would be a cool project.
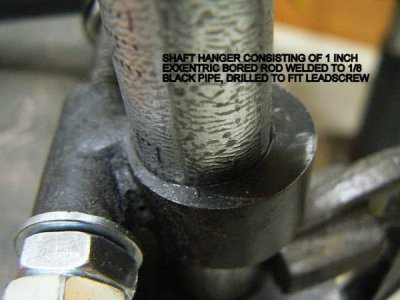
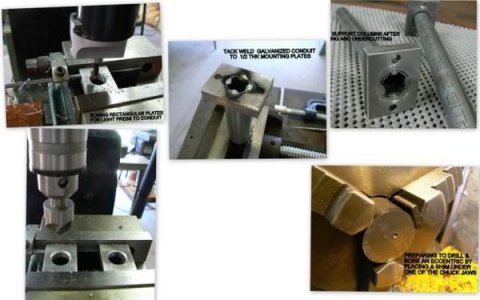
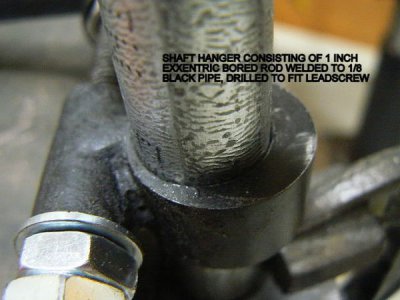
Back to the subject of the "robot" and thinking that the welds on the thin-wall conduit were not bad, I made two shaft hangers to support the lead-screw that moves the welding gun holder. These consisted of a couple of pieces of 1 inch diameter mild steel rod, eccentrically bored for vertical supports, welded to two short lengths of 1/8 pipe drilled out for the 3/8 - 24 lead-screw. I burned through the ends of the drilled-out pipe sections almost immediately and had to dial back the welder to tack/fill the pieces, followed by a hotter pass for looks.
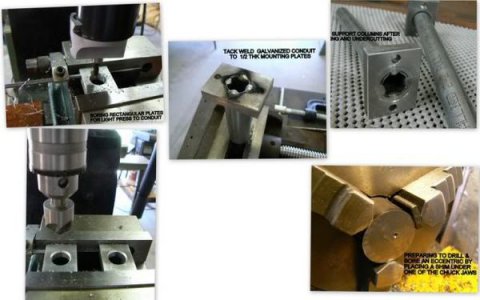
Here are some photos of the shaft hangers and some of the machining operations on individual parts:
After putting this Rube Goldberg assembly together, I temporarily clamped it to my small copper welding table and positioned the table near a floor drill press that is close to the MIG welder. After making wood shims for an old 3/8 drill motor, I packed/secured the drill into the vise on the drill press table. (The drill press table has four degrees of freedom, including rotation; it was a natural solution for securing and aligning the drill motor with the leadscrew.) I cranked the drill press table down, tilted and rotated until the drill motor was aligned well with the leadscrew of the welding "robot" then secured the leadscrew into the drill chuck.
The purpose of spending an entire day rigging this contraption is worth repeating at this point - in case I didn't make this clear earlier. I'm NOT a good welder - I didn't want to post an evaluation of a quality welding product and have it judged on MY merits (or lack of merits). So … on to the fun stuff.
An inexpensive router speed controller was used to vary RPM of the drill motor. After lubricating the leadscrew and installing the MIG gun in the wishbone, I made passes at various speeds, timed the distance traveled and calibrated the router speed control so that I could vary the MIG gun feed from around 5 IPM to about 30 IPM (speeds lower than 5 IPM were inconsistent). The wishbone gun holder has adjustable stickout, initially set to 3/8 inch (probably could have been greater since I was in my garage with the door closed). The gas flow was set to 20 CFH in accordance with the manufacturer's recommendation.
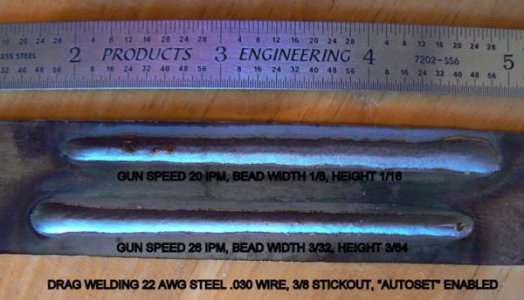
Other than the three "welding minutes" required to make the robot parts, the following are the first real welds made by the new Miller 211. The welds are made with .030 solid wire, gun angled about 10 degrees off vertical and opposite to the direction of travel (dragged) in "Autoset" mode. Note that the following photos of sample welds were taken with a close-up lens. There is visual distortion - an example: the steel machinists scale appears to be "bowed".
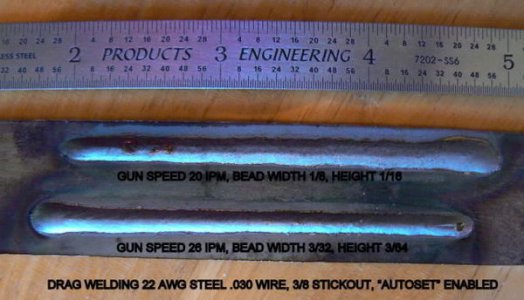
Because the machine was loaded with .030 wire, I was impressed by the above results. Selecting "Autoset" function, nothing more than dialing in the "material thickness" was required to set up the welder. Thin metal has always been my downfall, even with the O/A torch. The difference in the two above passes is gun speed, noted in the photo. Obviously slower speed produces a flatter, more penetrating weld. However, both of these welds obtained 100% penetration and if I tried to make the passes by hand there would definitely be blow-outs in the material, LOL.
Think about this: the material thickness was the same size as the welding wire !
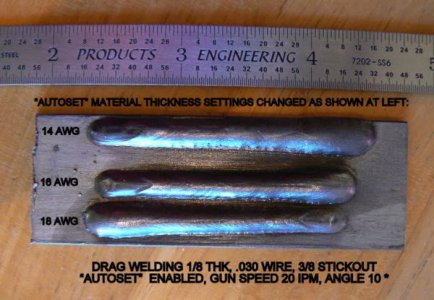
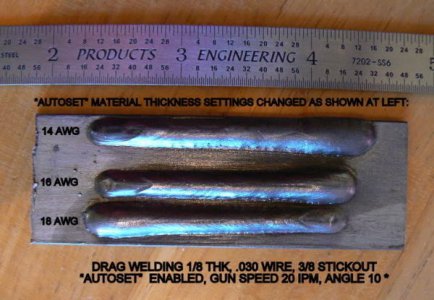
Three passes were made on this short piece of 1/8 strip, trying to get a feel for the "Autoset" function. There is little difference between appearance of the different passes although the penetration varies.
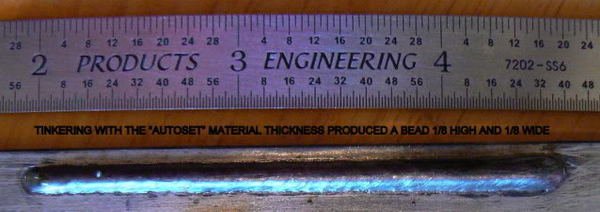
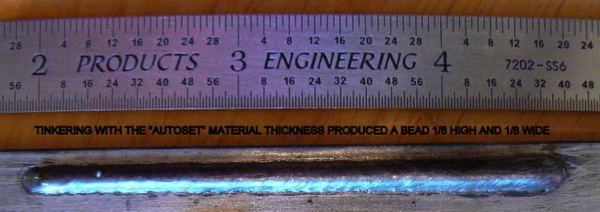
Continuing to experiment with the material thickness setting with "Autoset" enabled, I was able to produce the above bead with a unique shape: the height of the bead was identical to its width. The coupon was 11 AWG galvanized steel. No doubt that penetration was limited but there are applications where a crowned weld would be appropriate and useful.
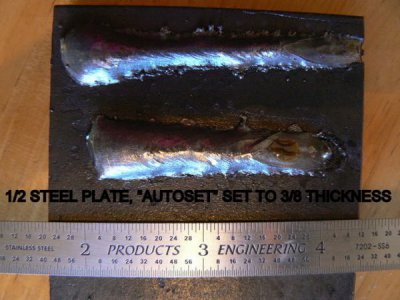
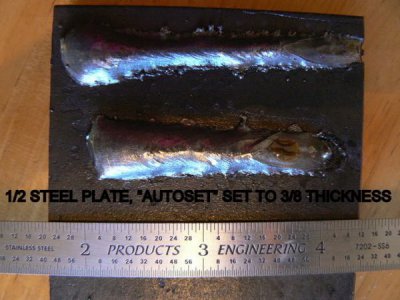
Although I'll never be required to weld it, I tried two short passes on a piece of 1/2 plate (the Miller 211 is rated at 3/8 thickness for mild steel). The material thickness was adjusted to 3/8 with "Autoset" enabled. Although the welds aren't pretty, I'd have been satisfied with their integrity with some vee groove prep work and two passes. This would have worked MUCH better with .035 wire.
At this point I'm satisfied that acceptable results in mild steel can be obtained in thicknesses ranging from .045 to .375 using .030 wire. Smaller diameter .023 wire would produce safer, more consistent results for thinner material, however … the welds in the above photo look good but be advised that the 22 AWG (.030 thick) test piece was welded in flat position, backed-up by a solid-copper welding table. In general, no special preparation seems to be required for thicknesses up to 3/8 and many applications could be satisfied with the "Autoset" feature. A problem (a common one) is joining dissimilar thicknesses, I think manual adjustment might provide better results than those I've experienced with the "Autoset" feature.
The jury-rigged mechanism that guided the MIG gun was a simple expediency - I didn't spend much time putting it together. About two hours of thought, an hour of machining, twenty minutes of welding setup, three minutes of welding, fifteen minutes of cleanup, twenty minutes of painting and paint cleanup, an hour to assemble the thing and thirty minutes to fine-tune … well, you get the idea. Just like ALL projects that we think will take about two hours, LOL.
This temporary rig produced good results and I'm going to mount it to three or four feet of heavy angle that can be "C" clamped in various positions for straight welds in an easy position. It could be compact, light and easily stored. I'll probably attach a universal joint (from a 1/4 socket set) and with a long extension the leadscrew can be driven by a cordless electric drill. The RPM adjustment range is about right for a welder application and the leadscrew pitch.)
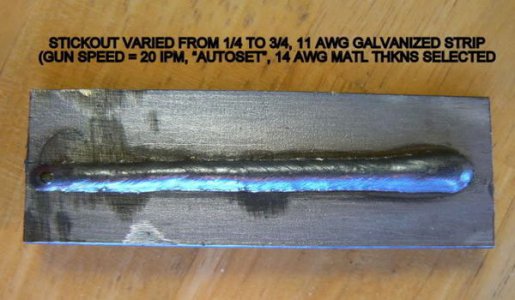
I've never been too meticulous about the "stickout" of my small MIG welder. Generally I "crowd" the workpiece on the assumption that more gas is better, leaving just enough room to see the puddle, unless I experience burn-back. The primitive "robot" gave me an opportunity to gain insight into this variable of the MIG process. All that's needed to make a visual comparison is to angle the workpiece in the welding vise so that stickout varies between two specific distances as the MIG gun travels across the workpiece.
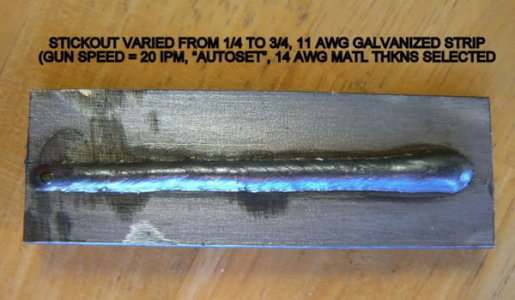
Although the photo is "backwards", there is little difference in the weld cross-section as a function of stickout. The coupon was adjusted so that the stickout varied across the work, as noted in the photo. This is reassuring because the implication is that I can pay more attention to gun speed and less attention to stickout (at least in calm air).
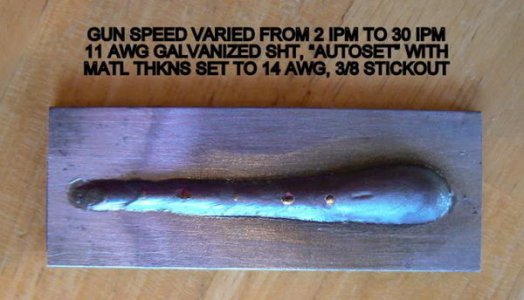
Another interesting piece of information easily obtained from this setup is the effect of gun travel speed on weld appearance. By setting the gun speed at one rate then commencing the welding process, one can linearly vary the rate of travel across the workpiece. Visual comparison between various gun speeds can be made on the test coupon; one could even section the coupon to observe penetration characteristics.
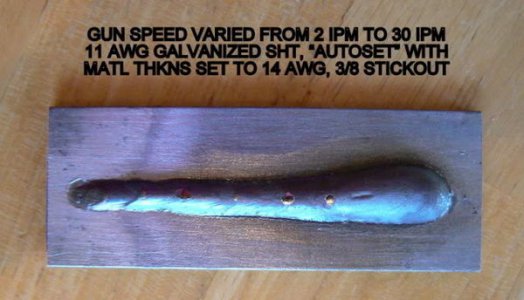
As noted in the photo caption, gun speed varied considerably as did the appearance of the weld. The photo is backwards, as ones intuition might suggest; the "fattest", most penetrating weld was produced by the slowest gun speed.
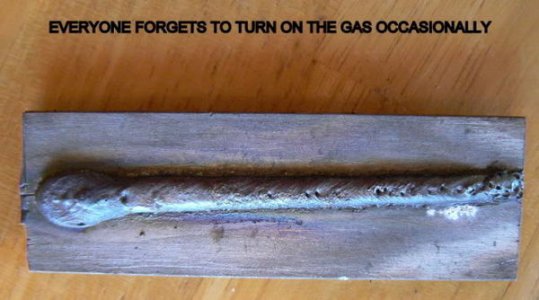
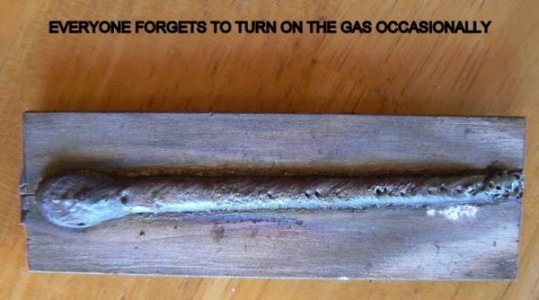
And finally, this is going to happen to everyone every once in a while, forgetting to turn on the gas and purge the line:
I'm satisfied with my purchase, it is small, compact, fits under my workbench very nicely. Lacking welding experience I can't comment on the quality of the work compared to other manufacturers of equivalent equipment. The 120/240 volt capability of the machine isn't of importance to me because it is stationary and always connected to the high voltage service. I was attracted to the "Autoset" feature of the 211 and it has not disappointed me. Based on limited experience, I'd have to say that the material thickness settings are a little aggressive for flat position welding on plate. But then, how many times is this situation encountered in the "real world" of attaching plate "A" to member "B" ?
In point of fact, the situations that I photographed will almost never occur - there's little need for passing a bead across a plate that doesn't join another piece of material, with the exception of hardfacing. I expect that the material thickness calibration is directed at something around 1-1/2 times the plate thickness, such as the thickness represented by a fillet weld, for example.
Here's a collage of some of the machining operations used to make the parts:
I'm happy that my local dealer matched the best internet pricing without blinking (I did have to pay sales tax but on the other hand I DIDN'T have to pay shipping costs, so it was a wash).
This post is intended for HSM readers, NOT those that make their living at this trade. I am not a welder, just a garage hack … so take my comments and recommendations with a pound of salt (or two). This subject has been covered many times but I thought that one more opinion wouldn't hurt and this IS my first Miller so I'm proud of it, LOL !
When I was 22 years old, just out of the Army, I bought a new Sears Craftsman 230 amp buzz box and squeezed it into the trunk of my used Pontiac "Tempest". The machine cost about two week's wages at the time and gave good service for decades. The design was unusual at the time for a "farm" machine because welding current was completely adjustable within two heat ranges (rather than conventional fixed "taps") from 30 amps to 230 amps. Along with the O/A rig that I purchased a few years later, my welding needs were mostly covered. If important work was required, I managed to get help from friends.
On my fiftieth birthday my wife gave me another Craftsman welder - this time a 115 volt MIG welder with argon cylinder. I thought that MIG operational costs could be less than the O/A torch and that the process was capable of the same type of work but faster and that HAZ could be restricted. I had some problems with out-of-position stick welding and friends suggested that MIG welding was more tolerant. I didn't expect great things from the little MIG welder and encountered no reason to change that opinion.
Work anticipated was related to my new (at the time) dirt bike and those of my friends. I didn't want an open flame or excessive heat, due to the extensive use of plastic on modern off-road motorcycles not to mention inflammable substances. I thought that localizing heat would permit me to do useful work (with thermal shielding around the work area) and it worked out fairly well. But frankly, not much repair work is required on modern off road motorcyles - unlike the British and Japanese motorcycles that I owned in my youth.
When I was 55 I retired and moved to Eureka, on the north coast of California. I moved my possessions, making a trip each weekend towing a fully-loaded dirt-bike trailer behind my fully-loaded SUV. But first I used the MIG welder with .030 flux-core wire to reinforce the trailer bed with steel straps so that I could move heavier objects. I reluctantly decided not to move the old Craftsman buzz box - it was almost as heavy as a half trailer-load of furniture, LOL.
I didn't anticipate needing the stick welder in retirement so I gave it to a friend. That was a BAD decision because I lost the capability of welding anything thicker than 5/32 - the realistic limit of the 115 volt MIG without pre-heating. If I expended large amounts of oxygen, acetylene, time and sweat, I could join heavier sections of mild steel with the help of the O/A torch.
I needed either another buzz box or a higher power MIG welder. Nobody sells used buzz boxes around 200 amps capacity around here it seems. The old ones are too darned handy I suppose, so I started considering the purchase of a better MIG welder. Lots of useful information originated from several welding forums and some off-road vehicle forums that I visited.
I'll make the assumption that most who are reading this post are interested in the class of welder most useful to the average HSM, rather than those who own and use industrial equipment. I hope that some of the following information might be useful to guys who are in the position I was when I started this exercise.
Anyone considering (or already owning) a welder should be familiar with the concept of "duty cycle". Welding machine manufacturers define this as the portion of a ten minute interval that can be spent welding (the rest of the time is required for the welder to "rest" and cool off). A 30% duty cycle at 115 amps implies that one can weld at 115 amps (average) for three minutes before the welder needs to cool for the next seven minutes.
It's important to be aware of this when comparing welders intended for home use IF heavy materials (or aluminum) are to be welded. A certain machine may be "specified" at 140 amps, for example, but this doesn't mean that it can produce 140 amps for an appreciable amount of time. One must note the duty cycle to determine how long the machine can safely operate at 140 amps and compare to personal needs/time available against similar machines.
Industrial welders are specified differently (60% duty cycle?). They are out of the reach of most of us and happily we do not have applications that require three-phase, 440 volt monsters. I've looked, with GREAT envy, at the numerous high quality, high capacity welding and cutting equipment owned by members of welding forums where I did some of my cost/performance research.
After six weeks of consideration, I felt that my needs could be served with a Millermatic 211 which has several features that are convenient for home use. Happily since the introduction of this machine a few years ago, the price has declined steadily. My local Miller dealer agreed to meet the best internet pricing and did so.
Fortunately for hobbyists (and those requiring a welder occasionally) many mainstream industrial welder manufacturers are extending their product lines to include machinery that is within the reach of people like me: Miller, Hobart, Lincoln, ESAB and others (not to mention the re-branded Asian imports). Choice of machinery depends on a lot of things: personal experience (brand loyalty), machine and parts availability, local dealer support and so forth. I can't compare other machines in the class of the Miller 211 because I haven't operated them and because I'm not experienced enough to recognize subtleties in performance. But traditionally successful manufacturers are sure to produce good equipment at the same cost level as this Miller welder.

The "Auto-set" feature included in some recent Miller designs is convenient for those who only weld occasionally. Here's the set up procedure: the wire diameter loaded in the machine is selected by rotating the wire-speed dial to the correct wire size (at which time a LED will light, indicating that the "Auto-set" function is enabled). Rotate the voltage control until its pointer aligns with the thickness of the work material and the setup process is mostly done. Based on my brief experience with mild steel and 75% Argon 25% CO2, the "AutoSet" function works well (samples later).
One can make fine adjustments by varying the material thickness setting or by switching to full manual control, allowing control of both voltage and current. At the extreme end of the adjustment range (very thin material), weld quality is dependant on the skill of the operator - no amount of clever internal microprocessor/switching circuitry can compensate for lack of skill when joining metals of very thin cross-section. The wire feed selector control is color-coded (for wire diameter) and .030 wire diameter wasn't indicated for the thinnest material thicknesses. I confirmed this to my satisfaction by blowing a few holes through .031 material with .030 wire, LOL. That is common sense and should have been obvious - if one were using a stick welder, a 1/4 diameter rod to weld 1/8 plate wouldn't be the first choice, right?
When using the "Autoset" feature, note that the thickness graduations on the front-panel voltage adjustment dial are in sheet metal gauges (up to 1/8 inch) NOT in decimal thickness. Most HSM are more familiar with decimal measurements than with sheet metal gauges. How much trouble would it have been to add the decimal thickness dimension to the silk-screen pattern on the front panel of the welder? Many others must have made this complaint because the machine now comes with a little key-chain gadget that "measures" the work thickness in sheet metal gauge.
To me, this seems like the tail wagging the dog and a failure to identify the target market for this machine. My comment is predicated on a simple internet search of the model number … most of the hits seem to be garage welders. At some point we might expect to see machines in home garages with bits of masking tape stuck to the front panel identifying decimal thicknesses for those who use the "Autoset" feature, LOL.
The machine pigtail has a threaded 4-pin connector on the loose end. The connector can be linked to either a standard 115 VAC plug or to a 230 VAC NEMA 6-50P plug, both are included. The welder detects the input voltage, no switches or internal wiring changes are required - attach the plug and insert into the appropriate outlet. I suspect a lot of home welders are going to be familiar with my next complaint: the NEMA 6-50P adaptor plug that comes with the welder won't fit standard 30 amp clothes drier outlets. I had to purchase additional parts to make an adaptor for the adaptor, LOL. The Miller dealer hadn't mentioned this problem but probably it is so common that I'm the only one that didn't know.
The manufacturer's assumption seems to be that a dedicated 6-50R receptacle will be available when the machine is operated from 220 - 250 VAC. However, operating the 211 from a 30 amp drier circuit shouldn't be a problem, the machine draws 24 amps maximum from the 230 VAC line and the welder duty cycle adds considerably to the safety margin. On this subject, here's another item of interest contained in section 4-9 of the manual, which deals with "extension cords". Operating from 115 VAC, the maximum length of 14 AWG is 27 feet at the input of the welder, while the same gauge wire can be 53 feet long when operating from 230 VAC.
Please note that I'm not suggesting that other welding machines can satisfactorily and safely function from a 30 amp clothes-drier outlet. There are considerations involving local electrical codes, manufacturer recommendations and the MANY on-site variables that make installations unique. Differences in welder technologies have led to higher efficiencies but manufacturers' recommendation should never be ignored. And never replace the 30 amp breaker with a higher current unit, of course.
My opinion is that many buyers would be better-served with an adaptor that accommodates a 10-30R receptacle (in addition to the 6-50R). This is based on the viewpoint of one who needs to operate the welder from existing house outlets. It's normal, I think, for a 30 amp clothes drier outlet to be located in or near the garage. Many homes also have a 50 amp circuit dedicated to an electric range however most kitchens are not located close to garages.
The welder is turn-key operational (except for changing gas mixture) with the Miller "Spoolmate 100" spool gun. Plug in the spool gun, set the front-panel switch from the MIG gun position to the spool gun position and you're good to go. I've no personal knowledge of this but posts on welding forums suggest that the lower amperage Millermatics are not completely turnkey and may require an additional wiring harness and switch at extra cost.
There are two options that the spool gun offers: aluminum welding (naturally) and MIG brazing. Both operations use 100% argon gas so it's simple to change over from steel welding to either aluminum welding or MIG brazing by simply switching tanks and guns, provided that the spool gun is loaded with the appropriate filler. The little 115 VAC Craftsman welder that has been replaced by the Miller has now been loaded with .030 flux core. That makes the small cylinder redundant so my intention is to refill this cylinder with 100% argon for the rare occasions when a process other than normal mild steel welding is required.
I've become recently interested in the MIG brazing process because of flexibility and low power consumption. Consider attaching any of the following materials to one another: cast iron (or cast steel), HSS, brass, copper, perhaps some stainless alloys, mild steel, bronze … any material that can be brazed can be brazed QUICKLY with this process and with less heat input and less distortion than using the O/A torch - or so I have read. (BTW I'm not suggesting that brazing a cast material to another material without pre-heating is a good idea.)
If I ever get the process going, I'll post what I experience. For those who may also be curious, an internet search about MIG brazing and auto body construction or auto body repair should yield lots of hits on the topic. I should note that the process is prevalent in Europe but hasn't achieved popularity in the U.S. yet. Maybe that's why the brazing wire is difficult to obtain and expensive. (If anyone has suggestions for a good material source I'd appreciate hearing about them.)
The internals of this welder appear to be manufactured with precision and quality, all parts are metal and the "human engineering" is thoughtful. No threading/unthreading to release/unrelease devices that must routinely be accessible to the operator. Lift the wire tensioner and the entire top of the wire feed mechanism pops up. Twist the feed roll 1/4 turn backward and the roll can be reversed to accommodate different wire diameters. Snap the MIG gun connection or the control connector out/in by hand then click the top of the feed mechanism in place. Done. There is a "solid" feel to the movement of all adjustments and mechanisms that inspired my confidence when the Miller dealer walked me through the set-up procedure.


No adjustment requires more than a few seconds except changing wire spools or changing polarity. A small wrench (a spin-tight is better) is required to back off the wire spool friction nut a turn or two until it can be spun off by hand when replacing spools. Ditto for reversing the welding polarity; both of these processes take less than fifteen seconds. The longest part of the setup process is the time required to unpackage the spool of welding wire and guide the wire through the drive and up to the gun. The welder is delivered with an adaptor for an eight-inch wire reel which I removed to accommodate a two pound roll, perhaps "friendlier" for most hobbyists.
There is a setup chart inside the side cover that provides information for various wire diameters and mild steel work thicknesses for both gas and flux core wire (and aluminum welding with 100% argon). The "Auto-set" feature has been satisfactory for me so far - using normal materials and gas - but the suggested setup conditions on the side panel provide a good starting point for manual optimization.
The day that I brought the welder home, my wife wondered aloud why the Miller 211 was required, what could it do that the little Craftsman MIG couldn't do? That was a difficult question to answer because the Miller was not yet wired to 230 VAC. If it HAD been connected to 230, I could demonstrate the difference in thickness capability. I decided to give her a brief demonstration of how much better I could weld with a modern machine, using the 115 VAC adaptor plugged into a standard outlet.
I cut a strip of 1/2 x 1/8 mild steel about 4 inches long and clamped it into the adjustable-angle drill press vise that I use for welding small items. Asking her to turn away, I welded a nice bead across the test strip. After removing my helmet I found that I had welded the test coupon TO THE VISE JAW - not one of my best moments. (On the bright side, after removing the jaw from the vise, I found that I couldn't break the test strip weld from the hardened jaw - I had to mill it off with a solid carbide end mill.)
Other than confirming operation, using the 115 VAC adaptor, I didn't use the new welder for several weeks (lacking the parts to make a 230 VAC hookup). I ordered parts from the internet because of temporary local unavailability in my small town; the price was OK but some time passed before the bits and pieces arrived. After wiring up, I started thinking about the WELDING part of this evaluation and concluded that my skills and experience weren't adequate to the task of reviewing the machine with complete credibility. (Shaky neuropathic hands, limited eyesight and lack of practice didn't help either, ha-ha.)
I decided that a mechanical helper that emulates some of the movements of an experienced welder might help (consistent gun travel speed and wire stick-out, for example). A device to hold the MIG gun and move it at a constant speed along a test coupon, a fixed distance away from the weld joint would be helpful. Bits and pieces that make up the mechanism are to be found in any shop: an old 3/8 drill motor, SCR speed controller, a length of threaded rod, a few matching nuts, some conduit or pipe and various scraps.
I'm going to call this simple device a "robot" because I can't think of another one-word description. Fabrication began with a "wishbone" MIG gun holder made from electrical conduit. Thin-wall conduit was rough-cut to length and free-hand ground for fit-up before firing up the welder for its first project. I used the "Autoset" function of the welder and filling gaps due to my sloppy workmanship required dialing down the welder material thickness setting (from the measured 20 gauge conduit wall thickness) to 22 gauge so that I could stitch across the gaps. After grinding off the high spots of the profile, a finish pass could be made with the welder voltage cranked up a bit to achieve a nicer appearance.
I had never welded thin materials with my old Craftsman MIG, although the machine worked OK for the heavy wall Cr-Mo tubing used on motorcycle frames. I had little confidence in that small welder for this type of application and it has not proved useful for other tasks involving material thinner than about .045. I've made four or five small woodworking machine stands with inexpensive galvanized electrical conduit using an O/A torch, which is great for filling gaps but time consuming (using proper ventilation, of course).
I'd opine that filling gaps and achieving a decent-looking finish pass with the Miller 211 is almost comparable to using an O/A torch for those - like me - with less than professional skills. Here's the "wishbone" that holds the MIG gun - as noted above, there were fills to be stitched across followed by a finishing pass:

It occurred to me that this mechanism might have other useful purposes. One example might be guiding an O/A cutting torch, since I have never been able to produce a straight line by hand. (I have no plasma cutter, should I have one?) Angling a workpiece, with respect to the torch guide, could easily produce chamfered weld preps for heavy work when required.
Another potential usage might be laying straight-line beads for fabricating thin wall structural members quickly and consistently. This could be very useful - structural shapes get more expensive every year, especially since they are not locally available and I must pay shipping costs. I'm considering fabricating a shop-crane, maybe a parabolic shape made from sheet metal - light and strong - would be a cool project.
Back to the subject of the "robot" and thinking that the welds on the thin-wall conduit were not bad, I made two shaft hangers to support the lead-screw that moves the welding gun holder. These consisted of a couple of pieces of 1 inch diameter mild steel rod, eccentrically bored for vertical supports, welded to two short lengths of 1/8 pipe drilled out for the 3/8 - 24 lead-screw. I burned through the ends of the drilled-out pipe sections almost immediately and had to dial back the welder to tack/fill the pieces, followed by a hotter pass for looks.
Here are some photos of the shaft hangers and some of the machining operations on individual parts:

After putting this Rube Goldberg assembly together, I temporarily clamped it to my small copper welding table and positioned the table near a floor drill press that is close to the MIG welder. After making wood shims for an old 3/8 drill motor, I packed/secured the drill into the vise on the drill press table. (The drill press table has four degrees of freedom, including rotation; it was a natural solution for securing and aligning the drill motor with the leadscrew.) I cranked the drill press table down, tilted and rotated until the drill motor was aligned well with the leadscrew of the welding "robot" then secured the leadscrew into the drill chuck.

The purpose of spending an entire day rigging this contraption is worth repeating at this point - in case I didn't make this clear earlier. I'm NOT a good welder - I didn't want to post an evaluation of a quality welding product and have it judged on MY merits (or lack of merits). So … on to the fun stuff.
An inexpensive router speed controller was used to vary RPM of the drill motor. After lubricating the leadscrew and installing the MIG gun in the wishbone, I made passes at various speeds, timed the distance traveled and calibrated the router speed control so that I could vary the MIG gun feed from around 5 IPM to about 30 IPM (speeds lower than 5 IPM were inconsistent). The wishbone gun holder has adjustable stickout, initially set to 3/8 inch (probably could have been greater since I was in my garage with the door closed). The gas flow was set to 20 CFH in accordance with the manufacturer's recommendation.
Other than the three "welding minutes" required to make the robot parts, the following are the first real welds made by the new Miller 211. The welds are made with .030 solid wire, gun angled about 10 degrees off vertical and opposite to the direction of travel (dragged) in "Autoset" mode. Note that the following photos of sample welds were taken with a close-up lens. There is visual distortion - an example: the steel machinists scale appears to be "bowed".

Because the machine was loaded with .030 wire, I was impressed by the above results. Selecting "Autoset" function, nothing more than dialing in the "material thickness" was required to set up the welder. Thin metal has always been my downfall, even with the O/A torch. The difference in the two above passes is gun speed, noted in the photo. Obviously slower speed produces a flatter, more penetrating weld. However, both of these welds obtained 100% penetration and if I tried to make the passes by hand there would definitely be blow-outs in the material, LOL.
Think about this: the material thickness was the same size as the welding wire !

Three passes were made on this short piece of 1/8 strip, trying to get a feel for the "Autoset" function. There is little difference between appearance of the different passes although the penetration varies.

Continuing to experiment with the material thickness setting with "Autoset" enabled, I was able to produce the above bead with a unique shape: the height of the bead was identical to its width. The coupon was 11 AWG galvanized steel. No doubt that penetration was limited but there are applications where a crowned weld would be appropriate and useful.
Although I'll never be required to weld it, I tried two short passes on a piece of 1/2 plate (the Miller 211 is rated at 3/8 thickness for mild steel). The material thickness was adjusted to 3/8 with "Autoset" enabled. Although the welds aren't pretty, I'd have been satisfied with their integrity with some vee groove prep work and two passes. This would have worked MUCH better with .035 wire.

At this point I'm satisfied that acceptable results in mild steel can be obtained in thicknesses ranging from .045 to .375 using .030 wire. Smaller diameter .023 wire would produce safer, more consistent results for thinner material, however … the welds in the above photo look good but be advised that the 22 AWG (.030 thick) test piece was welded in flat position, backed-up by a solid-copper welding table. In general, no special preparation seems to be required for thicknesses up to 3/8 and many applications could be satisfied with the "Autoset" feature. A problem (a common one) is joining dissimilar thicknesses, I think manual adjustment might provide better results than those I've experienced with the "Autoset" feature.
The jury-rigged mechanism that guided the MIG gun was a simple expediency - I didn't spend much time putting it together. About two hours of thought, an hour of machining, twenty minutes of welding setup, three minutes of welding, fifteen minutes of cleanup, twenty minutes of painting and paint cleanup, an hour to assemble the thing and thirty minutes to fine-tune … well, you get the idea. Just like ALL projects that we think will take about two hours, LOL.
This temporary rig produced good results and I'm going to mount it to three or four feet of heavy angle that can be "C" clamped in various positions for straight welds in an easy position. It could be compact, light and easily stored. I'll probably attach a universal joint (from a 1/4 socket set) and with a long extension the leadscrew can be driven by a cordless electric drill. The RPM adjustment range is about right for a welder application and the leadscrew pitch.)
I've never been too meticulous about the "stickout" of my small MIG welder. Generally I "crowd" the workpiece on the assumption that more gas is better, leaving just enough room to see the puddle, unless I experience burn-back. The primitive "robot" gave me an opportunity to gain insight into this variable of the MIG process. All that's needed to make a visual comparison is to angle the workpiece in the welding vise so that stickout varies between two specific distances as the MIG gun travels across the workpiece.

Although the photo is "backwards", there is little difference in the weld cross-section as a function of stickout. The coupon was adjusted so that the stickout varied across the work, as noted in the photo. This is reassuring because the implication is that I can pay more attention to gun speed and less attention to stickout (at least in calm air).
Another interesting piece of information easily obtained from this setup is the effect of gun travel speed on weld appearance. By setting the gun speed at one rate then commencing the welding process, one can linearly vary the rate of travel across the workpiece. Visual comparison between various gun speeds can be made on the test coupon; one could even section the coupon to observe penetration characteristics.

As noted in the photo caption, gun speed varied considerably as did the appearance of the weld. The photo is backwards, as ones intuition might suggest; the "fattest", most penetrating weld was produced by the slowest gun speed.
And finally, this is going to happen to everyone every once in a while, forgetting to turn on the gas and purge the line:

I'm satisfied with my purchase, it is small, compact, fits under my workbench very nicely. Lacking welding experience I can't comment on the quality of the work compared to other manufacturers of equivalent equipment. The 120/240 volt capability of the machine isn't of importance to me because it is stationary and always connected to the high voltage service. I was attracted to the "Autoset" feature of the 211 and it has not disappointed me. Based on limited experience, I'd have to say that the material thickness settings are a little aggressive for flat position welding on plate. But then, how many times is this situation encountered in the "real world" of attaching plate "A" to member "B" ?
In point of fact, the situations that I photographed will almost never occur - there's little need for passing a bead across a plate that doesn't join another piece of material, with the exception of hardfacing. I expect that the material thickness calibration is directed at something around 1-1/2 times the plate thickness, such as the thickness represented by a fillet weld, for example.
Here's a collage of some of the machining operations used to make the parts:

I'm happy that my local dealer matched the best internet pricing without blinking (I did have to pay sales tax but on the other hand I DIDN'T have to pay shipping costs, so it was a wash).


