Milling Rite

Just depends on the application. I’m a tech guy by training and temperament. I do understand what you mean though.

A DRO is just a measuring device. But, once you can measure you can calculate….

I figure the hard part is selecting and mounting the scales. But, I have no actual experience.

Just wanted to point out that we have a forum sponsor whose product deserves consideration.

John
For a custom or “non standard” installation it’s the perfect way to go as you get to pic the exact scales you need.

$170 is kinda hard to beat though, but I would want to see the readout lit up in person before buying.

We have a fantastic unit at work that is horrible to look at in certain light, glare on glare on glowing green numbers with glare to them.
 
So let's dig this back up from the grave...

After months of life-craziness, I'm FINALLY getting things arranged in the garage workspace. I decided to sell my little shaper; it's been fun, but I'm not using it regularly and it was too nice (and too large) to hang onto...so I've been slowly working on cleaning up the Millrite...and Holy F-ing Moses, does it need cleaning. I honestly didn't realize how dirty and grease-caked it really was until I started digging into it.

Pictured: The Forbidden Nutella.

View attachment 488465


That's just a little section under the bed that I haven't reached, yet; the entire thing looked like that before I started swabbing it away.


Pictured: More horror.

View attachment 488471


Honestly, now that I look at these two pictures I can say that this isn't the worst of it, because the caked-on foulness shown here is still mostly petroleum-based; in the more exposed areas, it was mostly chip and shaving and swarf that was being held together by grease...so, basically a low-grade lapping compound. I'm sure that did wonders for the ways.

On that note: since @pontiac428 puts up with me bothering them via PM, I had mentioned the need to get this thing actually secured to the floor and trammed, which led to my discovering - via some very crude means, admittedly - that the table has a bit of...well, slope to it. When I traverse the X-axis, I've noticed that there's about a .007" difference showing up: the left side is high...and the weird thing is that it's not a linear difference. If I start with the table positioned at the extreme right and move it to the left, the first six or eight inches fall off rapidly...and then it's flat for the remaining 24" of movement. The wear on the top of the table doesn't indicate one side being worn more than the other, so the thought was that there could be a pile of grease and terribleness between the table and the saddle that's causing it to heave when in that position. Having looked underneath the table...yeah, that could definitely be the case. It's pretty cruddy under there, on both sides.
Pictured: Why is there grease here in the first place?
View attachment 488488


I guess the good news is that the ways can't be too worn if those scrapings are still so visible...but again: this this is really dirty. The pictures actually make it look cleaner, somehow...but the parts that I've cleaned up actually look pretty decent.

Pictured: Less-awful.

View attachment 488489


I didn't know this thing was actually a nice shade of light grey underneath all of that neglect...but I did know that the floor underneath the machine was also made of neglect, in that it was terribly out of level and uneven: I could literally rock the top of the mill back and forth by a couple of inches. So, I decided to build some spacers/isolators and anchor it...and that was eye-opening.

Pictured: Uhhhh....

View attachment 488490


...yeah. About that.

So, the Millrite has a mounting pattern of 18" by 24", and the shortest of those hockey pucks - < ahem > "spacers"... - is 5/16" thick; the tallest is a full inch. Thus, in somewhere around two feet of run, my garage floor slopes by 11/16"...and that explains why things randomly roll around, and by "things" I mean "entire toolboxes." Here's a clearer shot of the height differences.

Pictured: Four of these things are not like the others.

View attachment 488491


Side Note: the drill press isn't level, either, but that's a project for another day.

So, yeah, I had to cut and shorten those to make them work and get the mill halfway level; I know they're not the greatest solution, but they're inexpensive and they did the job. Same goes for the anchors: I sank a 2"-deep hole under each mounting hole in the machine base - thankfully the 5/8" SDS bit slipped right through - and used a drop-in flush anchor in the concrete; those got hammer-set, and then a 1/2-13" grade 5 was put through a thick washer and snugged down. It's surprisingly movement-resistant, now.

Pictured: Mo-betta.

View attachment 488492


Sooooooo... I guess today's project is to keep cleaning and figure out how to get the table off the saddle. The only instruction manual I have doesn't tell me how to do that, so I'm going to do some Googling and then probably just jump in and break something from being impatient to see this thing up and running correctly.

More to come; stay tuned.
I’m going to go ahead and say someone somewhere back in time couldn’t figure out why his grease gun wouldn’t attach to the oil zerks and changed them out for grease zerks.

My Steinel had this don’t to it and the grease turned hard like wood over time breaking one of the jib screws rendering it inoperable.

I got it cheap that way.
 
I’m going to go ahead and say someone somewhere back in time couldn’t figure out why his grease gun wouldn’t attach to the oil zerks and changed them out for grease zerks.

I didn't know there was an appreciable difference, to be honest; I figured these were designed to be used with a high-pressure oiler...so I've been trying to think of an ergonomic way to make one of those.

My Steinel had this don’t to it and the grease turned hard like wood over time breaking one of the jib screws rendering it inoperable.

This stuff is still mostly-tacky on the outside, but I'm willing to bet that there's a hard film under the table. Also - unrelated - the head was seized in place; I left some AeroKroil (is it just "Kroil" now? ) soaking into the joint for a few hours, though, and it slid loose...so that's good. Still don't know now to get the table free...

I got it cheap that way.

Even if I have to do some repairs, this one cost me less than half of what a little benchtop model is going for, right now.
 
My Millrite had grease in it too, I cleaned it up and use way oil everywhere except the spindle. People see the zerks and think it needs grease and pack as much in there as they can.

To remove the table, take off the left side table bracket. You will need a pin wrench to take the securing nut off the lead screw, a pin drift of the right size would probably work too, then you can take the right side bracket off as well and unscrew the leadscrew so that you don’t bend it. Once that is off, you can slide the table off the saddle, but make sure you have something to support it, I used my engine hoist, it is very heavy. An alternative is to unscrew the leadscrew nut on the saddle instead of removing the leadscrew from the table, but make sure you secure the leadscrew so it doesn’t bend. You will need blocks to put the table on with space in the middle to the leadscrew when you set it down. Once off, you can clean out all the oil passages so that you can use way oil to lubricate it. For the pump, I used a small grease pump and blocked off the end where the plunger rod came out and hold the pump upside down when oiling it.

As to the table drooping, I suspect the previous owner put something heavy on that end and over time the ways wore more than the rest. If you have the means, it might be good to check the flatness and see if it is worn there, or if something else caused it.
 
My Millrite had grease in it too, I cleaned it up and use way oil everywhere except the spindle. People see the zerks and think it needs grease and pack as much in there as they can.

I'm thinking that's what happened here; it's a pretty severe amount of grease, but at least the visible portions aren't rock-hard

To remove the table...

Thank you.

Pretty sure I can handle getting it loose and off; I have a rolling table that'll be perfect to rest it on.

For the pump, I used a small grease pump and blocked off the end where the plunger rod came out and hold the pump upside down when oiling it.

I saw a few builds like that; I was trying to get something that would either gravity feed without being held upside-down, or that would siphon. Something about holding a gun inverted really aggravates my wrist.

As to the table drooping, I suspect the previous owner put something heavy on that end and over time the ways wore more than the rest. If you have the means, it might be good to check the flatness and see if it is worn there, or if something else caused it.

The vise is my first thought...but it was mounted on the high side of the table...

You may be correct, regardless; I'll know more once I get the table detached...and I need to do that in order to clean properly. That'll likely make the cleaning go much quicker, as well.
 
Looks like your floor was poured by the same blackout drunk and legally blind concrete subcontractor that poured mine. When I came home that day, I probably looked just like that picture of Quint you use for your avatar. If they weren't long gone that day, I probably still wouldn't be a free man today!

I wish I had some good advice for the caca clean-up, but it is a job for elbow grease and blue paper shop towels. Probably a good idea to use the engine hoist and a lifting sling or 4-way harness t-bolted to the table so you can stay in control of it as you slide it out. I bet it'll feel good to clean out the crap and get a good look at the ways.
 
Looks like your floor was poured by the same blackout drunk and legally blind concrete subcontractor that poured mine. When I came home that day, I probably looked just like that picture of Quint you use for your avatar. If they weren't long gone that day, I probably still wouldn't be a free man today!

Fun Fact: it took me a year or so, but I found one of those machetes. French Indochina/Senegalese pattern. It lives right above the drill press in case this concrete guy ever shows back up.

I wish I had some good advice for the caca clean-up, but it is a job for elbow grease and blue paper shop towels. Probably a good idea to use the engine hoist and a lifting sling or 4-way harness t-bolted to the table so you can stay in control of it as you slide it out. I bet it'll feel good to clean out the crap and get a good look at the ways.

Well, I bought two fresh rolls of towels and a package of red shop rags, all of which can just be thrown away; I usually don't like doing that, but in this case we just need to get rid of the wrongness. I would definitely use an engine sling and/or hoist if I had either, but I may have a way to just roll a work table over into position and slide it all out. I have some scrap cardboard as well, so I can protect the metal surfaces from devouring each other.

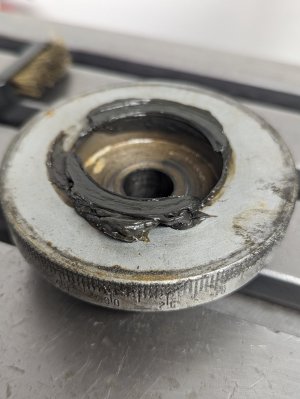
On the subject of removing the table: the left side handle and bracket came off without much complaint, and although I managed to drop a bearing and a thrust washer, they're both okay. What isn't okay is the vintage grease that's piled up inside that area.

Pictured: Ew.

1000025705.jpg


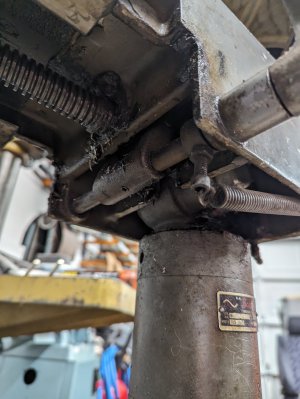
I got all of that cleaned up and the rest of that end removed, and then went to the right side...where I found that the powerfeed was going to make things a bit more complicated, and not in the least due to even more grease all over everything.

Pictured: Seriously...ew!


1000025707.jpg


I'm pretty sure the lead screw just passes through literally all of the powerfeed assembly, which I discovered by accidentally sliding the table sideways after removing the handle on the right side. On that note: as I was tapping that handle loose - yes, it was seized in place by old, congealed oil - I noticed that there is a LOT of backlash in the X- axis. Like, I could turn the crank a full rotation before the screw actually started moving the table...so what's up with that? Is there a separate backlash adjustment on the table, or is that accomplished via the handle being in place on the right and the retention screw being adjusted on the left? Anyone that knows, please chime in.

Meanwhile, there's another problem...

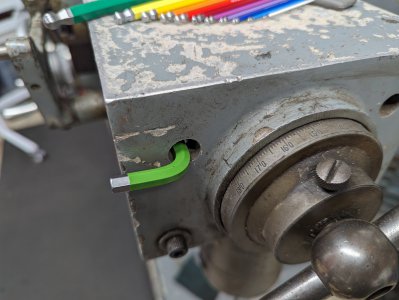
Pictured: My tool is too short.

1000025711.jpg


Feel free to tee up on that one; I pitched it soft.

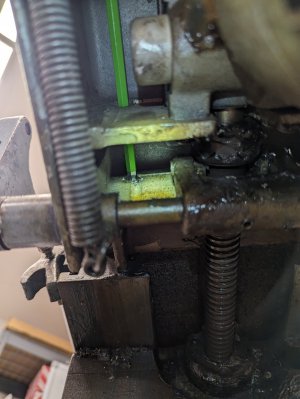
But seriously: even burying this thing to the hilt - phrasing - won't quite get the job done. The recess of the Allen screw isn't being fully-engaged, and these are ball-end keys...so, I've had to order one that's slightly longer in order to loosen the screws inside. They're buried pretty deep, and the accesses are so tight that I can't really get anything in there to loosen them up.

Pictured: Failure.

1000025713.jpg


It's just a fraction too short... but the new tool will be here tomorrow, so it's no big deal.

As I said earlier, I think the entire bracket and powerfeed assembly is going to slide off, even with that toothy shaft coupling in the way. After that's out I should be able to unthread the lead screw and then it's just manhandling a hundred or two pounds of table onto a work surface, where it can be cleaned up. Then we'll go to the hospital for the lower-back X-ray, come home and lay on the ice pack for awhile, and after the inevitably-herniated disc heals up I can finally scrape the goo off the ways. It's nearly a perfect plan; what could go wrong?

Oh, secondary question: is there a power drawbar kit in existence for these, or do I have to get creative? Have I already asked that? I think it's time for bed; more coverage tomorrow.
 
Pictured: My tool is too short.

1000025711.jpg


Feel free to tee up on that one; I pitched it soft.
I’m in a good mood, picking up my boy from college today, so I’ll let that slide.

Removing the bearing on the left side will give more backlash, so I’m not that concerned about what you found. When putting it back together, you will adjust that nut to take up the backlash, making sure you don’t go too tight and create drag on the screw. The leadscrew nut does not have any adjustment, so you are stuck with whatever wear that nut has.

I don’t have a power feed, so I’m not sure if the power feed slides off, or if there is something retaining it.

I haven’t seen a power draw bar for the Millrite. I’ve been trying to think of a way to do that myself.
 
Removing the bearing on the left side will give more backlash, so I’m not that concerned about what you found. When putting it back together, you will adjust that nut to take up the backlash, making sure you don’t go too tight and create drag on the screw. The leadscrew nut does not have any adjustment, so you are stuck with whatever wear that nut has.

Cool, that's kind of what I was thinking it had to be. I recall checking backlash last year when I bought it and thinking that it was unexpectedly marginal.

I don’t have a power feed, so I’m not sure if the power feed slides off, or if there is something retaining it.

As soon as my longer tool appears, everything will change: the right side bracket will just slide right off, the entire machine will clean itself, rainbows and unicorn tears will rain down from the heavens, cats and dogs will live together in harmony, etc, etc.

I haven’t seen a power draw bar for the Millrite. I’ve been trying to think of a way to do that myself.

I contacted Kurt Workholding to see what they had to say on the subject...and succinctly, it was "We've never seen it done, so let us know what you figure out." They're sending me some diagrams of their parts so that I can think on it, as well; right now, my thoughts are:
  1. Swap the step pulleys to a single-speed arrangement and install a VFD, and use a mount based around the motor area.
  2. Rearrange the pulley cover in order to create some real estate on the front side of the machine and start working from there
  3. Abandon all hope.
Option 3 is the easiest, of course.
 
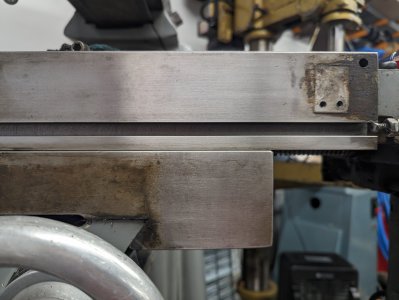
Pulled some other bits from the table in order to lighten it up; if you look carefully, you can tell where I've cleaned and where I haven't.

Pictured: It's admittedly hard to see the difference.

1000025727.jpg


I didn't really do much, here. Mostly just degreaser and a bit of green Scotch-Brite on the bad stuff, and then brass wool and brushes to do the majority of the work. I used a small steel brush to swap and scrape that T-slot; I couldn't get to it well with anything else.

The tabletop is looking cleaner, but I think it could use a stoning to knock down the nicks and burrs...which means I now have to find something to do that with.
 
Back
Top