-
Welcome back Guest! Did you know you can mentor other members here at H-M? If not, please check out our Relaunch of Hobby Machinist Mentoring Program!
You are using an out of date browser. It may not display this or other websites correctly.
You should upgrade or use an alternative browser.
You should upgrade or use an alternative browser.
How do you check a square with no reference square?
- Thread starter turbotadd
- Start date
- Joined
- Jul 1, 2012
- Messages
- 1,356
I've had 2 students show classes how to do this. Tadd, DR Jeff Thiele showed everyone in the scraping class you attended. I can't remember exactly how He used a surface gage and the Starret style with the little ball on the end and Parallels. I will write him and see if he can take some pic and explain it here. My CA Host DH Mayerson also had a gizmo he made that looked like a bridge where he would slide the base of the square under it and zeroed the indicator on the back side of the blade and then turned the square around and tested the front side If the square is true the indicator should read zero on both sides I'll also write him to see if he can send some info. Another way is to take it to work and check it on a new CNC machine or take it to United Labs and they will tel you too. Rich
- Joined
- Feb 22, 2012
- Messages
- 924
- Joined
- Jul 1, 2012
- Messages
- 1,356
I have both of those types of squares. But I lent the granite to Chris in WI. I just wrote him telling I needed it back. I have one of those squares you turn and look for light. If your not in a big hurry, When I get the granite I will lend it to you it's square to .00002" Tadd lives about 30 min from me.
Rich
Rich
- Joined
- Nov 16, 2012
- Messages
- 5,596
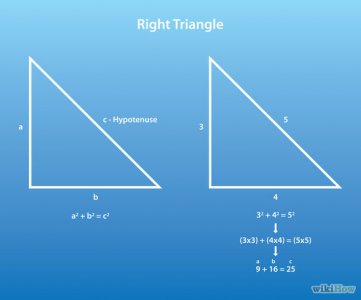
Wouldn't Pythagorem's be helpful?... http://www.mathsisfun.com/pythagoras.html
I once had a machinist square that was suspect. I measued the lengths of the legs and applied the theorm and determined the hypotenuse was off about 0.1[SUP]o[/SUP] Later on, when I bought a granite slab, I could check and see the difference.
I once had a machinist square that was suspect. I measued the lengths of the legs and applied the theorm and determined the hypotenuse was off about 0.1[SUP]o[/SUP] Later on, when I bought a granite slab, I could check and see the difference.
Or how are the reference squares generated?
Thanks,
Tadd
Not sure this is good enough for your purposes, but...
Hold the square against a surface having a verified straight edge. Scribe a line.
Flip the square over and check it against the scribed line.
Walt
- Joined
- Jul 26, 2011
- Messages
- 4,142
That's only good enough for wood working,really.
- Joined
- Jul 1, 2012
- Messages
- 1,356
I know this isn't exactly what we are talking about but when I was a Apprentice Millwright my Journeyman and I were installing a line of lathes inside a shop and he wanted to set them in a line that was square with a wall, he pulled out a tape 2 measures and a chalk line and we used the 3, 4 ,5 method to do it. We used 6, 8, 10 to do it though. Worked really nice and is a cool thing to know, even if it is off topic a little I find discussion off the original question is good for all as it is passing on information.
- Joined
- Feb 22, 2012
- Messages
- 924
Worked really nice and is a cool thing to know, even if it is off topic a little I find discussion off the original question is good for all as it is passing on information.
great idea- and the more the merrier
You can make a 90 degree reference rectangle which is as accurate as your best indicator using nothing but the indicator, if you have some cast iron and care to scrape it.
The version I made measured 14 inches tall, 8 inches wide and 1 inch thick.
First the left and right sides must be scraped exactly parallel to the best you can get them, in my case <0.002mm as that's what my indicator reads to.
Once they are parallel you stand the thing upright and use the comparative indicator method to check if the sides are vertical, since you already know they're parallel you only need to scrape the base until they become vertical. An explanation of this method is in this video https://www.youtube.com/watch?v=0tu9uyRG8ZM but it may not be too clear at first.
This part can then be used for checking any other squares either by bluing it or by making a little jig so you can slide an indicator up and down it.
Cheers,
Rich


