ELS on Mini-Lathe?

Yeah, It sort of put control panel in a lesser power setting for me. RPM gauge seems to still be on though the panel is "off". On a related note, during that flashing and changing my gearing steps to 3:1, I did a scratch pass at 8 tpi, came out at 32 tpi. This is better, but the pulse per rev does seem to be 4x (4000 not 1000) Trying to get a cable to change this setting...
 
Short story: Do not load "testfixture-f280049c" into the eval board.

Long story: The previous version of ELS was running fine. Downloaded the new one, compiled it without error, downloaded it to the eval board, and... it's dead. The display shows RPM as "7_" and FEED is "88888", plus all the LEDs on the top row are lit. The only activity on the eval board is LED5, which is flashing fast. Downloaded the old version of ELS again and that works fine.

Thought maybe I need to update Code Composer, (I'm running 9.2.0.00013). The update failed part way through... sigh. Reverted back to the version above.

Confirmed that the earlier version of the ELS always works and the new version always fails, meaning it's software. The odd thing was that when the v1.3.01 project was loaded, three files appear:
electronic-leadscrew1.3.01
els-f280049c
testfixture-f280049c

Only that last one could be changed to "[Active - Debug]" by clicking on it, none of the others did. That seemed suspicious and I wondered if I'd somehow downloaded an interim test version off GitHub. Sure enough, that was it, but I can't tell you the rev since it crashed the eval board. So, don't click on testfixture-f280049c; it's els-f280049c that has to be loaded into the board. Just posting this in case any of you fellow travelers run into the same thing! Maybe James came move testfixture-f280049c to somewhere less accessible on GitHub.
 
Last edited:
Yeah, It sort of put control panel in a lesser power setting for me. RPM gauge seems to still be on though the panel is "off". On a related note, during that flashing and changing my gearing steps to 3:1, I did a scratch pass at 8 tpi, came out at 32 tpi. This is better, but the pulse per rev does seem to be 4x (4000 not 1000) Trying to get a cable to change this setting...
It's supposed to do that. Watch his latest youtube video, where he explains what's going on (though your tpi issue is something different)
 
Last edited:
There were duplicate files so bring in new ones that had same name...issues. Fixed that, but now when it gets to "ice pick" running, I immediately get this message.
View attachment 339596
It's telling you that the USB interface chip on the eval board needs updating. I let it do its thing and the warning went away.
 
@kb58 I'm confused if you're having issues, but I will say that I couldn't open files either, it said something to the effect that those files were already opened. The code composer holds files until you actually remove them from Code Composer. Its actually a delete that gets them out (but not off your computer. I didn't have issues with the latest upload, sounds like devil here didn't either. Must be a setup difference.
My only issue now is needing that driver programming cable that's on its way. Soon...soon I will finally be done with this project. I learned more than I wanted to about software that runs this stuff behind the scenes and how these things work a bit better. I really wished I had picked up on the changes I needed to do to match what Clough ended up with. Live/learn!
 
I created a new workspace called workspace_v9_2 and downloaded the new code there. I had no issues compiling and downloading the debug and release versions to the PCB. This way I can go back to the old version without issue since that workspace workspace_v9 is untouched. Try that.

After using the new version a little making a metric thread, I like it. I like that when you use the power switch, it shuts down the motor drive, but keeps the RPM display. This is useful for keeping the leadscrew idle when facing a part, but still get tach info. Less jitter on the tach display is great. I don't have a carriage lock on my mini-lathe, so I use the idle leadscrew and clamp the half nut to it to keep the carriage stable while facing.

He goes over all the updates in Part 20 of his YouTube ELS series.
 
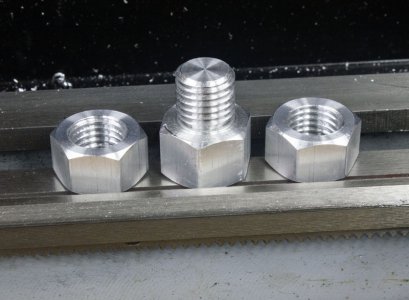
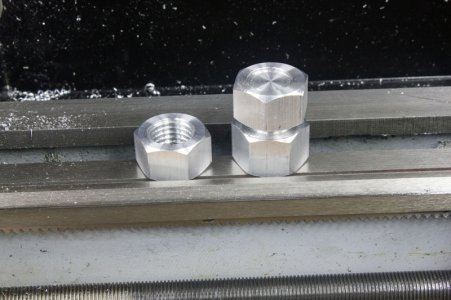
Here's some test threads done in 6061. They are M20 X 2.5 threads in both a bolt form and nut form. Everything seems good with the new software.--version 1.3.01.

IMG_5652.jpg

IMG_5655.jpg
 
Looks awesome! I am excited to not take 10 minutes to setup lathe to cut different threads more than anything else.
Since you cut metric, what was your technique with the new system? I assume you got to gutter, stopped, backed compound out, reversed and repeat? I mean, I know some people will still disengage half but at gutter, hit reverser and lock the half but at the same thread dual setting as what they went in with.
I’m interested to see which I prefer going forward...it’s always been the 1st version, but now I’m threading at 60 rpm vs 150 previously.
 
Here's some test threads done in 6061. They are M20 X 2.5 threads in both a bolt form and nut form. Everything seems good with the new software.--version 1.3.01.
Though it's probably fine, try screwing one of your fabricated parts into a commercial part. Reason being, if there's a scaling problem in the software, it won't appear because a wrongly-threaded nut will always fit a matching wrongly-threaded screw.
 
I cut mostly Imperial threads. This is probably the 5th or 6th metric thread I've cut! I wanted to see how it works with an Imperial leadscrew. My lathe has a 16 TPI for the leadscrew.

So, here's my technique for external threads are:
  1. Cut small gutter by end of cut.
  2. Cut small bevel at start of cut.
  3. Set compound to 29-1/2 degrees.
  4. Square cutter.
  5. Turn on lathe and advance cutter until it just starts to cut.
  6. Turn off lathe.
  7. Zero cross slide and zero compound.
  8. Position cutter for start of cut.
  9. Engage half-nut and leave it engaged for entire process!
  10. Turn on lathe to low speed (100-200 RPMs) and stop at end of cut--this is easy with the variable speed motor. Can also be advanced by hand if a little short.
  11. Back off cutter with cross slide to clear part.
  12. Reverse motor (spindle direction) and bring back to start.
  13. Turn in cross slide and bring to zero.
  14. Use compound to advance cutter to cut thread. I use about 3-5 thou DOC at start and finish with 1-2 thou along with some spring passes.
  15. Repeat as needed.
I usually start checking the thread with a thread mic when I'm in about 80% in based on the formula 0.75/TPI. So, for this thread, I converted 2.5 mm pitch to 25.4/2.5 = 10.16 TPI. Compound feed = 0.75/10.16 = 0.0738".
 
Back
Top