Drill Chuck Runout

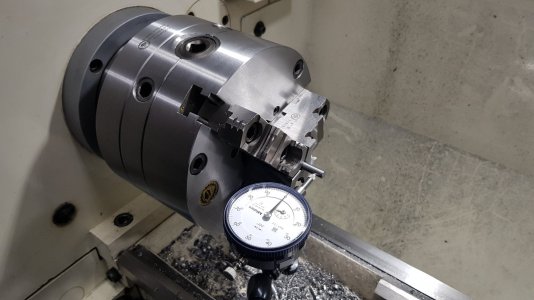
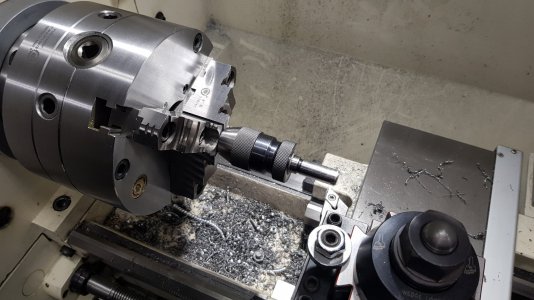
Here's a representation to give you a visual of what I was trying to say. But as you can see deflection can be a problem depending how big your chuck is & how much overhang there is (use tailstock support if needed but requires accurate setup also).

I would use the largest pin gauge or whatever that the drill chuck can hold to help with rigidity (if not using tailstock support). Doesn't even need to be something accurate, you could just chuck up a piece of stock, then take a cut so it will then be true to the lathe spindle axis, then you wouldn't even need to use a 4-jaw & indicate. Then mount the drill chuck. But this all assuming your lathe is adjusted so isn't cutting a taper either.

But remember scroll chucks don't have good repeatability throughout it's entire grip range. So if you were successful at truing it up gripping whatever size stock you used, it may not have the same accuracy at other diameters.
20221128_201735.jpg20221128_201923.jpg
 
Where your picture shows machining the chuck shaft, I don't have that. I have only a hole where the arbor screws in. So I would be machining the back of the chuck where it mates to the arbor. I can make a small spindle to go inside the chuck and center drill for support. I can use a piece of 1/2-20 bolt. I may leave the bolt long and use a center rest to dial in. I should need only a facing cut of a thousands or so to true up.

Interesting solution.
 
I'm not understanding why you need such precision if the arbor is going to be mounted to directly the shaft of a motor, I think that arrangement would introduce a fair amount runout, itself?
Anyway, if I were trying to accomplish this; I would start with an off the shelf arbor for a taper mount chuck and a straight shank. Then machine it to fit the motor and mount a keyless chuck. However, I think it would still have measurable runout.
Ultimately, a bearing block, spindle arrangement coupled to the motor by a belt or flexible shaft coupling would be the best for minimizing runout.
 
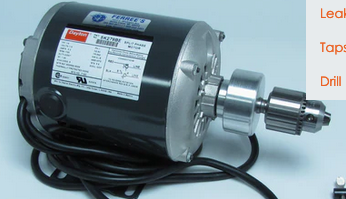
Here is a picture of approximately what I'm making. When I did the design, I decided against a JT3 taper spindle because there would be side loads grinding and buffing and I didn't want the chuck to deflect. I don't know what kind of motor you think this is going on, but all the Dayton and Baldor motors in my shop run damn true. This isn't going on a washing machine motor. Why am I being so fussy on precision? This is a "quality" chuck running on a dead perfect spindle in a lathe. No measurable runout. I expect a thousands or so runout, not 3-5 on the chuck. What you are saying is that if I put a drill in it and it spins around like a wiggler, just use it. Not going to happen. I like Darkzero's idea on how to true up the back. I was going to lap it or run across a stone, but it would save a lot of work. When I get down to 2-3 thousands runout at the drill, I will assemble the unit and make the counter weight. The motor came with a 1/2" shaft with a flat on it about 1-3/4" long.

Screen Shot 2022-11-29 at 9.08.32 AM.png
 
A sneaky trick would be to loctite the chuck onto the arbor with an undersized motor hole. Put the largest possible pin in the drill chuck and grab the pin in a lathe collet. Finish the motor hole; I would do a light shrink fit on this.
BTW, you may find the chuck back has a straight section for a pilot diameter.

Sent from my SM-G715A using Tapatalk
 
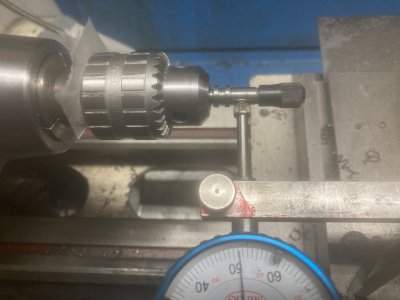
Update. I had some time to play with this. The picture shows 2 Zig-Zag papers under the back. A hair under .001. maybe .0008. That sets the chuck body runout at around .002. Checking different size dowel pins, the runout is between 1-1/2 & 2-1/4 thousands close to the chuck. Chucks have different runouts depending on size of drill. The Dremal adapter is a hair under .002 runout. I tried to check a number 43 drill, but the indicator was deflecting it. The drill runs straight by eye and the chuck is also not showing any signs of runout. This is perfectly usable.

Game plan is to wait until tomorrow for replacement chuck and see if it is any better.
Then make the permanent arbor and test fit the chucks. If I'm not close, then I will try to take a .001-2 cut on the back of the chuck to true it up.
I have a lot of material that could be removed if needed. I want to get this one done so I can move on to the Magnehelic tester.

IMG_0636.jpeg
 
What you are saying is that if I put a drill in it and it spins around like a wiggler, just use it.
Pardon, I wasn't saying that at all. I just didn't understand the expectation for such precision from the arrangement you described. Even Albrecht advertises their chucks to have a runout of around .0015" under the most ideal conditions.
Anyway, it sounds like you got dialed in now.
Good day.
 
Well you were looking for input from experts, which certainly isn't me, but I do have a couple comments regardless.

First thing I would do is check to see if the chuck jaws are remotely accurate. Chuck up a piece of 3/8 inch shaft in the lathe with about a half inch sticking out of the chuck. Turn that half inch stub down to 1/4 inch or so. Actual diameter doesn't matter much as long as it fits into your drill chuck, but make sure it's a good finish. Then tighten your drill chuck up on that 1/4 inch stub with the threaded end facing towards the lathe tailstock.

Then indicate the unthread portion inside the chuck for axial runout. And then check the back face of the chuck for radial runout. I would hope for sub-thousandth numbers for both of those readings. If you get good readings from the above, then the chuck is OK and your problem is elsewhere.

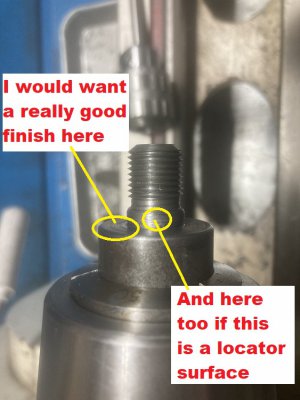
Next thing is that if I were expecting to use the back shoulder on the adapter as a reference locator, I would strive for it to have a reasonably nice surface finish. If I can figure out how, I attached a pic showing what I'm talking about:
IMG_0633.jpeg

And about the question of what actually provides the registration locator for the chuck onto the arbor. You said "I figured right or wrong that with nothing but threads to attach the chuck, that the back would be the reference surface." Well, it might be an extreme example, but I think you kinda proved with your first (die made, not single pointed) thread that the quality and perpendicularity of the threads ARE contributing to the location of the chuck in the end.

So considering that extreme example, maybe those die formed threads were so badly misaligned (angled) with the shaft centerline that the chuck threaded on at an angle, and maybe there was even a gap that could have been seen (under magnification maybe) on one side of the chuck where it contacted the perpendicular registration face? Long story short... The threads can clearly be so bad that they screw things up.

I've not messed with the threaded arbor chucks in a precision application either. Do you want the threads to be a loose fit so the back establishes perpendicularity and not the threads? But then what defines axial runout? The short unthreaded shoulder? Have you tried some sharpie or dykem on the back of the chuck to see where and how it makes contact with the arbor shoulder?

And lastly... This is all before you have slid your arbor onto the motor and tightened it down (with set-screws presumably)? If it's a sliding fit onto your motor shaft, there has to be some clearance there. And when you tighten down those set-screws, it'll probably pull all the slop to one side and jack things all wonky. BTDT.
 
My most expensive drill chuck is the worst piece of sh.... I have in my shop. I make most arbors myself and a runout less than 0.01 mm measured on the arbor is common. Measured on the drill chuck 0.06 mm is more common. The oldest (+20 years 13 mm Röhm) is the best, mostly 0.03 mm but not on all diameters.
For small diameters I use ER11 collets and I some times clamp a "C10 ER11 collet holder in an ER32 collet chuck.
In general, collets have less runout.
For low runout, you should use bits with laser marked descriptions not stamped.
 
Boxless, the grabbing pin in the jaws is a version of what Darkzero and Weldingrod1 is saying. I have not tried it yet because the test arbor is still in the collet. The original "good" arbor that I screwed up with the die, never seated. The threads cut so crooked that the back of the drill chuck touched the ledge and never went back to seat against the face. When I made the second arbor out of 5/8" 1018, I had a light press fit, but no face for the chuck to seat against, so it may need both.

The ledge or short piece of shaft was .001-15 under size so the back of the drill chuck could sit solid on the face of the test arbor. Threads were turned about .001 down at a time until the threaded part went all the way. I did not use the thread wires since it is a one time deal. The face was perfectly smooth, even if the picture looks chewed up. 1018 never really looks good even if you can't catch a fingernail. Going back and forth, the ledge and the face barely wiggles the needle on the indicator, which is why I couldn't figure out why the chuck was so far out. My thoughts were that the drill chuck would reference on the face. When I make the permanent arbor , I will start with a light press fit for the ledge.

After screwing around, I held a sharp pointed tool and touched the inside corner, so as to make certain there was no radius to hold off the drill chuck. That is why the ledge looks rough. When I started this, there was darn near zero run out as stated in the first post. After tapping slapping, wedging stuff and the shaft finally turned in the collet, the runout is .0001 at this time.

Huub Buis, the values you give is what I was expecting to see. I have made a half dozen shaft extensions for grinders and buffers to move wheels out. I typically get around .0002 runout max on the shaft. All my drill chucks on mill and 3 drill presses only run around .002-3 or less runout on the drill at the chuck.

Pardon, I wasn't saying that at all. I just didn't understand the expectation for such precision from the arrangement you described. Even Albrecht advertises their chucks to have a runout of around .0015" under the most ideal conditions.
Anyway, it sounds like you got dialed in now.
Good day.
If you read the first post, I said the chuck was around .005 runout and the drill was around .010 about an inch from the chuck. The drill was literally swinging around. No way it could touch a center punch mark.

I will make the permanent arbor in the next day or so. I will start with the ledge oversize and turn for press fit. If I run into the same problem, I will see about facing the rear of the drill chuck using the methods sugested above. I want to eliminate the cigarette papers, but it does add character to the job. :)
 
Back
Top