Anyone TIG weld bandsaw blades?

AGCB97

H-M Supporter - Diamond Member
H-M Lifetime Diamond Member
Joined
Apr 22, 2016
Messages
968
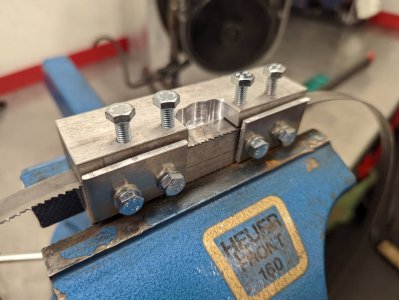
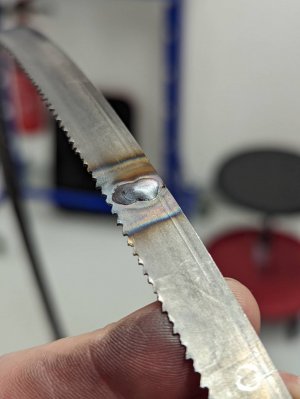
I have a bunch of bandsaw blade stock so wanted to try to learn to make splices. Possibilities were silver solder, braze but I thought I'd try TIG first. started by just doing a pass across a piece of blade and then testing its brittleness. Without any heat treatment it is quite easy to snap. Then started heating to blue color with a butane torch, various ways of cooling and after about 20 or so tries, it seems pretty strong. Now to build a little jig to hold things straight.
Aaron
 
Are you using any filler?
 
I haven't done it, but if I did, I'd fuse it with no filler like you did, then heat to red at the weld with a torch, and let it air cool. That's just about what a resistance blade welder with an annealing cycle does.
 
The best way I've found so far is to bevel both blades almost all the way through, clamp to a block of aluminum and use a .040 electrode with 1/32" filler and pulse. Just need to practice as it's easy to burn through on the edges. Thats where a jig might help also.
 
I haven't done it, but if I did, I'd fuse it with no filler like you did, then heat to red at the weld with a torch, and let it air cool. That's just about what a resistance blade welder with an annealing cycle does.
Ive made hundreds of blades and now make my own at home.

Of all the various methods I've seen co workers try and I've tried myself nothing has made the welded section more resilient than heating it to blue, then letting it cool slowly.

Heating it to a dull red would work also, but I don't see it being necessary and I might not trust it if cooled too fast from red.


For electric welders I mash the anneal button until it reached the dark blue I want, then tap it at intervals while cooling to prevent it cooling too quickly.


One of the key elements I have found to be helpful is paying attention to the tooth set and profile before beginning to weld. Cut the blade to length and then look for where you can have the tooth profile and set match, then trim back each end to that spot and weld. This does not need to be perfect, but if the tooth profile is the type that varies or your weld is a little off you can have one tooth stand proud of the rest right after the wend which will stress the wend in use.

If the blade is out of line when welded or there is a proud tooth after the weld you can dress this down with a hand grinder.

The little crack left open on the backside of the above pictured blade would be a no-no on a butt weld machine as it would lead to the blade breaking, but I have no idea if this follows over to tig welding blades, never done it.
 
Update on my success in welding bandsaw blades. I've now switched to MIG and with a lot of practice, I'm getting better.

Problems I've discovered are: 1. it's really hard to get close to the tooth edge without burning a few teeth away; 2. the blade wants to warp (becomes shorter on the edge that is welded 1st). This has nearly been eliminated by preheating with a propane torch and tacking the blade with alternating tacks on tooth vs back edge of the blade. 3. it's also very hard to get full penetration without burning through. So, I've found that after tacking one side of the blade, I grind it flat and then tack the other side of the blade, grind again, then anneal.

The 1st finished product is installed and seems to be doing well so far. These are on a Kysor Johnson model J saw with 11' 5" blades.

Aaron
 
Back
Top