EMCO Maximat 7 vertical mill - help with broken shifting lever

Jim SA

Registered
Registered
Joined
Mar 5, 2023
Messages
5
Hi Everyone, my first post here.
I just acquired a Maximat 7 7X17 mini-lathe and mill unit.
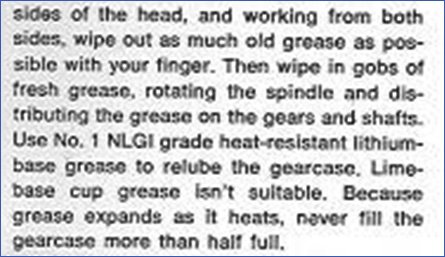
The lathe had been used a lot and is in good condition - I cleaned and relubricated and tightened everything according to the service recommendations in the manual.
The lathe seems to all work fine.
But the vertical mill had not been used for some time - all the grease in the gear head was thick and stiff, and the gears were jammed.
Taking the gear box apart, I found all the gear teeth to be intact (yeah ! ), but they had been re-assembled incorrectly.
With the help of the parts manual and a YouTube video, I was able to get the gears back together properly.
Now the right hand shift lever works fine.
All the gears now shift through all the speeds an turn easily. (though I have not run them under power yet)
But the left hand shift lever is missing - well sort of missing - the broken pieces are in a small box that came with the mill.
I have enough of the pieces to make an accurate template to make a new shift lever.

Has anyone done this - and any advice?
The original was a soft cast metal that was not up to the task. (maybe the grease had become too thick ?)
I'm thinking of making the new one out of thick aluminum.

Any suggestions or references ?

Thanks
Jim
 
Aluminum should work fine, I would think. Emco used some zinc/aluminum alloys in a few places
 
Thanks Mark - I've got a block of aluminum, and am working my way through the process.
I've measured the broken parts, and made a diagram with all the dimensions.
It looks like there is room to beef up the size of the swing arm portion (the weakest link)
If anyone else has done this, I'd sure appreciate your experience and suggestions.
Having fun so far...
Jim
 
there is a youtube video of someone making shift lever for the lathe gear box.. I happen to have my Maximat 7 milling head apart for cleaning and bearing replacment,, can I measure anything for you? Or pictures of parts? before I put it back together? mine is the 4 speed milling head. I am also curious, does the counter weight on top of your motor just pull off? there is hole in the shaft, but no where for a pin . I only noticed this because I removed the plastic cover for clearance of a C-clamp to push out the 6004 bearing in the top cover..
Scott
 
Hi Scott - thanks for the offer of photos. I've completed making a big thick aluminum lever for the left hand, and it works really smooth - pretty happy with that one. The right hand side is trickier with 3 gears all very close to the lever - so I'm going to take the milling head gears apart (again) to measure.
But I am interested in the bearings - what are you using, and where did you source them?
And the counter weight - hmm - I don't have any.
I just dug into the Spare Parts List booklet, and realize I don't have a cover or fan or flywheel.
Here is a copy - It looks like the FFD model (produced after 1968) is the only one with a flywheel, and it looks like there is no pin holding it in.
Hope that helps
Jim
 

Attachments

  • Emcomat 7 Milling Head motors.pdf
    432.8 KB · Views: 68
appears I'm asking about the "Fan" it's definitly be balanced as it has holes in it.. but they is no "lock pin" as in your diagram, nor is there space protruding above the fan in insert one..
When I was given the lathe/mill last year, the mill head was very dry inside as was the lathe head stock.. 'UGGGGG"
I cleaned and replaced the oil in the head stock.. everything runs great on the lathe side..
I dug out what I could from the milling gearbox and stuffed it full of grease.. but would intermitantly get a screaching sound like a dry bearing..
The previous owner said he NEVER used the mililng head, only the lathe.. but the prevous owner was a machinist and surely used it as it came with a pile of end mills and MT2 adapters for multiply sized end mills.
To the present: this week I tore into the milling head and cleaned everything up.. I'm only replacing the bearing that the end of the moter shaft rides in the the bearing a top of the gearbox that the quill shaft rides in. I'm not taking the quiil apart.. There is are some needle bearings inside one of the gearsets. I'm hoping that was not source of the noise. It's held in place by an interanal snap ring with no holes.., and I afraid that I will distroy the bearing while removing the snap ring.. so I'm putting a good amount of grease worked into them before I put I back together. fingers crossed.
The bearing the motor shaft was suspect, the bearing the top of the quill rides in seemed fine, but for $10US I'm replacing it..
Did you "blue print" your lever? By that I mean details of constuction and final demensions.
Here are some pictures of everthing I got with the lathe/mill.

https://www.hobby-machinist.com/thr...nd-tool-holder-alternatives.99602/post-946449

https://www.hobby-machinist.com/threads/xmas-in-march.105447/

here is a picture of my "fan" on the motor..

IMG_20230412_102717167_HDR.jpg
 
Hmm - that looks different than the drawing. The ID plate on mine is pretty damaged, but I can read that it is an FFD model built by WIEN & is 115 volt. Here is a photo of what is sticking out of the top - you can see the hole in the shaft.

My mill was also "unused" as the previous owner had a larger mill - but it had a broken left gear shift lever, and bent right lever that was jamming the gears - and there were at least two different types of old grease in the head. (so it definitely had been used). I took it all apart and luckily all the gears are intact. Cleaned everything really well and reassembled using #0 grease (John Deere Corn Head Grease - that was recommended somewhere on a forum). It seemed the #0 was too liquid, as everything ran quiet for 30 sec, then started squealing/vibrating. Watching with the covers off (and face full of grease) it looked like the gears were spinning the grease off, leaving them with no lube. I assumed that the noise was coming from the gears. I've read elsewhere that the type of grease is fairly critical, and what is recommended is #1 NLGI grade heat resistant lithium based grease. It was not available locally, but just got some in from Chevron labeled EP1 that is thicker than the #0, but as softer than the usual #2 grease.
I'll finish making this second shift lever, then reclean everything again, and reassemble with the #1 grease.
It that doesn't solve the noise issue, then maybe I'll need a new bearing as well.

Where did you get your $10 bearing from ?

Jim
 

Attachments

  • IMG_2839.jpeg
    IMG_2839.jpeg
    123.7 KB · Views: 50
  • image001.jpg
    image001.jpg
    54 KB · Views: 44
We have a bearing store here in Sarasota, but Amazon has the top Bearings 6004Z for

2PACK TIMKEN 6004-ZZ Double Metal Seal Bearings 20x42x12mm, 15$US, i bought mine locally for $10 each (one need one) and the motor shaft bearing for $7 locally.. the Timiken 6000z bearings are 4 for 24$ on Amazon.

My motor shaft looks just like yours..

IMG_20230411_100917891_HDR.jpg

 
Hey Scott - how is the bearing replacement going - did that solve the screeching sound?
I finished making both levers and tested each dozens of times to get the clearance to the surrounding gears correct.
They all run really smooth when turning by hand - and shift thru all the speeds easily.
I greased the gears with the #1 grease, and did a test run - it ran smooth for 2 min then the same loud squeal/growl again
I then completely packed the head with grease (as has been recommended) - and it ran for 10 min quietly - thought I had it made - then the loud noise again. Sounds like it is coming from a vibration in the quill, but hard to tell.
How did you make out - was that bearing in the top of the quill shaft difficult to remove ?

I've got sketches of the levers, but didn't make blueprint drawings - I can send you photos if you like.
I'm sure there is an easier way of making the levers - but these appear to work well

Jim
 
In the process of getting things back together , I have managed to lose one of the bronze shift pads (UUUUUGGGGG)
I have the gearbox back together and was leaving the shift levers out, so I could .. have my friend (draftsman) with a 3D printer, measure draw the shift forks into a 3D format as we could printer them in carbon fiber...... When I grabed the two shiftforks to put them in my truck, half way there I realized I had put the bronze pieces on the forks and now one is missing... So, I'll have to make one, before I can put it back together..
I cant find any source for the pads already made.. should be easier than making the arms..
I would love to see photos of what you made..
as for the two bearings I replaced, I pushed the the larger one right out with a couple correct sixe sockets and a c-clamp.. the other had to be snatched out with a blind puller. my email is noyesscott@gmail.com
 
Back
Top