- Joined
- May 3, 2020
- Messages
- 229
Last year I purchased (a great expense) the Haimer 3D. Nice unit but it's gigantic and requires too much knee action. I've seen others complain about the length so I thought I'd share my solution. It's still long compared to an edge finder in a collet but at least its' not 2x the length of a drill chuck!
I have the Haimer mounted in a tool holder. I suppose collets are acceptable and lower profile but I really prefer not to use collets for tool holding if I can at all help it. It just seems better to install the probe in a tool holder, zero it out, and rely on the key in the spindle to make sure it's clocked correctly. It's a matter of opinion, I suppose. ANYWAY, the 3/4 tool holder is contributing to the length problem so I decided to cut it down to minimum. Here's some pictures of the project.
First, for length comparison. The un-modified 3/4" tool holder is shown along with the modified version. Note how long the Haimer would be (mounted in the un-modified tool holder) compared to even a drill chuck, which already requires quite a bit of Z height.

One of the reasons I didn't start on this project was worries about the hardened steel in the tool holder. It was hard but not too hard for a carbide-insert cutoff tool on my 9x20 lathe. However, boring the 3/4 hole deeper was extremely difficult. I concluded that it was too hard to turn, even with a solid carbide boring bar and fresh insert.
So I decided to try making a CBN tool. I had recently purchased some used CBN inserts. The tips are a half round of sorts. The shank is a bar of pre-hard 4140. I turned it down a bit and cut a shelf for the insert so that the cutting edge would be on the center line. Then it was off to the welding table to braze the tip on with 56 % silver solder using black flux and MAPP gas torch. I wanted it to braze the bottom and back but the braze metal doesn't interact with the CBN itself, only the backing material.


The CBN tool was much better. I still got quite a bit of vibration. The tool post and carriage seemed solid but the headstock was vibrating to the point that I could feel it on my fingertips. The pattern in the bore has shown up on other projects when I use my 6" 4-jaw chuck. I thought the problem was bellmouth jaws so I mounted the work with thick copper shims to take up any gap along the length of the jaws. It didn't make any difference. I had no other way to hold the work because I needed to grab the tool between the bearing surfaces of an R8 collet, on the black portion in the picture above. The bore on my lathe is not large enough to fit the tool holder so I was stuck using this bad setup. But at least the CBN tool was cutting. I eventually used a solid carbide grooving tool with a lot of positive rake to take some very light finish passes.


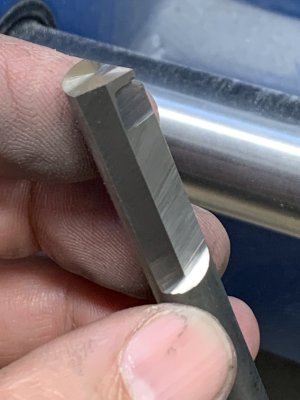
The post on the Haimer is fairly long, almost 2". It was all I could do to bore 1" deep in the tool holder. So I disassembled the Haimer and cut off the post. There's a socket head cap screw holding it on and there are little set screws around the perimeter to adjust center. If you look carefully, you can see the flats on the sensor. The post was very hard and it was an interrupted cut. I tried my Shars insert parting tool and had all kinds of trouble. Sometimes it would cut, then it wouldn't. Maybe the interrupted cut chipped the insert. So I honed the edge and tried again. At one point, it cut for a while, then stopped. I moved over a bit and then cutting was easy. I adjusted center heigh, locked and snugged this and that but couldn't make it work. I tried winding it into the work fairly hard, a trick that sometimes works. But this revealed a weakness in my cross-slide to the point that it was visibly moving (maybe 0.050) with every pass of the flat on the work. I'll have to figure that out at some point. So I made another CBN tool. It's a chunk of CNB on a solid carbide shank. My beginner's luck was running out, though. The tip broke off. But the carbide shank ended up cutting pretty well. I think the problem was the parting tool holder just wasn't rigid enough for the carbide insert to do its job.


Assembly was a hassle, too. I was aiming for about 5 tenths interference fit. I think that may have been too much, especially given the less-than-perfect finish on the tool holder. After jamming it on twice, I took a skim cut on the tool holder and settled for Loctite 609. And apprentice's end to a long project but a good start to another year of machining. Cheers.
I have the Haimer mounted in a tool holder. I suppose collets are acceptable and lower profile but I really prefer not to use collets for tool holding if I can at all help it. It just seems better to install the probe in a tool holder, zero it out, and rely on the key in the spindle to make sure it's clocked correctly. It's a matter of opinion, I suppose. ANYWAY, the 3/4 tool holder is contributing to the length problem so I decided to cut it down to minimum. Here's some pictures of the project.
First, for length comparison. The un-modified 3/4" tool holder is shown along with the modified version. Note how long the Haimer would be (mounted in the un-modified tool holder) compared to even a drill chuck, which already requires quite a bit of Z height.
One of the reasons I didn't start on this project was worries about the hardened steel in the tool holder. It was hard but not too hard for a carbide-insert cutoff tool on my 9x20 lathe. However, boring the 3/4 hole deeper was extremely difficult. I concluded that it was too hard to turn, even with a solid carbide boring bar and fresh insert.
So I decided to try making a CBN tool. I had recently purchased some used CBN inserts. The tips are a half round of sorts. The shank is a bar of pre-hard 4140. I turned it down a bit and cut a shelf for the insert so that the cutting edge would be on the center line. Then it was off to the welding table to braze the tip on with 56 % silver solder using black flux and MAPP gas torch. I wanted it to braze the bottom and back but the braze metal doesn't interact with the CBN itself, only the backing material.
The CBN tool was much better. I still got quite a bit of vibration. The tool post and carriage seemed solid but the headstock was vibrating to the point that I could feel it on my fingertips. The pattern in the bore has shown up on other projects when I use my 6" 4-jaw chuck. I thought the problem was bellmouth jaws so I mounted the work with thick copper shims to take up any gap along the length of the jaws. It didn't make any difference. I had no other way to hold the work because I needed to grab the tool between the bearing surfaces of an R8 collet, on the black portion in the picture above. The bore on my lathe is not large enough to fit the tool holder so I was stuck using this bad setup. But at least the CBN tool was cutting. I eventually used a solid carbide grooving tool with a lot of positive rake to take some very light finish passes.
The post on the Haimer is fairly long, almost 2". It was all I could do to bore 1" deep in the tool holder. So I disassembled the Haimer and cut off the post. There's a socket head cap screw holding it on and there are little set screws around the perimeter to adjust center. If you look carefully, you can see the flats on the sensor. The post was very hard and it was an interrupted cut. I tried my Shars insert parting tool and had all kinds of trouble. Sometimes it would cut, then it wouldn't. Maybe the interrupted cut chipped the insert. So I honed the edge and tried again. At one point, it cut for a while, then stopped. I moved over a bit and then cutting was easy. I adjusted center heigh, locked and snugged this and that but couldn't make it work. I tried winding it into the work fairly hard, a trick that sometimes works. But this revealed a weakness in my cross-slide to the point that it was visibly moving (maybe 0.050) with every pass of the flat on the work. I'll have to figure that out at some point. So I made another CBN tool. It's a chunk of CNB on a solid carbide shank. My beginner's luck was running out, though. The tip broke off. But the carbide shank ended up cutting pretty well. I think the problem was the parting tool holder just wasn't rigid enough for the carbide insert to do its job.
Assembly was a hassle, too. I was aiming for about 5 tenths interference fit. I think that may have been too much, especially given the less-than-perfect finish on the tool holder. After jamming it on twice, I took a skim cut on the tool holder and settled for Loctite 609. And apprentice's end to a long project but a good start to another year of machining. Cheers.