- Joined
- Feb 15, 2015
- Messages
- 1
Hi,
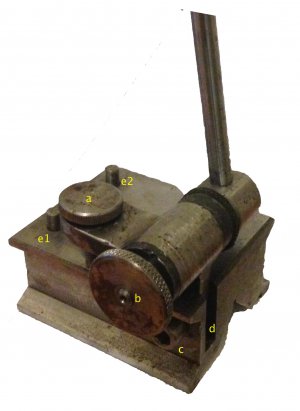
I got this surface gauge at a shop in my town (Alexandria, Egypt). I just took a photo and labelled it. I've left out the top part of the photo.
It is second hand, clearly, and been used a lot.
I understand the following parts (please correct me if wrong):
a) fine tune adjust
b) main adjust
But I don't understand these parts
1) The screw (c) allows the entire arm to be removed or to swing down through slot (d) up to 90 deg.
Why would this be useful since the main adjust (b) already does this.
2) the pins e1 and e2 extend upwards. I thought they were supposed to extend downwards underneath the piece to hang onto the edge the surface plate. Underneath there are non-threaded cavities of the size of the pins, but the pins don't easily move down (could be stuck with rust?) and there is no evidence of banging on top of the pins that would indicate they were sometimes pressed down into these cavities.
So why the pins, and why the cavities?
3) the gauge is very heavy. I thought that they needed to be light so you could move them along a surface to scratch a line.
So is this a regular surface gauge or an unusual one?
There is no stamp or writing on the gauge. The shop sells a lot of ex-Soviet machinery tools (from the 1960's). There are no USA products here.
Could anyone explain the bits I don't understand?
Thanks,
Tim


