How to Paint Projects (in Less Than a Month) Without Brush Marks

Chips O'Toole

H-M Supporter - Gold Member
H-M Supporter Gold Member
Joined
Jun 15, 2017
Messages
525
Greetings. I have not posted before, but I have some experience with other machining forums. I hope I can be a useful contributor here.

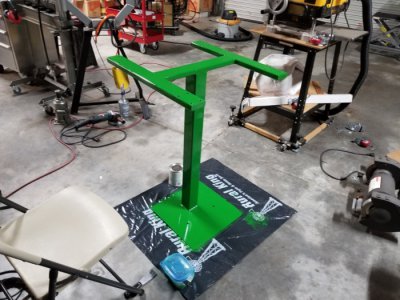
I am working on a mobile base for a bench grinder. I welded it together, and I've been painting it for what seems like forever. I tried to do it right instead of slapping a coat of Ebay-blue spray paint on it and letting the drips fall where they might. I used brush-on Rust-Oleum tractor paint because I knew it was very durable.

It has been quite an odyssey. I have been told a number of new things. For example, I've seen people saying it's a waste of time to prime under this paint. They say it wears like iron and sticks just fine with no primer, and that's distressing, because priming was a major pain in the butt.

I've also seen people saying the EPA is the reason I have brush marks. They say the EPA forced paint manufacturers to change their formulas to reduce volatile organic compounds. Supposedly, this causes paint to form a skin quickly, and that leads to brush marks even if you do everything right. I have been told the answer is to add a product called Penetrol, which, of course, adds volatile organic compounds and undoes the evil perpetrated by the EPA. I added some Penetrol to the paint, and it seemed to help, but I already had some paint on the project, so if Penetrol helps, it will only reduce the problem, not solve it.

I am wondering if anyone here knows the real answers.

What with the primer (white, so I have to use more coats to cover it), the brush marks, and the Penetrol, it's taking me an eternity to finish this job.

This base will be done in about two days, regardless, but I plan to make other projects in the near future, so it would be good to pick up useful information.
 

Attachments

  • 11 09 19 dayton grinder pedestal stand base mostly painted small.jpg
    11 09 19 dayton grinder pedestal stand base mostly painted small.jpg
    241.8 KB · Views: 41
Yup, paint is not what it used to be that's for sure.

I used to use Floetrol (equivalent of Penetrol or similar) and it does help the paint to flow out some. It doesn't get you back to the smoothness of the two-day-dry-time of the old enamels though.

I prefer to prime with a neutral grey body primer which is dead flat and also has fairly good fill characteristics. Failing that, and if you're buying your primer in a can, the paint store can tint it for you. We rarely use a full-on white primer for any work anymore and get everything tinted beforehand.

As for the rest of the story, I'm not sure. I know there's a lot of pressure from industry to have fast dry times so two or three coats can be done in a day. Makes for faster jobs, and given that almost everybody sprays or rolls I guess it makes sense. For the guys that hand-brush though, it's a challenge.

Lastly, a good brush cannot be beaten for quality of finish. Bestt-Liebco, Purdy are a couple available around here. Your choices may be different.

-frank
 
You should try Majic Diamond Hard acrylic enamel. It flows beautifully and dries hard and sticks to almost anything. Best part is it cleans up with water.

I have used it on a number of projects and have never been displeased with it. I've never seen a brush mark with it. The only "problem" is the limited color pallet.

Gloss WhiteOff WhiteSandy BeigeDark BrownLight YellowRed
Oil-Floor-150x150.jpg
dh-150x150.jpg
dh2-150x150.jpg
dh3-150x150.jpg
dh4-150x150.jpg
dh5-150x150.jpg

Royal BlueMachine GreenNavy GrayBattleship GrayGloss BlackSatin White
dh6-150x150.jpg
dh7-150x150.jpg
dh8-150x150.jpg
dh9-150x150.jpg
Color-Swatches-PRO15-Black-150x150.jpg
Oil-Floor-150x150.jpg


Satin BlackGray PrimerRed Oxide PrimerCharleston Green
Color-Swatches-PRO15-Black-150x150.jpg
dh10-150x150.jpg
dh11-150x150.jpg
dh12-150x150.jpg

Majic Diamond Hard
 
My experience is in using boat paints. These paints are intended to be brushed on. Pettit EZpoxy and Interlux Brightside are the easiest to use. There are special brushing thinners that you have to use. And you can only do small areas unless you are a true pro. I only mix a cup at a time. Any more than that and it starts to go off before you can get it on. You have to use very high quality brushes. My brushes cost over $30 each. Even the supposedly high quality brushes from the big box stores aren't any good. Surprisingly you can sometimes get acceptable results with foam brushes. But in the long run you will end up spending more money on the foam brushes than buying good quality brushes. I have dedicated brushes for each of the colors on my boat and for varnish. And there are tricks of the trade like anything else. How you hold the brush when you paint and even how you dip it in the can all have an effect on the quality of the job. One of my friends painted his car with a brush. It looked like it had been sprayed. Not a brush mark to be found anywhere.

So yes it is possible to paint without getting brush marks.
 
Thin the paint,very light coats and most important a good brush,not some Home Depot or harbor freight 5 dollar one.
 
With oil based paints, put on with a brush, it is important to put a full coat of paint on (a 'wet' coat), get it smoothed out, and then get away and stay away from that area. Plan the work so you are never mixing fresh from the can paint with paint that has been standing even a short time. Keep the wet edges moving forward, smoothly spreading the paint away from previous areas. Finish an area nicely and then resist going back. It also takes some practice on how to hold and use the brush, and on how to start and end contact with the work. Amazingly, the best work goes hand in hand with a fast but careful job. Again, keep moving ahead, use enough paint, level it evenly, and move on. 50 years ago, it seemed like half the population could do beautiful brush work. Now, it is becoming a lost art.
 
I flipped the base over to finish the top, and somehow paint had flowed under the edges. I had to remove damaged paint and start over. Don't know if it's going to work. The new paint will stick, but I don't know if I can get it to level with the old paint. I guess I should have stripped the entire top. Maybe that's what I'll be doing tomorrow.

This is much harder than machining. Everyone is impressed when someone says he can run a lathe or mill, but painting is way harder, and no one is impressed by it. Strange.
 
Last edited:
I MAY be finished with the grinder pedestal. I took what was probably a stupid approach to fixing the problems with the damaged paint on top. I was determined to avoid stripping the entire top, so I decided to try wet-sanding. I kept applying layers of paint, sanding in between to flatten it out. It does work, but I guess it's obvious that stripping and repainting would make more sense.

I jacked up the ratio of Penetrol to paint. It looks like you need maybe 20% to make Rust-Oleum implement paint lie down. Blew over $10 on a snazzy new brush.

I'm really hoping I can bolt the grinder on tomorrow.

My big painting problem now is that as soon as I finish applying a coat, one bug flies over and dies in the middle of it. It's never two bugs. It's always one. They sit and wait so they can commit suicide on my grinder pedestal.

Today I bought steel for an arbor press stand. I just got myself a Klutch welding table with clamps and so on, so I feel pretty cocky.

11 22 19 dayton grinder pedestal stand with final paint small.jpg
 
I have been painting everything with Rust-Oleum Hammer Finish paint. Literally smear it on with cheap chip bushes or a roller. When dry it seems to be really hard and looks great, assuming you like the hammer finish look and can live with the limited pallet. Has worked well for me over the last 10 years or so. YMMV.
 
I have used the spray version. At first, I thought it was great. Then I learned that it takes weeks to really harden. It seems okay after that.
 
Back
Top