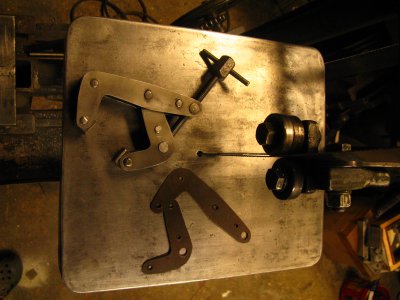
That looks awesome. Any chance of getting a scaled pic of the templates you used?
I'd like to make some myself but just can't see buying one to disassemble to use for template.
Those clamps are not cheap to buy. Especially the 4" to 6" size.
Mike,
I can give you measurements and such if you like. If you look at a bunch of photos on the web however, you will find that there
are many shapes of jaws out there as well as position of the pivot point. Seeing the variations tells me that shape and pivot point
is somewhat acritical (not carved in stone). The easy way is to grab a piece of stiffish paper and draw out your proposed
shapes in the size you want to make. Use a pin or nail for testing and verify that the paper jaw meets and the pinch point
and that it will open far enough for your purpose. Once you have the shape and the pivot points marked, you are ready to
carve out the shapes. I used 100 thousandths material as it is what I had in my metals. If I were to make a huge clamp,
I would use somewhat thicker material, probably 3/16 mild steel. Common 1/8 inch material would be a little heavy for
a 2 inch clamp, .065 to .075 thickness would make a less clunkier clamp. Spacing between the parts isn't critical either.
I used 0.4 spacing on the moving jaw and 0.65 inches on the stationary larger part. The threaded part was made with
some 3/8 all thread silver soldered to a piece of hex. One could make it easily with a 3/4 inch piece rod in my case but
for a test clamp, it works just fine. This whole project came about when I learned I could make a lot of shapes using
the metal band saw in vertical mode with a horizontal table to work on. One could use a mill to make the arms but a
lot more work. All the points on the clamp are riveted with the exception of the two free floating pins that the threaded rod
passes through. I'm using a one inch wide band saw blade so it won't follow exact curvatures so I roughed it out to start
and cut away small pieces to the the approximate shape and followed up with a disc sander. That's the basic details.
If you still want my dimensions, I can provide them for you, just let me know. One other thing. when you drill the holes,
be sure to clamp them and drill them in pairs so the holes are in exact alignment! I used a vise grip to hold the pairs
of parts when drilling 1/8 inch starter holes, then bolted the pairs together with 6-32 bolts and off to the disc sander.
If the holes are not all equidistant, the clamp is sure to bind up. Once done shaping the arms, unbolt the parts and
drill out the holes to size. One other thing, I used steel for the business end of the clamps rather than brass or copper.
I couldn't see much sense in using copper or brass. I have a little brass but considered it a waste for something that
just pinches. If I were worried about marring, I would slip a piece of paper between the jaws and the work. If you don't have a band saw, a jig saw with a bimetallic metal balde would
work fine too.
That's the details.

Give it a go.
 Today I got to use the new vertical freehand band saw attachment to make a "Kant Twist" clamp,
