
I’m working on designing a receiver for my Marauder air rifle to incorporate a side lever bolt and want to have a Picatinny rail for the scope mount instead of a dovetail. I know I can buy one, but the whole point of having machine tools is to make it myself. I found a gage for checking the rails after manufacture, but haven’t found any in process gaging techniques that I could use to verify as I am machining it. Is there anything commercially available, or something I can make that would measure my progress?

-
Welcome back Guest! Did you know you can mentor other members here at H-M? If not, please check out our Relaunch of Hobby Machinist Mentoring Program!
You are using an out of date browser. It may not display this or other websites correctly.
You should upgrade or use an alternative browser.
You should upgrade or use an alternative browser.
Measuring Picatinny rails
- Thread starter Ischgl99
- Start date
I don’t see how that would work, a quick change holder can retain the measuring pins in the dovetail, with this, there is nothing to restrain them. The following picture is the shape that needs to be measured.

- Joined
- Oct 14, 2014
- Messages
- 1,970
duno if this helps you, but they sell two custom endmills just for rails. Makes this job duck soup easy.With these the tolerances are not at all tight as they do the form for you.
i found a better price but here's the form cutter
there is one for the slots also.
i found a better price but here's the form cutter
there is one for the slots also.
- Joined
- Jun 7, 2019
- Messages
- 359
This is going to be a little tricky to do a real good job on the QA. What measuring tools do you have available? Hopefully a surface plate and a height gage, micrometer, gage blocks. A Starrett 260Z groove mic would be helpful. As would be 220xfl multi-anvil mic. But not necessary. Gage blocks can be used to check the grooves. Many of the dimensions could be measured with the height gage off the surface plate. Angles could be checked on a sine bar/plate with a 10th indicator. Figuring out the setups is the fun part of metrology. It takes a long time to do well, which is why custom gages are so valuable to production and companies spend big bucks on CMM’s.
For “the top”, it would seem plausible to clamp the rail to a bar wide enough to retain the pins but not get in the way of the measuring tool. Some math will give you a number to hit. I suspect the cutter will yield correct angles on both surfaces - I didn’t know they had rail specific cutters that will do both at the same time, I do know they have double sided cutters (double dovetail cutter?)where the top and bottom comes to a point in the middle. If the angles are correct, then the width across the rail becomes the gauge number you are looking for. Then heights to other features. The rings tighten to one side, which accommodates for the tolerance. Not a high precision part, getting the mounting holes to the receiver correctly aligned may be more important to the function, but you’re looking at the whole system and will have more insight.
I was looking at the form cutters designed for this, that does make this fairly easy for the angles. I already have 45 degree cutters, so it would be nice to use those instead of getting new tooling. I watched a video of a guy using the Picatinny cutterto make the rail, but he just moved over from the center axis the required dimension and cut one side, then moved over and cut the other side. He didn’t measure anything, so I was wondering how you could verify you went far enough with cutting the first side instead of relying on your calculations. A thought just came to me, since it cuts the recess below the angled part at the same time, you could probably measure that distance from the edge to see if you went the proper depth, and then measure the width after the final cut.
I have a surface plate, height gage, depth mics, mics, pin gages, but don’t have gage blocks or a sine bar yet. I wasn’t even thinking of the grooves in the top yet, I will probably need to get something for that even if it is just go / no-go blocks.
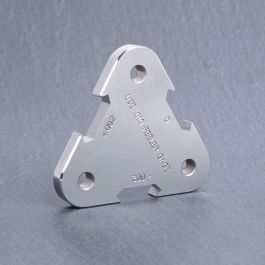
This is the gage I found that can be used to check once finished that I mentioned above.
 www.egwguns.com
Thanks for the ideas, I’m probably over thinking this, so when this project gets further along, I’ll have to experiment some and see what I can do with what I have and then look at the form cutter.
I have a surface plate, height gage, depth mics, mics, pin gages, but don’t have gage blocks or a sine bar yet. I wasn’t even thinking of the grooves in the top yet, I will probably need to get something for that even if it is just go / no-go blocks.
This is the gage I found that can be used to check once finished that I mentioned above.
EGW Certified Picatinny Rail Gauge
This picatinny rail gauge is certified to be in picatinny spec. It is measured with gauge pins, gauge blocks, and a keyence microscope to ensure the tightest tolerances. Instructions:This gauge allows you to check if your picatinny is within +/-.002" of p
www.egwguns.com
Thanks for the ideas, I’m probably over thinking this, so when this project gets further along, I’ll have to experiment some and see what I can do with what I have and then look at the form cutter.
Or just grind a flycutter from a 2 flute end mill, using only 1 flute, with the required geometry.Thanks for the ideas, I’m probably over thinking this, so when this project gets further along, I’ll have to experiment some and see what I can do with what I have and then look at the form cutter.