- Joined
- Jul 28, 2017
- Messages
- 2,381
Over the last month or so I've been working on a mold to cast some gaskets out of high temperature silicone for our old gas stove.. These days apparently any appliance over 10 years old qualifies as nearly obsolete, and replacement parts become either impossible to get or impossibly expensive; or they're pre-owned and may not hold up very long. Anyway, the basic problem is that the burner valves have a separate output for the simmer flame and over time many of the small orifices have become plugged. I actually found some replacement valves (for $$$), but suspecting that's an anomaly, I want to refurbish the old ones I pull out of the stove as I swap the newer ones in. However, the gaskets that form the seal between the valve and distribution manifold are made of relatively soft plastic, and once they're removed they are trashed. Natch, I couldn't find ANYONE selling just the little gaskets. Sooooo..... I decided to make my own. And that's the subject of this post. This is my first attempt at being a mold maker and I learned a few things along the way, but it looks like I will get some usable gaskets for all my effort.
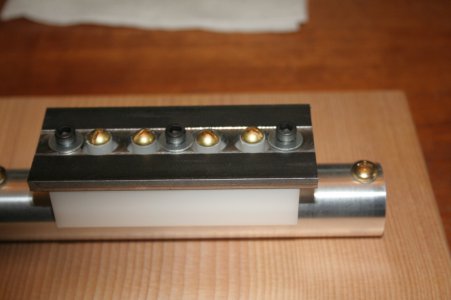
Here's a photo of my mold, ready for the 2-part silicone:

The body is a 1" diameter aluminum rod I turned and polished on my lathe. To reduce waste I turned between centers (I made my own lathe dog for that, too). The white plastic piece is made of UHMW polyethylene -- I figured that it would be best to get the gaskets to release. I used a home-made boring bar to form a .5" radius so it would seal against the aluminum rod.
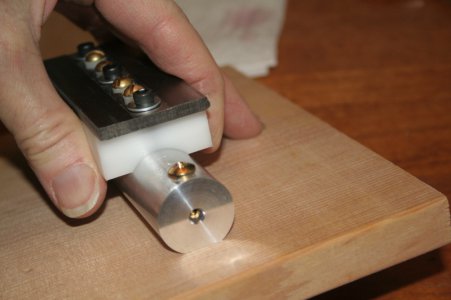
Like this:

I actually made the radius just a hair less than .500" so when I screwed the steel clamping piece down the plastic would spread out a bit and (hopefully) form a good seal so my molding compound wouldn't leak out. That worked. I did put a very thin coat of mineral oil on all the surfaces that have to release the gaskets once the compound had set up.
BTW, the gas distribution manifold in the stove is a 1" pipe, that's why one side of the gasket has to be curved. I puzzled a long time over how to get that radius & decided this would be the best approach.
The whole thing is screwed down to a piece of scrap wood to make sure the mold doesn't tip over when it's filled with molding compound.
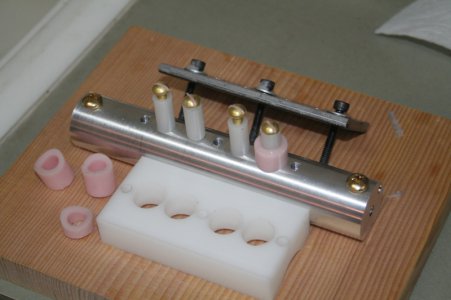
The through-hole for the gasket is made by installing small high-density polyethylene posts in the center of each cavity. I also used my boring bar to get the same radius on the bottom so no molding compound would get underneath the post. That also worked out. Getting lucky I guess .
.
And here's the final result, some gaskets that just need to be trimmed to the proper thickness. It was a PITA to get the very-thick silicone molding compound into the gap between the mold body and post. Fortunately the long curing time allowed the silicon to (slowly) flow all the way around the posts. I'm going to make more of these, to take advantage of the fresh batch of silicon molding compound I bought. Even the "trial size" was pretty expensive. But for future renditions I bought some disposable 10cc syringes and some blunt-tip #18 needles. That should make it pretty easy to get the silicone in there without too much of a hassle. So he sez.....

If I was to do this again I would replace those #8-32 brass screws with shoulder bolts. There's too much slop between the screws and holes in the posts so the center holes aren't all that well-centered. I'm pretty sure the gaskets will work OK but I know I can do better (next time).
Here's a photo of my mold, ready for the 2-part silicone:

The body is a 1" diameter aluminum rod I turned and polished on my lathe. To reduce waste I turned between centers (I made my own lathe dog for that, too). The white plastic piece is made of UHMW polyethylene -- I figured that it would be best to get the gaskets to release. I used a home-made boring bar to form a .5" radius so it would seal against the aluminum rod.
Like this:

I actually made the radius just a hair less than .500" so when I screwed the steel clamping piece down the plastic would spread out a bit and (hopefully) form a good seal so my molding compound wouldn't leak out. That worked. I did put a very thin coat of mineral oil on all the surfaces that have to release the gaskets once the compound had set up.
BTW, the gas distribution manifold in the stove is a 1" pipe, that's why one side of the gasket has to be curved. I puzzled a long time over how to get that radius & decided this would be the best approach.
The whole thing is screwed down to a piece of scrap wood to make sure the mold doesn't tip over when it's filled with molding compound.
The through-hole for the gasket is made by installing small high-density polyethylene posts in the center of each cavity. I also used my boring bar to get the same radius on the bottom so no molding compound would get underneath the post. That also worked out. Getting lucky I guess
And here's the final result, some gaskets that just need to be trimmed to the proper thickness. It was a PITA to get the very-thick silicone molding compound into the gap between the mold body and post. Fortunately the long curing time allowed the silicon to (slowly) flow all the way around the posts. I'm going to make more of these, to take advantage of the fresh batch of silicon molding compound I bought. Even the "trial size" was pretty expensive. But for future renditions I bought some disposable 10cc syringes and some blunt-tip #18 needles. That should make it pretty easy to get the silicone in there without too much of a hassle. So he sez.....

If I was to do this again I would replace those #8-32 brass screws with shoulder bolts. There's too much slop between the screws and holes in the posts so the center holes aren't all that well-centered. I'm pretty sure the gaskets will work OK but I know I can do better (next time).

