- Joined
- Feb 2, 2014
- Messages
- 1,208
In April of 2016 I started an end mill sharpener project.

 www.hobby-machinist.com
It did work but just not very well. I received some suggestions from members on how to make it easier to use so I made some modifications in September, 2016.

 www.hobby-machinist.com
That helped a lot and that is how I have been using it since.
In the last 5 years my machining skills have improved greatly and when a friend asked to sharpen an end mill a while back I said sure but as I was setting up the sharpener for him I realized just how rickety it was. I decided that a rebuild was in order to tighten everything up and improve the accuracy.
I started by ordering a set of 10mm slide rails and 8 bearings.
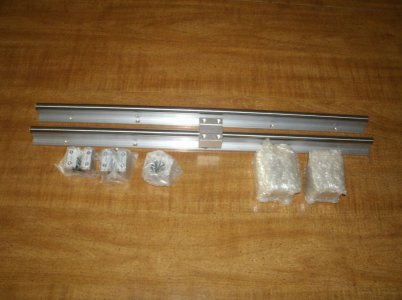
And this is how I mounted them.
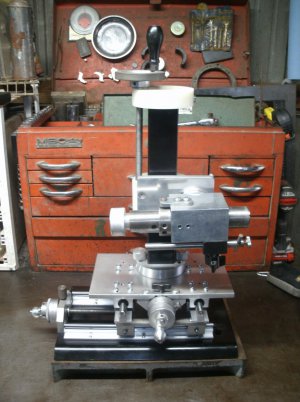
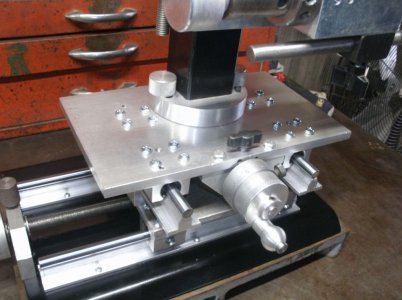
Here it is mounted next to the grinder.
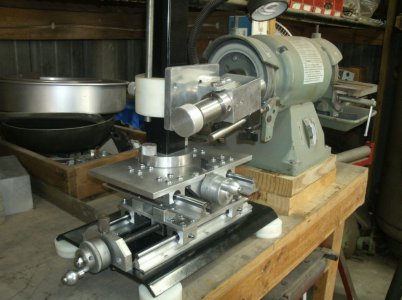
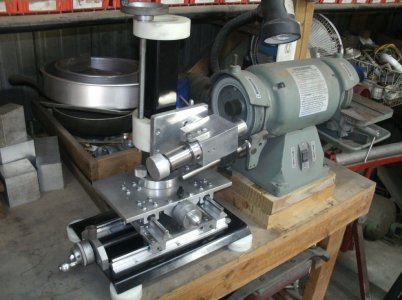
Things I changed
Installed new rails and bearing blocks.
The lead screws have 1/2" X 20 threads.
Needle thrust bearings were installed on both lead screws.
Installed locks on both axis.
Raised the sharpener for more clearance under the base.
Added spinner knobs for both axis.
Secured the upper plastic lift plate.
This doesn't look like too big a job and I thought maybe 2 days tops. Well I have 4 1/2 days into it now and am glad it is done.
Installing the rails and getting all the dimensions just right was a pain. Every thing is mounted solid to something else and if the rails or the bearing blocks are off just 0.010 then things bind up. When you get the rails running true then add the lead screw to the mix and that has to run exactly in parallel to the rails or it will bind up. That was just the x axis and it didn't get any easier for the Y axis. All the same problems and the Y axis had to be elevated for the lead screw mount to fit.
I am very happy with it now as the screws turn like silk and it is very stable and well worth the time and energy.
Just goes to show you that if it looks simple and easy WATCH OUT.
After I took the pictures I cut 3" off the tower as it wasn't needed to be that tall.
I wonder what else I will change.
Thanks for looking
Ray

End Mill Sharpener ?
I have been watching mark_f's post (Another Tool and Cutter Grinder) with great interest. He makes some beautiful useful tools and this one just caught me. Maybe I could make something that resembles an end mill sharpener that might even work. I watched a lot of videos and many other threads...
 www.hobby-machinist.com
It did work but just not very well. I received some suggestions from members on how to make it easier to use so I made some modifications in September, 2016.

End Mill Sharpener Rebuild
A few months back I posted a end mill sharpener I had made. http://www.hobby-machinist.com/threads/end-mill-sharpener.45541/ One of the last posts was from benmychree who made some suggestions for ways to improve the sharpener. At the time I was deep into a different project and since the...
 www.hobby-machinist.com
That helped a lot and that is how I have been using it since.
In the last 5 years my machining skills have improved greatly and when a friend asked to sharpen an end mill a while back I said sure but as I was setting up the sharpener for him I realized just how rickety it was. I decided that a rebuild was in order to tighten everything up and improve the accuracy.
I started by ordering a set of 10mm slide rails and 8 bearings.

And this is how I mounted them.


Here it is mounted next to the grinder.


Things I changed
Installed new rails and bearing blocks.
The lead screws have 1/2" X 20 threads.
Needle thrust bearings were installed on both lead screws.
Installed locks on both axis.
Raised the sharpener for more clearance under the base.
Added spinner knobs for both axis.
Secured the upper plastic lift plate.
This doesn't look like too big a job and I thought maybe 2 days tops. Well I have 4 1/2 days into it now and am glad it is done.
Installing the rails and getting all the dimensions just right was a pain. Every thing is mounted solid to something else and if the rails or the bearing blocks are off just 0.010 then things bind up. When you get the rails running true then add the lead screw to the mix and that has to run exactly in parallel to the rails or it will bind up. That was just the x axis and it didn't get any easier for the Y axis. All the same problems and the Y axis had to be elevated for the lead screw mount to fit.
I am very happy with it now as the screws turn like silk and it is very stable and well worth the time and energy.
Just goes to show you that if it looks simple and easy WATCH OUT.
After I took the pictures I cut 3" off the tower as it wasn't needed to be that tall.
I wonder what else I will change.
Thanks for looking
Ray
