I just thought I'd post up some info on my first VFD Install! The VFD is going to power a 2 Hp. Lagun FT-1 Mill I recently picked up. I did a lot of research but was finding little info on complete enclosure builds. I finally happened upon this thread http://www.hobby-machinist.com/showthread.php?t=17670 and decided to use it as a foundation for my build. I contacted chip_slinger and he was nice enough to send me a parts list (Which I think took him a considerable amount of time to write up). I also watched a very detailed video that Mike posted as well. https://www.youtube.com/watch?v=o69QEVtZIeA
I purchased the majority of my hardware from Automationdirect.com. Some of the parts were a bit more expensive than other places but I was able to buy 90% of the parts for the build from them. They also have a really nice feature that allows you to build a bill of materials. One of the main reasons I liked them was how good their documentation was. Each product, no matter how small, had a downloadable PDF manual. This really helped in the planning phase. The VFD manual, for example, is very well written. I've gotten several industrial electronic devices from china that have manuals that are almost impossible to follow. This was a welcome change.
The remainder of the items were purchased locally, from Digikey, Ebay, or Mcmaster Carr
A full build like this definitely isn't cheap. Part of the expense is having to purchase larger quantities of items than you need for the build. For example, I only used 6 white DIN terminal blocks, but purchased 50. Luckily, I have several other upcoming projects and will be able to use most of the other components. A build like this also gives me several other benefits.
It also gave me a reason to learn more about basic electrical work.
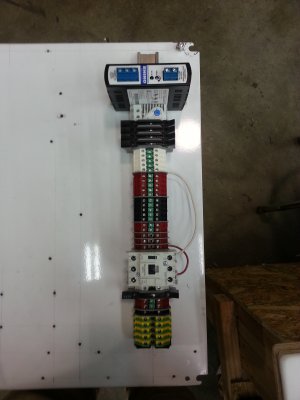
I don't have very many good pictures at the time, but here is one of the DIN Rail getting set up.

I installed it following a diagram I made based upon the above video. I'll post that diagram after I've gotten a few changes made to it. I'm quite certain I didn't draw the diagram with the proper symbols. Does anyone know of a quick reference I can use for drawing the wiring diagram properly?
More updates to follow as I make more progress tomorrow.
-Clay

I purchased the majority of my hardware from Automationdirect.com. Some of the parts were a bit more expensive than other places but I was able to buy 90% of the parts for the build from them. They also have a really nice feature that allows you to build a bill of materials. One of the main reasons I liked them was how good their documentation was. Each product, no matter how small, had a downloadable PDF manual. This really helped in the planning phase. The VFD manual, for example, is very well written. I've gotten several industrial electronic devices from china that have manuals that are almost impossible to follow. This was a welcome change.
The remainder of the items were purchased locally, from Digikey, Ebay, or Mcmaster Carr
A full build like this definitely isn't cheap. Part of the expense is having to purchase larger quantities of items than you need for the build. For example, I only used 6 white DIN terminal blocks, but purchased 50. Luckily, I have several other upcoming projects and will be able to use most of the other components. A build like this also gives me several other benefits.
- More controlled environment for the VFD (temperature, cleanliness)
- housing for other accessories
- E-Stop
- Remote Control
- The ability to control
- Simple control of other items (Coolant, Lights, Power Feed, DRO)
It also gave me a reason to learn more about basic electrical work.
I don't have very many good pictures at the time, but here is one of the DIN Rail getting set up.

I installed it following a diagram I made based upon the above video. I'll post that diagram after I've gotten a few changes made to it. I'm quite certain I didn't draw the diagram with the proper symbols. Does anyone know of a quick reference I can use for drawing the wiring diagram properly?
More updates to follow as I make more progress tomorrow.
-Clay


