QCTP Top nut handle.

Boomer

Registered
Registered
Joined
Aug 15, 2014
Messages
14
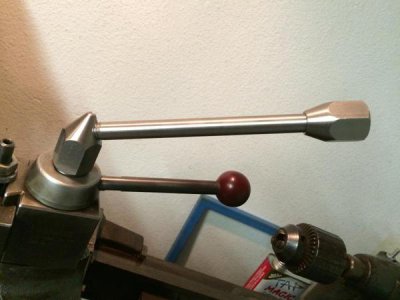
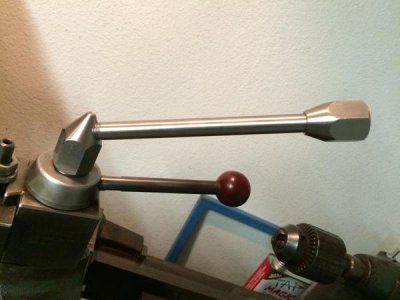
I decided I wanted to upgrade from the old lantern type tool post on my Atlas/Craftsman 12x36. After a little researching and browsing ebay, I found an older Phase II piston type QCTP. The original T-nut would not fit my compound and I didn't have the metric tap, or other materials to make another stud. Luckily I have a buddy with a mill, and I just made the original T-nut fit my compound. Then I had to shorten and rethread the original tool post stud because it was too long. After messing around with the QCTP, I decided I wanted to make a new top nut with a handle to make life easier. It's made from 1/2" round & 1" hex 303 stainless steel. The top nut is 1.75" tall w/ a 20 degree taper, the handle is 6.5" long and threaded to 1/2x13 threads, and the knob is 1.5" long w/ a 20 degree taper as well. I'm really happy with the way it came out, quick re clock position changes are a snap now. As many times as I reached for the oddball wrench that the Phase II QCTP normally takes was getting annoyning.
6C492861-AA86-45EC-BDB0-4E3C2CE0A2C9_zpsis9hih67.jpg

6C492861-AA86-45EC-BDB0-4E3C2CE0A2C9_zpsis9hih67.jpg
 
Nice job on the conversion. I've been meaning to do the same for a couple of years now (got the materials) but I always seem to get side tracked.
 
Boomer , I too have retired the lantern post ..... so I can use bigger tools on the lathe . Initialy it was a "Myford clamp plate . stand off adjuster bolt & head nut etc.nut .
This proved unsatisfactory so I moved to a simple machined block tool post with a 1/2" grove running all round it.

I've made a temporary securing nut with tightenin g bar and woild love to improve upon that.
I see that your tool post clamps has two " bar nuts " on it .


Questions .
1.
Are both nuts threaded so that what you are actually doing is lock nutting them when the bottom nut is tight ?

2.
If this is not the case what is the bottom nut for ?

Dave

The original T-nut that goes in the compound was milled down to fit my compound, and I had to shorten the threaded section of the hold down stud on the t-nut side because it would bottom out in the t-nut slot of my lathes compound slide. Of the two handles on the top, the lower one with the red ball end is for locking the tool bit holders onto the tool post. The top handle is the sinch down nut for the tool post hold down stud. I made it for quick loosening and tightening of the hold down stud, so I wouldn't have to keep reaching for a different wrench. If you would like some more pictures, let me know and I will snap a few more for you.
 
This is on my project list too. To do it well, I will have to make a ball turner first.

Yours "turned" out very nice! Thank you for sharing.

GG
 
Nice job, the longer handle helps.

I also did one, I used larger hex stock for mine. Check it out on my youtube.
 
Nice job, the longer handle helps.

I also did one, I used larger hex stock for mine. Check it out on my youtube.

Oh wow, I got the inspiration to make mine from your video! I didn't know this was yours, small world. I had wanted to use larger 1.5" hex for mine, but the price was jumping up quickly and I decided the 1" hex would work for my liking. I ordered it from SpeedyMetals.com, and they actually screwed up my order and sent me a piece of 1" round 303 stainless steel. Once I emailed them to notify them of the oops, they told me the sale was final and I could keep the piece of 1" round for free. I thought of making the handle knob out of the round but I decided to keep the design theme with the hex stock. The longer handle is nice, just enough length to put enough torque on it to easily hold the tool post in its clock position.

This is on my project list too. To do it well, I will have to make a ball turner first.

Yours "turned" out very nice! Thank you for sharing.

GG

Thanks! I had wanted to put a ball on it, but I don't have a ball turning jig either. I had a piece of 1" round that I was contemplating on using, but decided to keep the hex and just put a couple tapers on it to match the nut. Also, I'm never putting that much torque on it for the shape of the hex to dig in or hurt my hand/fingers.
 
quote "Nice job on the conversion. I've been meaning to do the same for a couple of years now (got the materials) but I always seem to get side tracked" quote


sounds like the story of my existence !!!
 
Back
Top