- Joined
- Feb 27, 2014
- Messages
- 2,129
I recently completed a project in Aluminum where I wanted a polished finish. I could use a buffing wheel but decided to use the tumbler instead. there are a few advantages to this approach
1. While the overall time to complete is high, the actual time on task is pretty low. I can do other things while the tumbler is running
2. The buffer creates a big mess over time while tumbling is keeps the shop clean
3. No burnt finger tips
Like buffing, the tumbling does not remove a lot metal so you need to start with a fairly smooth surface. Sanding with 220 will work but 400 is better.
I use four different tumbling media that I get from Rio Grande Jewelry supply
From Left to right
Ceramic Grinding Media Green Fine Cut #339-400
Ceramic Aluminum Oxide Cylinder Media #339-416
Ceramic Mixed Polishing Media #339-071
Stainless Steel Shot Mixed #339-097

I fill the tumbling barrel about 25-40% full of media and then add water to just over 50%. Neither of these measures are very critical

for everything EXCEPT the final stainless Steel media, I add
Sunsheen Deburring Compound #339307 (it is very concentrated so you just add a small amount (instructions on label)
and for the Stainless Steel, I add
Super Sunsheen Descaler #339391


For Aluminum I run each stage for between 6-12 hours.
for the first stage with the Ceramic Grinding Media Green Fine Cut #339-400 if you run it longer than 5-6 hours you will start to see sharp outside corners getting rounded and at 12 hours the effect is very noticeable so be sure to check often the first time you do this to be sure you are happy with the results. For the later stages I notice very little rounding of outside corners but I am sure there is some.
One thing you will notice when you remove your parts, If they have any interior holes, the media will find a way to JAM into the holes and you will need to pick them out before going on to the next stage. For the ceramic stages, I find an spring loaded punch works well to dislodge the small pieces.
it is hard to get decent pictures of surface finish but here is an attempt
Before: I think I did a pass with 400 sandpaper after this picture and before tumbling

This is after the first stage

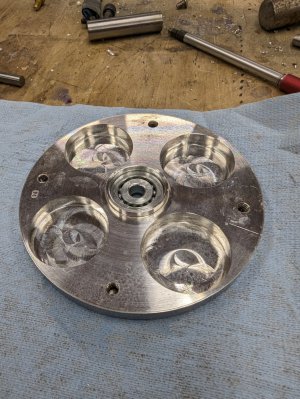
After all 4 stages. look closely and you can see the rounded outside corners on the base. In this case, I liked the softening of the edges. sort of like a rounded edges

While this is not for every situation it can be a very handy tool to add to the shop. I have polished both Aluminum and Brass using this method. For smaller parts you can put multiple parts in the tumbling drum at the same time.
1. While the overall time to complete is high, the actual time on task is pretty low. I can do other things while the tumbler is running
2. The buffer creates a big mess over time while tumbling is keeps the shop clean
3. No burnt finger tips
Like buffing, the tumbling does not remove a lot metal so you need to start with a fairly smooth surface. Sanding with 220 will work but 400 is better.
I use four different tumbling media that I get from Rio Grande Jewelry supply
From Left to right
Ceramic Grinding Media Green Fine Cut #339-400
Ceramic Aluminum Oxide Cylinder Media #339-416
Ceramic Mixed Polishing Media #339-071
Stainless Steel Shot Mixed #339-097
I fill the tumbling barrel about 25-40% full of media and then add water to just over 50%. Neither of these measures are very critical
for everything EXCEPT the final stainless Steel media, I add
Sunsheen Deburring Compound #339307 (it is very concentrated so you just add a small amount (instructions on label)
and for the Stainless Steel, I add
Super Sunsheen Descaler #339391
For Aluminum I run each stage for between 6-12 hours.
for the first stage with the Ceramic Grinding Media Green Fine Cut #339-400 if you run it longer than 5-6 hours you will start to see sharp outside corners getting rounded and at 12 hours the effect is very noticeable so be sure to check often the first time you do this to be sure you are happy with the results. For the later stages I notice very little rounding of outside corners but I am sure there is some.
One thing you will notice when you remove your parts, If they have any interior holes, the media will find a way to JAM into the holes and you will need to pick them out before going on to the next stage. For the ceramic stages, I find an spring loaded punch works well to dislodge the small pieces.
it is hard to get decent pictures of surface finish but here is an attempt
Before: I think I did a pass with 400 sandpaper after this picture and before tumbling
This is after the first stage
After all 4 stages. look closely and you can see the rounded outside corners on the base. In this case, I liked the softening of the edges. sort of like a rounded edges
While this is not for every situation it can be a very handy tool to add to the shop. I have polished both Aluminum and Brass using this method. For smaller parts you can put multiple parts in the tumbling drum at the same time.