- Joined
- Jul 15, 2020
- Messages
- 421
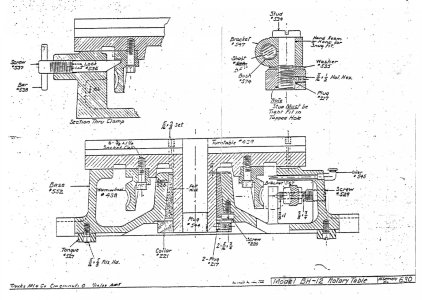
I just took my BH-9 apart, cleaned it, and put it back together. I believe the procedure is the same for the BH-12. The diagram is for a BH-12. Here is the procedure:
1. Remove table lock screw (537). Remove the lock rod behind the screw. Mine had a 1/4-20 threaded hole in it, so I screwed a matching bolt into it and pulled it out. Otherwise, use a magnet, or needle nose pliers.
2. Remove backlash adjustment screw (529). There are two socket head set screws behind it. The next one in is a lock screw - remove it completely without dropping it inside the case. The furthest screw in is pointed, and limits the distance to which you can turn in the backlash adjustment screw. You don't need to remove it - just back it out enough for the worm assembly to be removed. It's ok to remove it all the way. Be sure not to lose any of these small parts, as you will have a tough time replacing them.
3. Back out locking set screw labeled #217 below. Remove stud (434), making sure not to lose any washers or shims underneath it. The worm assembly should slide out of the case at this point. If it doesn't, make sure you have backed out the inside, pointed backlash adjustment screw sufficiently.
4. Your case may have enough oil in it to make a mess. Lay down some shop towels in a big pan, and flip the table upside down. After all the oil, if any, runs out, clean everything up and put the table, still upside down on a solid work surface with a good edge to which you can clamp the table down.
5. You will see a large circular nut with two holes in it. There will also be a lock-down screw next to it. Remove the lock-down screw. Clamp the table to the work surface. slide a couple of 1/4" dia. bolts into the two holes a short distance. The bolts should be long enough to put a big screwdriver or bar between them and turn the nut out (counter-clockwise). If you are lucky, the base will now lift off the turntable. If not, as will probably be the case, put a couple of wooden blocks under the bolt tabs on each side of the base, so that the turntable surface is maybe 2 1/2 to 3 inches above the work surface. Clamp both bolt tabs to the work surface. You can try rotating the turntable using a big screwdriver in the T-slots to free it up. Otherwise, With a great big C-clamp, press down on the center. Don't hammer it. The turntable should drop out.
Once you get it apart, you will be able to make some sense of how the thing works. It really is quite simple, and you should have little trouble reversing the operation to get it back together. Be sure to replace any shims/washers that were under the stud (434).
The 2nd illustration shows the backlash adjustment mechanism in some detail. When you turn in the backlash adjustment screw, it pushes the worm gear assembly inward, pivoting on the stud. The distance to which it can be moved is limited by the innermost, pointed locking screw. With the innermost, pointed screw still backed off, turn the outermost screw in until it keeps the turntable from turning. Then unscrew it about 1/4 turn. The table should be able to rotate all the way around with no tight spots. Then note how far you have turned in the outer adjustment screw (how many threads show - position of screw slot). You will have to screw the pointed screw in incrementally, replacing the outer screw each time until the desired amount of backlash is locked in place. Then remove the outer screw, replace the center locking screw, and replace the outer screw. It is time consuming and tedious, but once done, it will stay that way.
If this seems complicated, I apologize. I don't know how to state it in any clearer terms. Probably should have taken some photos during disassembly, but didn't.