

Hi Folks,
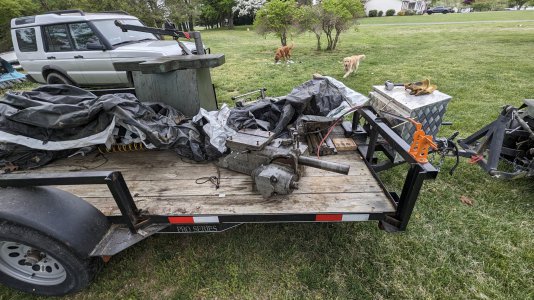
A month or so ago I picked up a disassembled VN 12 from a fellow member here who was only a few hours north. I've been looking for a horizontal on and off for a bit, saw the ad and realized I could put it to good use. Luckily until now, a neighbor let me store the trailer load in his barn, but the time has finally come to move it to it's new home.
Just as a quick background- We moved to this house a few years back, as it's next to the wife's parents. It didn't have a garage, and my only stipulation for moving here was that we build a garage. She agreed. Long story short, I still don't have one, and my heavy machinery is relegated to an old coal boiler room "basement", with 78" ceilings and a 30" wide external staircase. It's always an adventure getting the heavier stuff down, but this was by far the heaviest and most difficult.
I'll update this as I go through the machine and set it back up, but here are a few pictures from today:
I lifted the column and base with the boom tube just a hair as the tractor was struggling to lift it, and then pulled the trailer out from under it. Once i turned around, the tractor was wheelie-ing. Oops. Definitely a bit too heavy. So i had to move the attachment point closer to the tractor (where you see below) to be able to pick it up
Staged and ready to go. The only entrance to the boiler room is a small cinderblock stairwell under our side porch. It was a struggle to get it as close as i could without hitting the window or running over the lady's plants.

Just so you can see what I'm working with. Here's the view from inside. (it's a mess since i have to move everything whenever moving machines)

Chain attached to joist bolts holds the chain hoist that gets it over the threshold

View up the stairs. It's tight.

Neighbor came over to help when I got stuck and couldn't figure out what to do. I wrapped the winch around the front of the tractor and pulled it tight to give us extra "Won't tip on us" insurance. In the end, I sat on the ground and wedged myself between the colum and tractor tire and pushed it all forward with my legs while the neighbor lowered it, to get it down the first few stairs. After a few stairs it was easy going.

Once down at the bottom, we used a heavy ratchet strap to hold it to the boom pole, then I moved the chain hoist to the doorway. Luckily, or unluckily, the column and base fell to the side a bit and angled towards the house, so with the chain hoist repositioned, it pulled itself right where it needed to be. The wife rarely comes down so she wont notice the damaged siding.

I can't wait until i can finally move this engine crane out of here. This is hopefully the last big machine movement i make.

The Lathe is normally next to the door, but I put it on dollies to get it out of the way. Doig that I also decided I'm going to reposition it to allow more room.


And here it sits for the time being on some 4x4s. It'll get a good cleaning, strip and paint with rustoleum (No body filler) before being assembled over the next couple weeks. I intend to use the machine so it'll be more of a "Resto-mod" with some modern upgrades, than a period correct piece. It'll be placed somewhere around the well tank depending on how it fits. The old handmiller behind it unfortunately is getting pulled out & sold since i'm tight on space. I just picked it up in January and was starting to strip it and do a nice restoration when the VN came available. Maybe i'll just coat it in DIY cosmoline and keep it in one of the sheds for when the garage is actually built. It's in quite nice condition.

More updates to come tomorrow as i move the rest of the Mill down into the dungeon.
Blake
A month or so ago I picked up a disassembled VN 12 from a fellow member here who was only a few hours north. I've been looking for a horizontal on and off for a bit, saw the ad and realized I could put it to good use. Luckily until now, a neighbor let me store the trailer load in his barn, but the time has finally come to move it to it's new home.
Just as a quick background- We moved to this house a few years back, as it's next to the wife's parents. It didn't have a garage, and my only stipulation for moving here was that we build a garage. She agreed. Long story short, I still don't have one, and my heavy machinery is relegated to an old coal boiler room "basement", with 78" ceilings and a 30" wide external staircase. It's always an adventure getting the heavier stuff down, but this was by far the heaviest and most difficult.
I'll update this as I go through the machine and set it back up, but here are a few pictures from today:
I lifted the column and base with the boom tube just a hair as the tractor was struggling to lift it, and then pulled the trailer out from under it. Once i turned around, the tractor was wheelie-ing. Oops. Definitely a bit too heavy. So i had to move the attachment point closer to the tractor (where you see below) to be able to pick it up
Staged and ready to go. The only entrance to the boiler room is a small cinderblock stairwell under our side porch. It was a struggle to get it as close as i could without hitting the window or running over the lady's plants.
Just so you can see what I'm working with. Here's the view from inside. (it's a mess since i have to move everything whenever moving machines)
Chain attached to joist bolts holds the chain hoist that gets it over the threshold
View up the stairs. It's tight.
Neighbor came over to help when I got stuck and couldn't figure out what to do. I wrapped the winch around the front of the tractor and pulled it tight to give us extra "Won't tip on us" insurance. In the end, I sat on the ground and wedged myself between the colum and tractor tire and pushed it all forward with my legs while the neighbor lowered it, to get it down the first few stairs. After a few stairs it was easy going.
Once down at the bottom, we used a heavy ratchet strap to hold it to the boom pole, then I moved the chain hoist to the doorway. Luckily, or unluckily, the column and base fell to the side a bit and angled towards the house, so with the chain hoist repositioned, it pulled itself right where it needed to be. The wife rarely comes down so she wont notice the damaged siding.
I can't wait until i can finally move this engine crane out of here. This is hopefully the last big machine movement i make.
The Lathe is normally next to the door, but I put it on dollies to get it out of the way. Doig that I also decided I'm going to reposition it to allow more room.
And here it sits for the time being on some 4x4s. It'll get a good cleaning, strip and paint with rustoleum (No body filler) before being assembled over the next couple weeks. I intend to use the machine so it'll be more of a "Resto-mod" with some modern upgrades, than a period correct piece. It'll be placed somewhere around the well tank depending on how it fits. The old handmiller behind it unfortunately is getting pulled out & sold since i'm tight on space. I just picked it up in January and was starting to strip it and do a nice restoration when the VN came available. Maybe i'll just coat it in DIY cosmoline and keep it in one of the sheds for when the garage is actually built. It's in quite nice condition.
More updates to come tomorrow as i move the rest of the Mill down into the dungeon.
Blake
Attachments
Last edited:
")


