- Joined
- Feb 17, 2013
- Messages
- 4,407
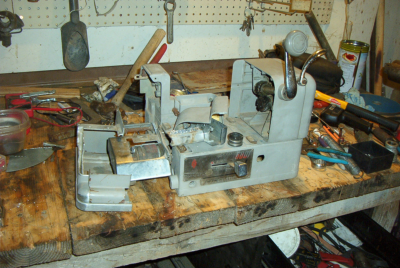
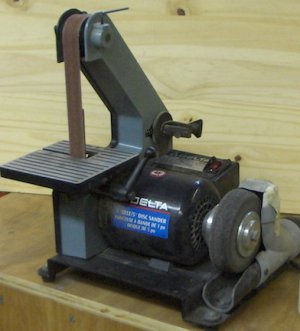
For several years I’ve made very frequent use of a Delta 1”x30” belt/5” disk sander. Never had much success with the disk part, so I turned an aluminum arbor/adapter and mounted a 6"x1”x1” Scotch-brite wheel in its place. This wheel is absolutely the cat’s meow for deburring, polishing, and general cleanup! The photo shows the wheel (now down to well below 5” diameter) and a homemade dust catcher on this sander.
I recently bought a larger (1” x 42”/8”) Delta belt/disk sander (Craigs List, $65) and went to work on converting it as well. What made the project interesting was the need to add a “blind” keyway on the motor side of the arbor/adapter. The wheel side would be drilled and tapped for a 5/16” mounting bolt. I could probably have gotten away with simply shortening the key on the motor shaft (which also holds the pulley used to drive to sanding belt), but I’ve always wanted to try my hand at cutting a keyway on my lathe.
After turning the adapter from 2 1/2” aluminum rod I went to the mill. Added two external flats to the motor side. Then, in order to avoid building up of swarf when cutting the dead-end keyway, I cross drilled a 1/4” hole on centerline into one side of the part, right where the end of the key would be (about 1 1/2” inboard from the end). The motor shaft has a 5mm (.197”) key, so the 1/4” hole diameter would allow a small amount of location inaccuracy.
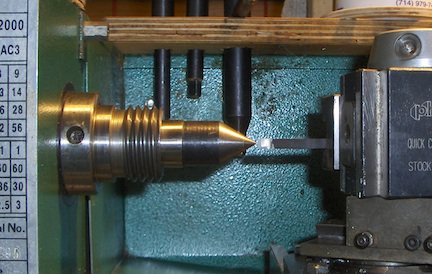
Next up was setting the keyway tool height on the lathe. Luckily I had a length of (unidentified alloy) steel bar stock, labeled “3/16 x 1/2 - Oversize - Pre-colored” that I’d bought along with a bunch of (nominally sized) 0-1 steel a couple years ago. The thickness of the “oversize” material was .200” - perfect for the keyway! I mounted a short length of the material in a QCTP tool holder, set the height with the help of a center in the lathe spindle, and locked the height adjuster not on the tool holder.
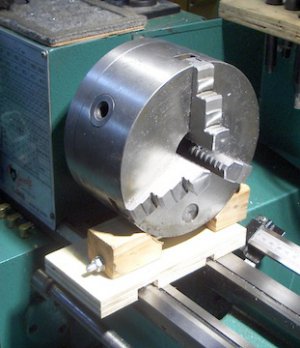
Then I improvised a “spindle lock” on the lathe. This was simply two angle-faced wood blocks and a length of threaded rod. The assembly wedged the chuck against a board lying across the ways when the nuts were snugged up.
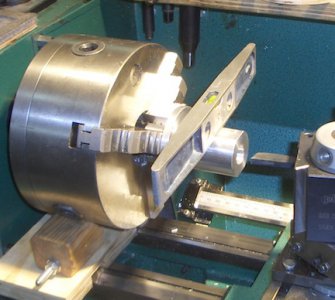
The last step before starting to cut the keyway was to mount the part in the chuck. I used a carpenter’s level on one of the milled flats. This gave rotational (and therefore vertical) alignment of the cross-drilled hole with the cutting tool. In addition, I’d assumed I would have to take the part out of the chuck at various times (for measurements. etc.) The flat-and-level technique would allow returning the part to its original position in the chuck. As it turned out, I didn’t have to do this ... but it was good to know I could if I had to.
Now comes the fun part (preparing the tool), where I reveal my lack of experience. If you know what you’re doing, you can skip this section. But if you’re as much of an amateur as I am, read on and take heart - unlike rocket science, you can succeed without being a professional!
By the way, the usual practice is to mount an appropriately shaped tool bit in a boring bar and use it to cut a keyway. Unfortunately, all I have are 3/16” and 1/4” tool bits. As the 3/16” (.188”) tools were undersize for the 5mm (.197) key, cutting the keyway would require raising and lowering the tool a fiddly precise amount with the relatively crude height adjustment screw on the QCTP. A 1/4” tool would require grinding to an exact width. As I’m not yet very talented with a grinder, I didn’t want to go there. Very fortunately, the “oversize” steel bar stock I had was just the right thickness for the job. And the 1/2” width provided plenty of lateral strength to resist tool deflection from cutting forces.
I shaped the end of the tool with about 15 degrees of back rake and end clearance. I did not try to add side clearance or relief. Instead I mounted the tool at about a 5 degree horizontal angle from the spindle centerline, reducing how much of the tool would be within the keyway, thus reducing drag. Then, because the tool was 1/2” wide and the hole only 5/8” diameter, I had to add a relief cut on the “back side” of the tool, starting about 1” from the end.
I then tightened everything down, put the end of the tool into the start of the hole, adjusted the cross slide to where the tool just started to make contact with the bore, and used the carriage to advance the tool toward the chuck until it got to the cross hole and the chips broke off.
- NOT - :angry:
Backed the carriage out of the bore, dismounted the tool holder from the QCTP, and looked at the cutting edge. Adjusted the angles a bit. Replaced the tool holder. Tried again. Repeated the process a number of times, until the tool started to cut nicely.
Then it sorta quit cutting! Tried more adjustments. Repeated this process a while, until I realized that the tool just wasn’t holding an edge (Durn! It was just cutting aluminum!) Bad assumption on my part. Time to try hardening the tool.
I’ve never done any hardening and the tool was made of an unknown alloy, so I was really in uncharted territory. But I decided to do the best I could. I set the tool on top of a firebrick, used a propane torch to get just a bit of a glow around the tip, picked the tool up with a pair of pliers, and dropped it into a cup of water. Finally I gave the cutting edge a bit of a touch-up with a wet grinder. Lo and behold! The crazy kludge worked beautifully! The smooth “shaving action” of the tool on the aluminum, stroke after stroke, was delightful to hear and feel!
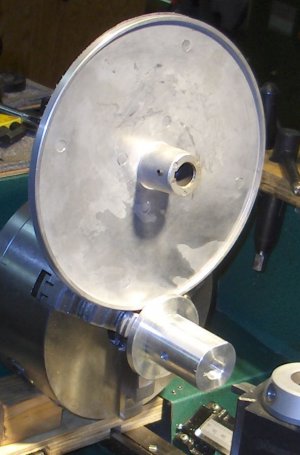
Once the tool was correctly shaped, hardened and sharpened, cutting the keyway was simply a matter of tool just touching the tool to the surface of the bore, running the carriage toward the chuck until the tool reached the cross hole, running the carriage out, advancing the cross slide .002”, and repeating the process until the keyway looked deep enough. I decided that instead of measuring precisely, I’d make the keyway a bit deeper than necessary. There would be two set screws against the key anyway, and a bit of extra clearance wouldn’t hurt. The photo shows the finished keyway, a bit deeper than that of the original sanding disk.
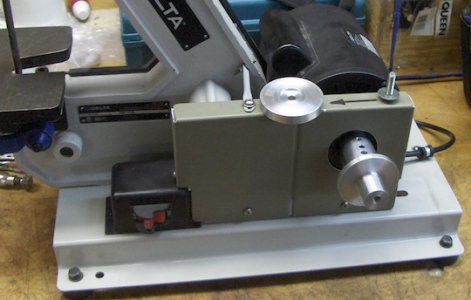
The last operation on the arbor/adapter was to drill and tap two setscrew holes aligned to the keyway. These were done after cutting the keyway, so that the “shaving operation” would not be an interrupted cut. The next photo shows the arbor/adapter mounted on the motor shaft. The pulley (and belt) is inside the new belt guard. The 1” diameter section of the adapter is about .06” longer than the width of the Scotch-brite wheel. The end cap (seen atop the belt guard) has a recess about .10” deep, so it will clamp down on the side of the wheel when the bolt is tightened.
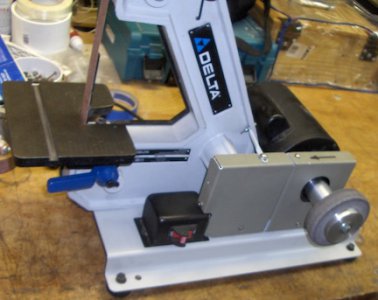
The final photo shows my almost-used-up wheel in place and ready to use. All I have to do now is order another one! )
)


I recently bought a larger (1” x 42”/8”) Delta belt/disk sander (Craigs List, $65) and went to work on converting it as well. What made the project interesting was the need to add a “blind” keyway on the motor side of the arbor/adapter. The wheel side would be drilled and tapped for a 5/16” mounting bolt. I could probably have gotten away with simply shortening the key on the motor shaft (which also holds the pulley used to drive to sanding belt), but I’ve always wanted to try my hand at cutting a keyway on my lathe.
After turning the adapter from 2 1/2” aluminum rod I went to the mill. Added two external flats to the motor side. Then, in order to avoid building up of swarf when cutting the dead-end keyway, I cross drilled a 1/4” hole on centerline into one side of the part, right where the end of the key would be (about 1 1/2” inboard from the end). The motor shaft has a 5mm (.197”) key, so the 1/4” hole diameter would allow a small amount of location inaccuracy.
Next up was setting the keyway tool height on the lathe. Luckily I had a length of (unidentified alloy) steel bar stock, labeled “3/16 x 1/2 - Oversize - Pre-colored” that I’d bought along with a bunch of (nominally sized) 0-1 steel a couple years ago. The thickness of the “oversize” material was .200” - perfect for the keyway! I mounted a short length of the material in a QCTP tool holder, set the height with the help of a center in the lathe spindle, and locked the height adjuster not on the tool holder.

Then I improvised a “spindle lock” on the lathe. This was simply two angle-faced wood blocks and a length of threaded rod. The assembly wedged the chuck against a board lying across the ways when the nuts were snugged up.

The last step before starting to cut the keyway was to mount the part in the chuck. I used a carpenter’s level on one of the milled flats. This gave rotational (and therefore vertical) alignment of the cross-drilled hole with the cutting tool. In addition, I’d assumed I would have to take the part out of the chuck at various times (for measurements. etc.) The flat-and-level technique would allow returning the part to its original position in the chuck. As it turned out, I didn’t have to do this ... but it was good to know I could if I had to.

Now comes the fun part (preparing the tool), where I reveal my lack of experience. If you know what you’re doing, you can skip this section. But if you’re as much of an amateur as I am, read on and take heart - unlike rocket science, you can succeed without being a professional!
By the way, the usual practice is to mount an appropriately shaped tool bit in a boring bar and use it to cut a keyway. Unfortunately, all I have are 3/16” and 1/4” tool bits. As the 3/16” (.188”) tools were undersize for the 5mm (.197) key, cutting the keyway would require raising and lowering the tool a fiddly precise amount with the relatively crude height adjustment screw on the QCTP. A 1/4” tool would require grinding to an exact width. As I’m not yet very talented with a grinder, I didn’t want to go there. Very fortunately, the “oversize” steel bar stock I had was just the right thickness for the job. And the 1/2” width provided plenty of lateral strength to resist tool deflection from cutting forces.
I shaped the end of the tool with about 15 degrees of back rake and end clearance. I did not try to add side clearance or relief. Instead I mounted the tool at about a 5 degree horizontal angle from the spindle centerline, reducing how much of the tool would be within the keyway, thus reducing drag. Then, because the tool was 1/2” wide and the hole only 5/8” diameter, I had to add a relief cut on the “back side” of the tool, starting about 1” from the end.
I then tightened everything down, put the end of the tool into the start of the hole, adjusted the cross slide to where the tool just started to make contact with the bore, and used the carriage to advance the tool toward the chuck until it got to the cross hole and the chips broke off.
- NOT - :angry:
Backed the carriage out of the bore, dismounted the tool holder from the QCTP, and looked at the cutting edge. Adjusted the angles a bit. Replaced the tool holder. Tried again. Repeated the process a number of times, until the tool started to cut nicely.
Then it sorta quit cutting! Tried more adjustments. Repeated this process a while, until I realized that the tool just wasn’t holding an edge (Durn! It was just cutting aluminum!) Bad assumption on my part. Time to try hardening the tool.
I’ve never done any hardening and the tool was made of an unknown alloy, so I was really in uncharted territory. But I decided to do the best I could. I set the tool on top of a firebrick, used a propane torch to get just a bit of a glow around the tip, picked the tool up with a pair of pliers, and dropped it into a cup of water. Finally I gave the cutting edge a bit of a touch-up with a wet grinder. Lo and behold! The crazy kludge worked beautifully! The smooth “shaving action” of the tool on the aluminum, stroke after stroke, was delightful to hear and feel!
Once the tool was correctly shaped, hardened and sharpened, cutting the keyway was simply a matter of tool just touching the tool to the surface of the bore, running the carriage toward the chuck until the tool reached the cross hole, running the carriage out, advancing the cross slide .002”, and repeating the process until the keyway looked deep enough. I decided that instead of measuring precisely, I’d make the keyway a bit deeper than necessary. There would be two set screws against the key anyway, and a bit of extra clearance wouldn’t hurt. The photo shows the finished keyway, a bit deeper than that of the original sanding disk.

The last operation on the arbor/adapter was to drill and tap two setscrew holes aligned to the keyway. These were done after cutting the keyway, so that the “shaving operation” would not be an interrupted cut. The next photo shows the arbor/adapter mounted on the motor shaft. The pulley (and belt) is inside the new belt guard. The 1” diameter section of the adapter is about .06” longer than the width of the Scotch-brite wheel. The end cap (seen atop the belt guard) has a recess about .10” deep, so it will clamp down on the side of the wheel when the bolt is tightened.

The final photo shows my almost-used-up wheel in place and ready to use. All I have to do now is order another one!


