2016 POTD Thread Archive

You cant put the tool upside down in the "front" if you have a threaded spindle, just putting that out there in case some people want to do this, he's running the spindle in reverse which is no Bueno for tool pressure on a threaded spindle/chuck
 
POTD 02Jan2016: Making small nutdrivers

Two days ago I posted, in my "Greg's French 75 mm Field Artillery Model" thread, a picture of a wooden wheel in midst of assembly.
See http://www.hobby-machinist.com/threads/gregs-french-75-mm-field-artillery-model.34665/#post-318270
These wheels each have 7 #2-56 nuts and bolts, and 42 #0-80 nuts and bolts. Without the proper tools, getting the nuts started and and tightened has been frustrating and slow going.
And the wheels will probably have to be disassembled and reassembled a few times before I'm done.

At a local hobby shop, I bought a pair of nutdrivers, for the #2 bolt and nut. So, my POTD was to make some #0 nutdrivers.

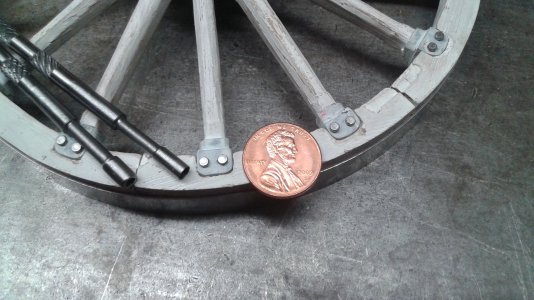
I used 3/16" O1 drill rod, turning knurls on one end of the 6" tool, and forming a hex socket in the working end. In the lathe, I drilled shallow holes in the ends, sized to the distance across the flats, 0.090" for the bolt head and 0.122" for the nut. To make the hexagonal form, I left the piece in the lathe and put a #0 bolt in the tailstock chuck. Using a propane torch, I heated the work, then cranked the tailstock spindle to force the nut into the red-hot tip. I repeated the heat and press procedure a few times to get the proper penetration. This worked very nicely.
size 0 nutdrivers.jpg

One odd thing: I thought that for hardening, you need to quickly dunk the hot steel into oil; just letting it cool off normally is the annealing process, right? So I was surprised to find the tips were now quite hard. This was a problem, since I needed to reduce the hex socket's wall thickness so it would fit into position. I sanded/ground it down until the walls were just 0.015" thick.

(If I had done a better design on my cannon wheels, I'd have spaced the two holes in the spoke shoes a bit further apart, (or maybe used smaller fasteners, i.e. #00.)

Greg
 
So A little progress was made On the tool rest today. All still in the mounting parts, I am still working on the table design. It will either have a dove tail slide or Slots to allow each table to move in or out independent of the other. I am leaning towards the dovetail as I have not made one before. On this project the dovetail will not have to be perfect so a good place to start. Any thoughts?
Well any way this is what I got done today.
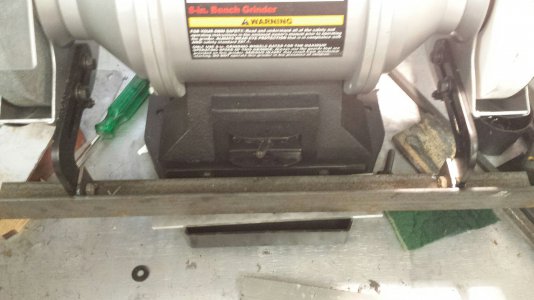
I fit and tacked up the first piece for mounting the rest to the grinder. It is 1/4x 1-1/2 x 1-1/2 L with tabs drilled and welded to mount on the original rest brackets but I flipped them upside down.
20160102_143750_resized.jpg

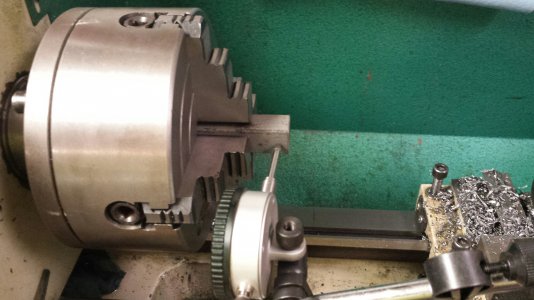
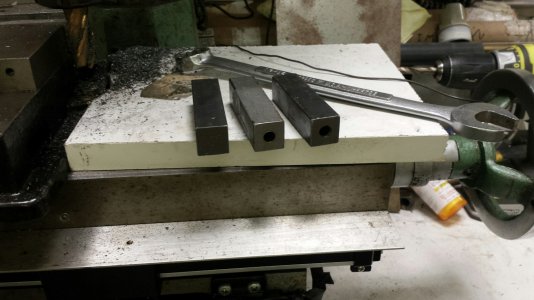
Once that was done I started on the 3/4 x 3/4 x 3" mounting bars I cut 4 of them as one set will go on the angle bracket mentioned above and I will make slotted bars going up from them to the bottom of the table. this will allow for height adjustment. and the other 2 will mount to the bottom of the table and act as a pivot point. I only managed to get 2 of them drilled through. First photo is setting them up in the 4 jaw chuck, the second is the mounts with 2 drilled and one not the third is in the chuck.
20160102_203839_resized.jpg

20160102_203826_resized.jpg

Mark
 
You cant put the tool upside down in the "front" if you have a threaded spindle, just putting that out there in case some people want to do this, he's running the spindle in reverse which is no Bueno for tool pressure on a threaded spindle/chuck

Ahh yes that is why I never did this. I do have keepers that should stop the chuck from spinning off but rear mount would seem a better plan.

Mark
 
Greg nice looking wheel. I was hoping that was a large penny not that small of screws. Very cool looking if not for the penny I would have thought it was a full size wheel.

Mark
 
what are these keepers you speak of? like set screws pushing on the threads?
even so I would be a little wary of using a parting blade in this manner given the high pressured nature of that tool.
 
what are these keepers you speak of? like set screws pushing on the threads?
even so I would be a little wary of using a parting blade in this manner given the high pressured nature of that tool.
He might be referring to a chuck mount that isn't screwed on and uses keys. The mount on my Colchester for example is a tapered mount with a key that is pulled on with a large nut. There are also chucks that use three posts to mount them.
POTD 02Jan2016: Making small nutdrivers

Two days ago I posted, in my "Greg's French 75 mm Field Artillery Model" thread, a picture of a wooden wheel in midst of assembly.
See http://www.hobby-machinist.com/threads/gregs-french-75-mm-field-artillery-model.34665/#post-318270
These wheels each have 7 #2-56 nuts and bolts, and 42 #0-80 nuts and bolts. Without the proper tools, getting the nuts started and and tightened has been frustrating and slow going.
And the wheels will probably have to be disassembled and reassembled a few times before I'm done.

At a local hobby shop, I bought a pair of nutdrivers, for the #2 bolt and nut. So, my POTD was to make some #0 nutdrivers.

I used 3/16" O1 drill rod, turning knurls on one end of the 6" tool, and forming a hex socket in the working end. In the lathe, I drilled shallow holes in the ends, sized to the distance across the flats, 0.090" for the bolt head and 0.122" for the nut. To make the hexagonal form, I left the piece in the lathe and put a #0 bolt in the tailstock chuck. Using a propane torch, I heated the work, then cranked the tailstock spindle to force the nut into the red-hot tip. I repeated the heat and press procedure a few times to get the proper penetration. This worked very nicely.
View attachment 118443

One odd thing: I thought that for hardening, you need to quickly dunk the hot steel into oil; just letting it cool off normally is the annealing process, right? So I was surprised to find the tips were now quite hard. This was a problem, since I needed to reduce the hex socket's wall thickness so it would fit into position. I sanded/ground it down until the walls were just 0.015" thick.

(If I had done a better design on my cannon wheels, I'd have spaced the two holes in the spoke shoes a bit further apart, (or maybe used smaller fasteners, i.e. #00.)

Greg
If you've brought O1 up high enough in temperature (i.e. bright red) the hardening happens with a rapid cool down. Since your parts are so small, they likely hardened due to their size and speed of cooling. At this point, they are likely too hard unless you have tempered them slightly. O1 is not a very good steel but has its uses and when too hard, it is very brittle. Bring it back up to 500-600F to temper it back a bit. If you polish it, this is a slight tan/straw color when heating. Since it is so small, you will have to be very careful or you will bring it dead soft again.
 
Right techie, I know of the different mounts, but he said the keepers would keep his chuck from spinning off, so one would only assume he has a threaded spindle mount, not an L taper like the colchester you have
 
Right techie, I know of the different mounts, but he said the keepers would keep his chuck from spinning off, so one would only assume he has a threaded spindle mount, not an L taper like the colchester you have
I wonder if he did something custom.
 
You cant put the tool upside down in the "front" if you have a threaded spindle, just putting that out there in case some people want to do this, he's running the spindle in reverse which is no Bueno for tool pressure on a threaded spindle/chuck
I think that most lathes don't like a lifting action on the slide either. They are built for downward forces into the bed. I don't have much time on lathes since as a toolmaker, my time was mostly on mills, drills, and surface grinders so someone with more experience should chime in.
 
Back
Top