2017 POTD Thread Archive

Franco
You might think of sending that bad board to someone that you know thats good at electronics and let them troubleshoot it (and repair it?)
if possible. it would be good for you to have a backup board on hand if it is fixable. I'd be interested to see where the failure was since this is
one of several small mills that I am interested in.

CHuck the grumpy old guy
 
That's not a bad idea, Chuck. I have considered that. The guys at Grizzly suggested it was probably a capacitor that went bad. I'll have to look for someone who might be able to test it. At this point, I know of no one.
 
Franko
take a magnifying glass and study the board looking for any bulging or deformed capacitors, cracked solder joints or burn or scorch marks. Sometimes it will take a couple times looking to find a bulged capacitor. Could very well be a .25 cent capacitor.
Good luck
Martin
 
Thanks, Martin. I'll give it a good looking over when I take it out.
 
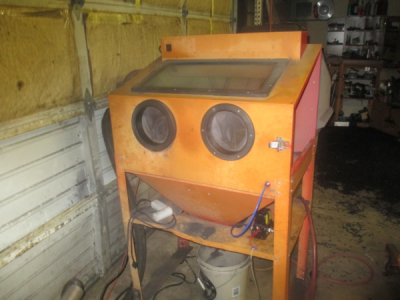
I have some parts to sandblast and my poor old Harbor Freight blast cabinet needed a complete overhaul, so today was the day for a rebuild and some enhancements.

upload_2017-5-4_21-42-24.png

So off to Home Depot for a few odds & ends. New acrylic to replace the frosted glass window, new LED lighting, and some screws to fasten the window frame from the outside.

I looked at all the 2 ft LED lights they had displayed and this one hurt my eyes to look at it, so in the cart. A little pricy at $65.00 but a lot of light. http://www.homedepot.com/s/2%20ft.%20led%20light%20mnlk?NCNI-5

I removed the 2 lamp fixture and installed the new one. About 2 inches square so I have room to install another later if I think I need it, but one seems to be fine. Links to another lamp with a link cable.

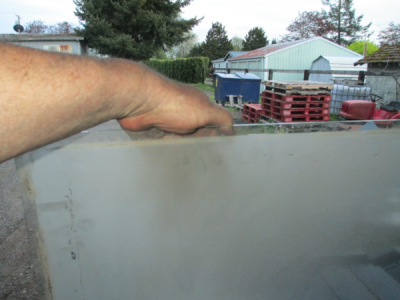
This was the glass window, would make a good privacy window for a bathroom, no wonder I couldn't see much through it. Kinda had a couple places left that I could sorta see through. :rolleyes:

upload_2017-5-4_21-8-52.png

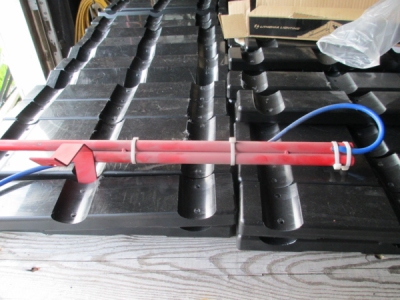
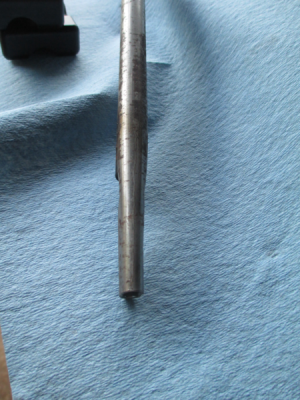
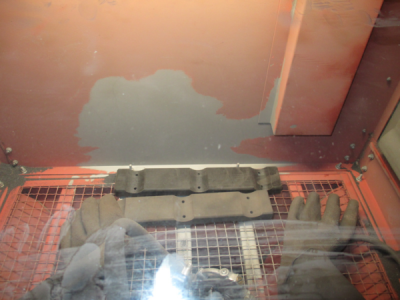
This is the original suction tube. It is built completely wrong, as I'll show in the next picture. :confused: The blue air line is a modification I made the last time I sandblasted the parts (fishing rod holder brackets) you see in the picture. It kinda worked to help blow the sand up the tube to get more volume.

upload_2017-5-4_21-41-24.png

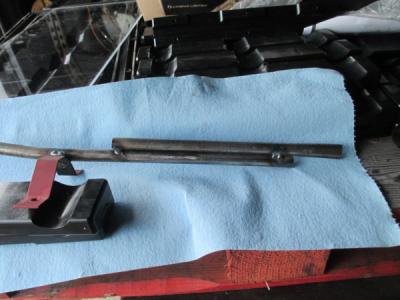
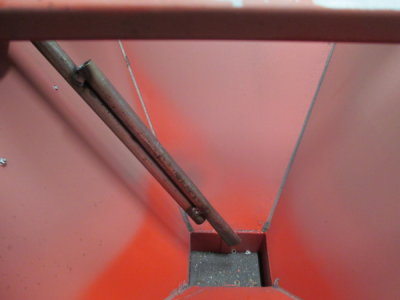
This is the new suction tube, with the ''stiffener'' tube on the top where it is supposed to be. This creates a bit of an air pocket below and controls the sand flow into the suction tube. Makes it much more consistent and clog resistant. Also requires less air to flow the same volume of sand because the sand is not packing around the suction tube.

upload_2017-5-4_21-21-53.png

And a top view showing the slightly squished profile of the ''stiffener''
upload_2017-5-4_21-23-13.png

And installed

upload_2017-5-4_21-24-15.png

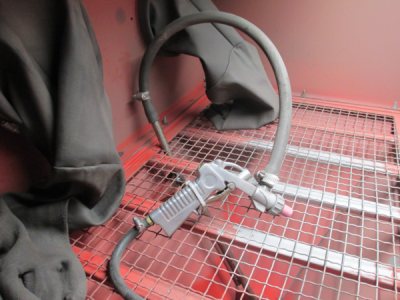
A somewhat modified stock gun. Note the short flex hose and the top entry to the gun. Works much better this way and you can still reach anywhere in the cabinet. Eliminates about 2 feet of hose. To get top entry, just unscrew the air nozzle, flip it over, and screw the air nozzle back in. I have a solenoid valve and a foot switch to run the air, thus the zip-tied trigger.
upload_2017-5-4_21-29-49.png

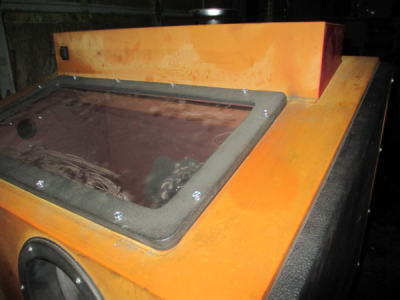
The genius that designed the cabinet wasn't thinking about how to replace the glass. :mad: They use screws through the frame with nuts & washers on the back side. Just about impossible to reach the far end unless you have 2 people or 6 foot arms. So I used some #14 x 1 sheet metal screws to fit the existing holes in the sheet metal, drilled out the frame holes to 1/4 inch, and screwed it in from the outside. Now I can change the window in about 5 minutes and not struggle to do it. :)

upload_2017-5-4_21-35-38.png

And the view through the new window after testing the blaster. With the mods to the suction tube and a new nozzle I get about twice the sand and am using about half the air I was before. I'll see how the acrylic holds up, I bought enough to make 3 windows. If it frosts up too quickly, I have a whole roll of 3 mil Mylar. I'll try to make a quick change sacrificial shield.
upload_2017-5-4_21-37-15.png

Overall, I'm going to call this a success for now :encourage:, but we'll see how it really works out by the time I'm done with 216 parts. :cautious:
 
I have some parts to sandblast and my poor old Harbor Freight blast cabinet needed a complete overhaul, so today was the day for a rebuild and some enhancements.

View attachment 232838

So off to Home Depot for a few odds & ends. New acrylic to replace the frosted glass window, new LED lighting, and some screws to fasten the window frame from the outside.

I looked at all the 2 ft LED lights they had displayed and this one hurt my eyes to look at it, so in the cart. A little pricy at $65.00 but a lot of light. http://www.homedepot.com/s/2%20ft.%20led%20light%20mnlk?NCNI-5

I removed the 2 lamp fixture and installed the new one. About 2 inches square so I have room to install another later if I think I need it, but one seems to be fine. Links to another lamp with a link cable.

This was the glass window, would make a good privacy window for a bathroom, no wonder I couldn't see much through it. Kinda had a couple places left that I could sorta see through. :rolleyes:

View attachment 232830

This is the original suction tube. It is built completely wrong, as I'll show in the next picture. :confused: The blue air line is a modification I made the last time I sandblasted the parts (fishing rod holder brackets) you see in the picture. It kinda worked to help blow the sand up the tube to get more volume.

View attachment 232837

This is the new suction tube, with the ''stiffener'' tube on the top where it is supposed to be. This creates a bit of an air pocket below and controls the sand flow into the suction tube. Makes it much more consistent and clog resistant. Also requires less air to flow the same volume of sand because the sand is not packing around the suction tube.

View attachment 232831

And a top view showing the slightly squished profile of the ''stiffener''
View attachment 232832

And installed

View attachment 232833

A somewhat modified stock gun. Note the short flex hose and the top entry to the gun. Works much better this way and you can still reach anywhere in the cabinet. Eliminates about 2 feet of hose. To get top entry, just unscrew the air nozzle, flip it over, and screw the air nozzle back in. I have a solenoid valve and a foot switch to run the air, thus the zip-tied trigger.
View attachment 232834

The genius that designed the cabinet wasn't thinking about how to replace the glass. :mad: They use screws through the frame with nuts & washers on the back side. Just about impossible to reach the far end unless you have 2 people or 6 foot arms. So I used some #14 x 1 sheet metal screws to fit the existing holes in the sheet metal, drilled out the frame holes to 1/4 inch, and screwed it in from the outside. Now I can change the window in about 5 minutes and not struggle to do it. :)

View attachment 232835

And the view through the new window after testing the blaster. With the mods to the suction tube and a new nozzle I get about twice the sand and am using about half the air I was before. I'll see how the acrylic holds up, I bought enough to make 3 windows. If it frosts up too quickly, I have a whole roll of 3 mil Mylar. I'll try to make a quick change sacrificial shield.
View attachment 232836

Overall, I'm going to call this a success for now :encourage:, but we'll see how it really works out by the time I'm done with 216 parts. :cautious:


Looks good Jim. I have a blast cabinet thats about 20 years old. Still works pretty good , but I have the same problem with seeing thru the lexan window with the mylar sacrificial shield I use on mine. You can put a new one on it and it last about 5 or6 times before you can't see thru it at all. Always wonder if glass might last longer.
 
:dancing banana:
The blown mill Motor PC board arrived today and it is installed and it's a mill again.
All it took was cubic money. About $317.
Grizzly made it easy. All the wires were marked clearly with tags. Two plugs and about 6 wires got it done.

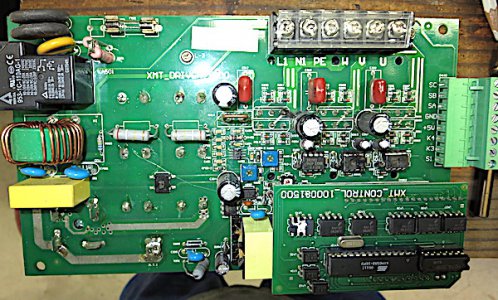
This is the offending PC board.
IMG_0976.JPG

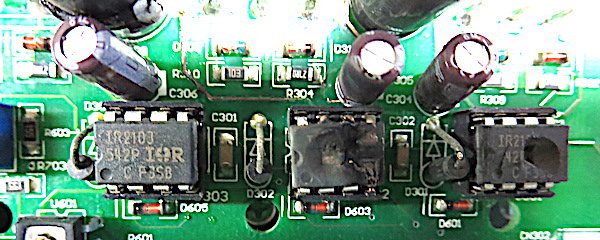
These are the offending components. The two on the right are melted and burnt.
IMG_0979.JPG

I have no idea what they are, but replacing them would require major surgery. They are soldered in (8 pins each) and the only way to get to the back of the board would be to unsolder 24 large pins from the board that are attached to gizmos that are screwed to the heat sink on the back of the board. That would be to just get access to the 24 pins that attach the burnt components. Screws hold the other gizmos on the heat sink that can't be reached unless the pins on the gizmos are unsoldered. There is about a half inch between the bottom of the board and the heads of the phillips screw heads.

It might be possible to clip the component pins from the board and splice the new component pins to the stubs, but that would be some tricky close quarter solder work.
 
Last edited:
They look like they are put into holder, and the holders are soldered to the board. Hard to tell if that's the case. But if it is, you only have to order the 2 chips and pop them out and pop them in. The caps look like they are burnt, but probably from the chips, but if I were replacing the 2 chips I would also do the 2 caps.
Since you don't like doing these, see if there's someone in your area. Some kids are good at this too, if you can't find an adult. To me they look very fixable. See if you can read the part #, or if the other board has the same part #... I'll bet they are not expensive. Based on the part to the left, if they are the same, .027 cents a piece. They are mosfet switches... So they may indeed be soldered in , but it really looks like a holder .. normally the mosfet is screwed to a heat sink don't really know how the heat sink works from the bottom.
 
He could check the new board to discover if the chips are the same. as the old one and also if they are the same in all three stops ken
 
Back
Top