

- Joined
- Sep 28, 2022
- Messages
- 141
I have a couple of thoughts. The reason the originals are mostly gone is that they were mostly cast iron – long ago broken, repaired and discarded. I would make the plates out of 1” especially on an older American arbor press just because these tended to be built well and sometimes are overloaded. It’s a little like someone saying they will only ever need to lift 1 ton on a 2-ton hoist. Sooner or later it will get tested to the max.
As far as size, I would make it where it extends a little beyond the ram. If you make them too big, the plates can tip.
A 10” lathe I think would be a little small, but a lathe isn’t required. It just makes the finished product look a little more professional. I would say to build one at a minimum you would need a torch, angle grinder with a cone wheel, and a drill. If you are, you are going to make a snail plate, you need a mill to drill the holes and bore them to size. As I said, this would be a minimum, but there are lots of ways to get there. What larger machines get you is a little nicer finished product and rather than being a weekend project it becomes one done in an afternoon.
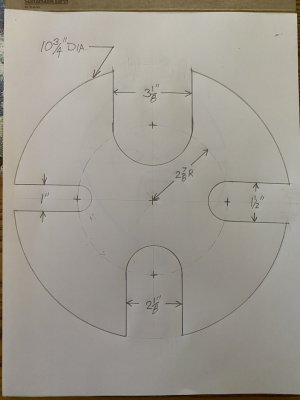

") - draw it out full size on some cardboard, cut it out, and try it on the press and see if it works for you.
- draw it out full size on some cardboard, cut it out, and try it on the press and see if it works for you.