[How do I?] Help Me Build My Bogies

James, nice project! I too would suggest using Delrin for the all of the same reasons.

I've actually been looking for a good source of Delrin stock ever since Terry mentioned it. Although I've been thinking of using it to insulate the axles and as the main crossmember of the bogie chassis. I won't need my bogies to be insulated across the wheels, but if I ever decide to make any of these to put up for sale on eBay they had better be insulated for normal use.

As far as making the wheels themselves out of Delrin, I agree that would be very practical, especially in terms of easy machining. They even may make better wheels functionally. But part of the reason I wanted to make my own bogies was to get away from plastic. (hee hee) So to end up using plastic seems to be self-defeating part of my original purpose. Although a secondary purpose for making my own is cost savings. Bogies are EXPENSIVE! Even for the cheapest plastic ones. When I realized I could make my own from Aluminum and Brass for less that what I would pay for an injection molded plastic bogie I was excited.

Now you guys want me to go right back to plastic again. Phooey!

But I agree it would be more practical. That's for sure. Far easier to machine.
 
I congratulate you for your unconventional method of building model trains. I am in the exact same situation as you; no money. I build trains in 3/4" to the foot scale. My materials are wood, metals and plastics. They are all models of electrics and diesels, (no steam) and they operate with on-board batteries and R/C. The wheels I made were 3/8" thick x 2-3/4" dia. material was 6061. I used a hole saw to cut discs from the 6061; then with a jig, finish turned them on the lathe. I used loctite to secure the wheels to the axles. This may be a better solution to round stock. Cutting it with a parting tool will still require a skim cut to clean up the wheel. Most of the bodies are wood, but the running gear is all metal. I find that browsing in thrift stores and home centers, I can find materials to use. For example; when I needed a headlight, a visit to a Dollar store produced a cheap $1. flashlight. The bulb and reflector were perfect in size; all I had to do was to build a case for it. I do have a lot of aluminum rail I have had for a long time and It is used to make my own track.
 
I congratulate you for your unconventional method of building model trains.

Hi Ron, I'll need to make it actually work before congratulations are in order. It's a humongous project and I'm taking a big chance that it will work out ok. But as you point out, it's either this or nothing, because I simply can't afford to just buy conventional materials.

Your method of making wheels sounds interesting, I've already purchased the round stock so I'll see where that leads for now. If it's too much trouble I might just end up going with the Delrin wheels as suggested by others in the thread.

I find that browsing in thrift stores and home centers, I can find materials to use.

I'm suffering from an extreme loss in that department right now. I live in a fairly rural area and there isn't much around. However there was a Trader Horn store here very close to me that I depended on for all my DIY projects which includes just about everything I do! They carried a very wide range of materials and supplies and they were my absolute favorite store in the area. I lived by them. But just yesterday I went over to pick up some filters for my water system only to discover they are CLOSING!

This hit me like a ton of bricks. I was devastated with both feelings of panic and the loss of something I basically considered to a "Good Friend". They have been there since 1958, and I've been dealing with them ever since. The same people have been there for years. This is like having your best friend die. It feels that way in my gut. I can't believe they are closing down. It's end of an era.

In any case, there are no other decent hardware stores or home improvement centers near by. I'll have to travel at least 35 miles now just to find another home improvement hardware store. And I know they won't be as good as this Trader Horn was. I used to buy all my nuts and bolts by the pound there. They were my lifeblood as a do-it-yourselfer. They even had an automotive section and carried DIY items that many of the other local auto parts stores didn't even carry. And I keep all my own cars running. I can't afford to take them to a garage. If I can't fix it myself it goes to the scrap yard. :grin:

So I'm suffering from a serious loss here right now. I have that same hollow empty feeling in me that you get when someone close to you dies. This store closing really is like a close friend dying. I knew every employee that worked there. They have been there for years like a close-knit family.

I'm just totally sick to my stomach right now. I'm also a little panicking over how I'm going to survive without this fantastic hardware store just down the street. This is going to change my life dramatically.

My sister says that something like a Home Depot or Lowes will move in to fill the vacancy. I hope she's right. We do need a decent home improvement store in this area now that this one is gone. It won't be as nice as the original story I'm sure, but even a Home Depot would be better than nothing. We do have a Walmart Supercenter but they don't carry home improvement supplies.

Sorry for the rant. But I'm just ready to break down and cry here. This is a major loss for me. I can get some stuff online mail order. So it's not the end of the world. But still, I was so used to just running down the street every time I needed something. Those days are gone. Goodbye to the past, and hello to the future. Yuk!
 
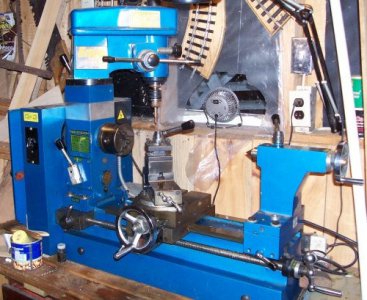
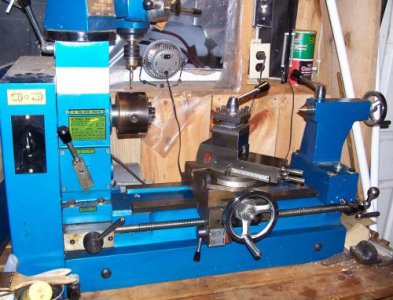
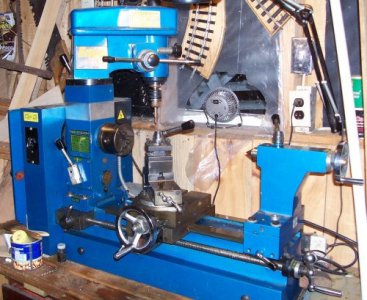
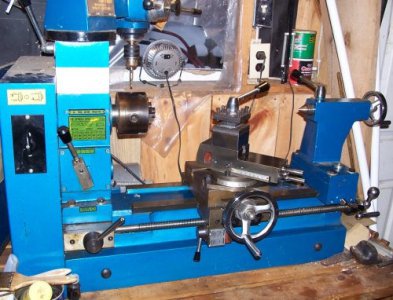
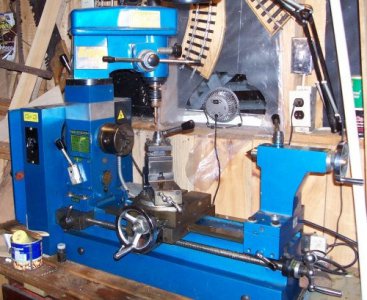
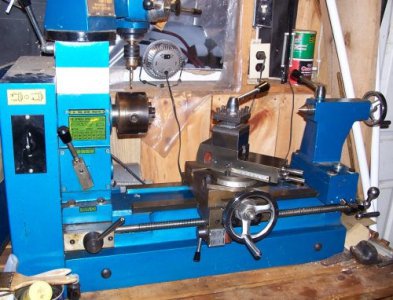
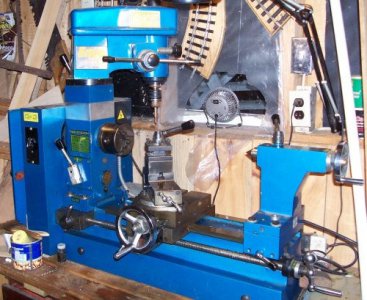
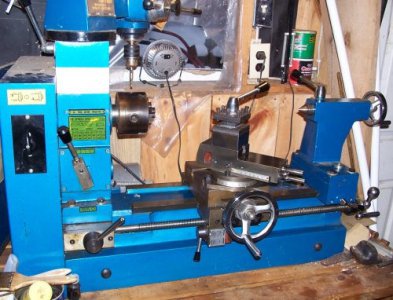
I was out in the shop cleaning up the lathe. It was buried in junk and quite rusty. I had to clean it all up with a wire brush on a hand-held grinder motor. Not looking too bad now.

25110358386_32a67bb1d6.jpg

25110358406_ba47744f9d.jpg

It's been a while since I've run this beast so I'm going to need to relearn how to do this.

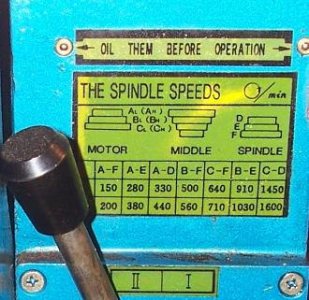
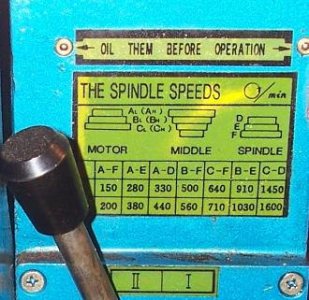
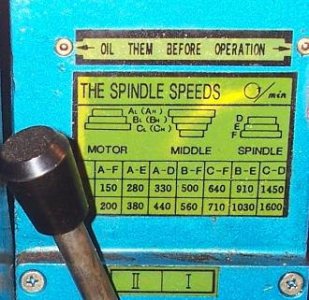
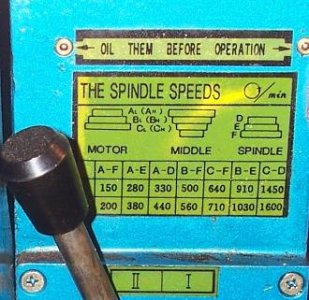
I just realized the first order of business is to figure out what spindle speed to use. I have no clue. I just turn it on and it spins. (hee hee) I think the last time I used it I was cutting plastic parts so I probably have it cranked up about as fast as it will go. I don't even think I have a manual for this lathe, but fortunately the stickers on it are in pretty good shape.

25110358426_c7e904aa58.jpg

It appears it has a range of speeds from 150 rpm to 1600 rpm. So what speed range should I use for turning these aluminum wheels?

It's a good thing I read that label too. I better oil this thing up before I turn it on. Although I did run it when I was wire-brushing down the chuck and it seemed to run pretty smoothly.

Apparently it has a 4" 3-jaw chuck. Non-removable. I didn't know it didn't screw off when I bought this lathe. But it does come with a second set of jaws for grabbing I.D. or O.D. so that's nice.

If I sound like an idiot here it's probably because I am. :grin: I used to be really sharp when I was younger, you'll have to take my word on that. But lately I've been loosing mental capacity and probably shouldn't be playing with these dangerous toys anymore. But what the heck I can't just sit around doing nothing.

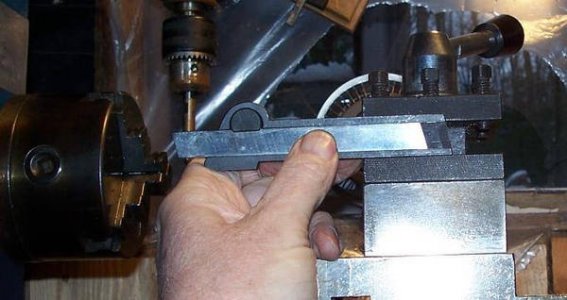
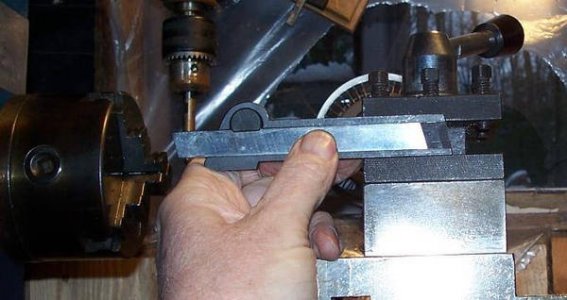
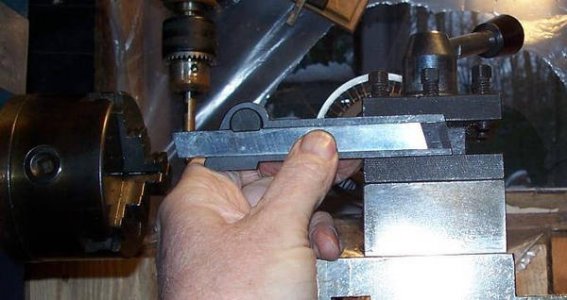
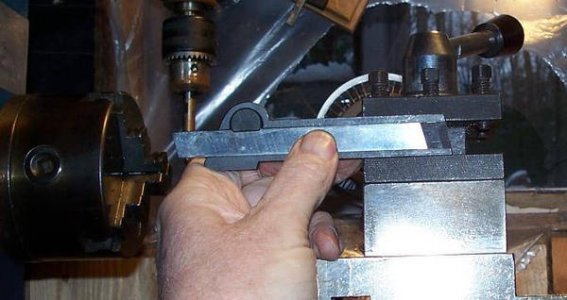
In any case, I remember now why I never used that parting tool before. It doesn't fit into the tool holder!

25110358436_3578c0dc61_b.jpg

If you look close you can see that it's quite a bit too tall. I was thinking of sticking it in a vice and grinding it down, some off the top and some off the bottom until I get it to fit. I think there's enough room to do that without grinding clear down to the actual grooves that hold the tool.

I just don't have anyway to hold this other than my turret tool holder. I don't have any other kind of tool post holders. And besides, I'd like to have it mounted on the tool turret so I can just click over to it when I need it.

So I guess I'll have to look into grinding that thing down. I can't mill it or drill it, it's hardened. I actually bought it with this lathe, I had no clue it wasn't going to fit. But I think I can grind it down enough to fit, hopefully. It's never been used. Precisely because it doesn't fit!


For your speed calculations in aluminum the safe parameters are: 500-600 SFM/for single-point work. To calculate it you need the surface area of your material and multiply it by the inch per minute count. Proceed like this: 500*12= 6000 IPM (inch per minute) times surface area. Your stock is 1.5"OD therefore: 1.5*3.1417=4.713. Now divide IPM/SA: 6000/4.713=1273. Your best performance would be at 1273RPM. If you send me your email I can send you in return A complete list of feed and speed's charts.

25110358386_32a67bb1d6.jpg

25110358406_ba47744f9d.jpg

25110358426_c7e904aa58.jpg

25110358436_3578c0dc61_b.jpg

25110358386_32a67bb1d6.jpg

25110358406_ba47744f9d.jpg

25110358426_c7e904aa58.jpg

25110358436_3578c0dc61_b.jpg

25110358386_32a67bb1d6.jpg

25110358406_ba47744f9d.jpg

25110358426_c7e904aa58.jpg

25110358436_3578c0dc61_b.jpg
 
I work mainly with aluminum. It is a very forgiving material to work with. Almost any tool form and speed will work to cut it as long as it is sharp and set on center. When I grind a tool, I just eyeball clearance angles. 5° or 10° angle doesn't matter much as aluminum is soft and machines easily, so I wouldn't sweat precise tool angles. Only when working ferrous metals and stainless steel, does angles and speeds matter more. A coolant is required for machining aluminum. WD-40 works great. Always use it to keep aluminum chips from "welding" to the HSS tool. Using WD-40 spells the difference between a drilled or tapped hole and a broken drill or tap. Many do not use a coolant because it is messy, but it is an absolute necessity for a good job without broken tools. I mention this based on my own experience. Cutting tools are expensive and I can't afford to buy $20 end mills after they break.

I have made rails from wood, but only for display. I thought about using wood for an operating railroad, but I don't think they would stand up too well on the 3/4" scale I am using. My locomotives weigh around 30# with a battery; (I use a lawn tractor or motorcycle battery).

I was building models in 1-1/2" scale using the same method as with the 3/4" trains. The weight of a locomotive is more like 100#, so wood rails would be out of the question. I stopped building in the larger scale as I was running out of room. The reason for choosing 3/4" scale is I can use common building materials and fasteners. I use 2-56 and 4-40 machine screws to hold everything together. I use the following materials for building my models:
  • Double stick tape
  • 3M VHB transfer tape
  • contact cement
  • epoxy
  • crazy glue
  • Titebond adhesive
  • Aircraft plywood (available in thicknesses ranging from 1/32" to 1/4")
  • Thin aluminum "garage sale" signs These are around .020" thick and good for car sides and easy to cut and bond, using transfer tape.
That is about all the time I have now, as I have to go to my shop to work on a project for my son. I am building a closet for his new nursery. I will get back to you later if you need any assistance with your project.
 
Mr. Ron,

I'm interesting in hearing more about your WD-40 coolant system. How are you applying the WD-40 to the workpiece and tool? Are you using a standard recirculating system where the WD-40 is constantly running? Or do you just apply WD-40 manually intermittently as you are cutting?

My lathe isn't equipped with a coolant recirculating system. I suppose I could build one from scratch, or maybe pick up some sort of generic coolant system. I'm not fond of the mess of using a coolant either, but then again, it if makes the job go smoother and increases tool life, I might consider this.
 
See if your tool holder (the one that goes in your tool post) is very hard. If you can cut it in your mill, enlarge the slot to hold your cut off tool in its holder. you will use this a lot, so it should have its own holder.
If you can't do this just hold the cutoff tool without its holder using shims and ingenuity.
But, if this was my job, I would chuck up the alum bar, get it to run true and centerdrill and then drill a 1/4 inch ** or so hole and ream. Then cut off a chunk as deep as the hole and band saw into coins the thickness of the wheel +1/16".
Make a mandrel to hold the coin and you can cut both sides to profile and thickness.
Press in a bushing of anything to fit your axle.
And most importantly, make a prototype track and bogie so you are sure you have the dimensions and LOOK correct, before you burn up a lot of time. I applaud your ambition. Build it and they will come.
**I don't think a 1/8" mandrel will be stiff enough.

I think your wood tracks will work fine if you can control the wood movement. Try to use quarter-sawn wood for the track base and give it a good soak in oil based wood finish to keep the water out.
 
@Steve,

The tool holder was too hardened to cut. So I ended up putting it in a vice and just grinding it down with a hand-held grinder. That actually worked pretty well. I had to grind some off the top and off the bottom of the tool holder in order to avoid grinding into the grooves that hold the cut-off tool. I did this by just eye-balling the top surface of the tool holder against the top of the vice jaws and then just grinding down to the surface of the vice. That seems to work really well to keep things nice and square. When I got it down to where it was just barely starting to fit into the tool turret I finished it off, squaring it up even more by hand using a file for the finishing touch. It came out pretty nice. It now fits into the tool turret. This beats trying to hold the cut-off tool all by itself, as I was doing before!
 
Back
Top