Keyed Washer/spacer

Hey Sav,
i have a win-win for you...
tell swmbo, that you are working on a gift for her or someone she adores, and can't be disturbed because it's a surprise.
she won't mess with you, you get to play in the shop for double the length of time because "i want it to be extra special and perfect!";)!!!!
win- win
 
EDM now works, actually its such a simple unit that spark eroder is probably a better term.
Now have to shape an electrode.
Its getting exciting.
 
Savarin,

Since this is your thread maybe this is not too bad of "topic hijack"........I thought about PMing you, but it sounds above like others are also interested.

Can you provide some info on your EDM?
I have collected some books (Langois https://secure.villagepress.com/store/items/detail/item/797) and articles on building one and started collecting parts to build my own.
I am justifying it as being for dealing with the occasional broken bolt, though really it's just because it looks really interesting.

I have so many questions.....
-do you use a stepper motor and lead screw; if so what step angle and thread? any micro-stepping?
-does your motor controller advance then retract on low spark voltage?
-what kind of linear bearing arrangement did you use?
-what are you using for the electrolyte fluid?
-do you pulse the spark voltage?
-what worked well and what would you do differently?

Have you already published any info or photos here?
If not, perhaps a new thread is in order for these details (with a link to it from here).

Thanks!
-brino
 
Hi Brino,
No steppers
the solenoid auto retracts once it sparks.
Linear bearings?? a hole in the wood
Kero as a fluid.
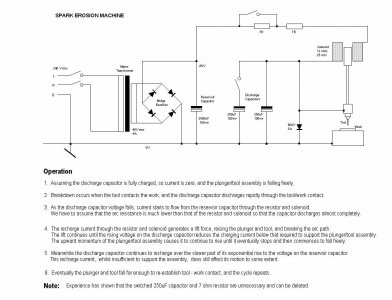
The circuit I used is this one by Derek Lynas its not a speedy system by any means.
What would I do differently? build the pulse version from the book by ben fleming

eroder.jpg

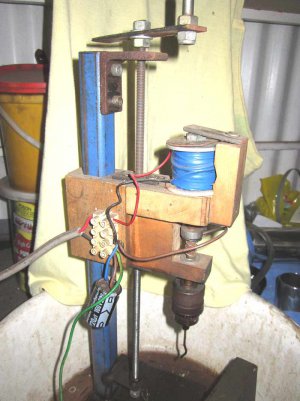
I used an old welder and tapped into the transformer for the 40V, the vertical column is 1" square tubing welded to a 6mm steel base.
The rest is bits of wood glued and screwed.
It works but I hesitate to recommend it due to how easy it is to short it out. Its never bitten me yet but I have shorted it and blown the diodes.
The larger caps and rectifier are inside the welder case.
The earth wire connects to the work piece and the bowel is filled with kero.
You cant leave it whilst running but sometimes the vibration auto screws the head down at the correct rate.
spark-eroder.jpg
 
Wow, so elegantly in it's simplicity! :applause 2:

In all the stuff I read I saw either an engraver solenoid re-used as a vibrator, or complex stepper motor designs.

You cant leave it whilst running but sometimes the vibration auto screws the head down at the correct rate.
Nice! :grin big:

Thanks so much for your quick response with a circuit diagram, write-up and photo!
It is very much appreciated.

-brino
 
To continue
I cut a chunk of brass from a failed casting that was chockers with porosity, turned it to 12mm and cut the 5mm keyway in it for a test electrode.
This stuff was like a brass sponge it was so porous.
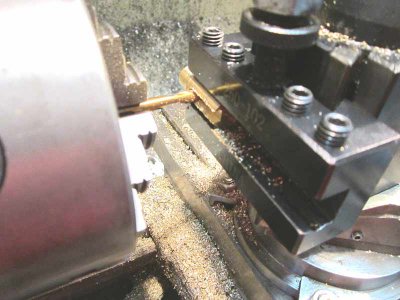
cutting-key.jpg

Then had to cut a 3mm keyway along the shaft of the eroder as previously I hadnt bothered with it rotating, but to burn the tab I cant allow that shaft to rotate otherwise it will destroy the tab.
As it is now apart I thought some may be interested in how simplistic it all is.
The keyway is not perfect as I stumbled a tad at one end but it shouldnt be a problem as the key doesnt reach that bit.
The small cylinder screws to the top of the shaft and is pulled up when the coil energises, the one with the flange and bolt sits in the top of the coil and acts as a magnetic amplifier (I believe but am not sure) and also acts as a stop,
The plastic disk cut from a milk bottle prevents the two steel chunks from sticking together so the assembly will fall when the coil de-energises (is that a word?) The washers and spring allow a bit of tuning to get a fast "bounce" rate and help lift the assembly.
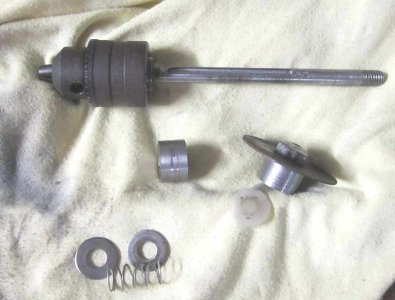
parts.jpg

Reassembled with a bodgy adjustable key. The coil is a reel of enamel winding wire purchased from our version of radio shack with the flanges cut so it can sit close to the end and wont rotate.
The plate that holds the coil down is again adjustable so the coil can move a very small amount so the shaft/steel cylinder wont jam.
The two wooden arms that the shaft slides in have pressed in steel bushes.
The reason for the cap just hanging there is thats the one I've burnt out and it may happen again.
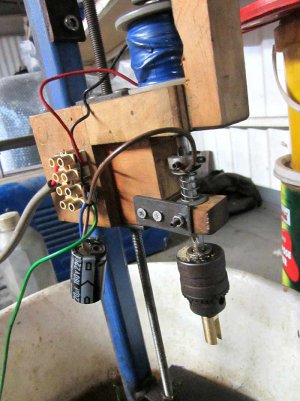
new-head.jpg
Now I have to cut the stainless and figure out how to hold it down.
Will it or wont it? Will the brass electrode dissolve? stay tuned for the next exciting episode.
 
Excellent cobbled rig, if only making several parts burn the ID feature first holding the stock easily with clamps then make a second electrode and do the OD, done deal, using a 3 jaw drill chuck changing will be easy. I imagine that copper tubing would male an decent tool for this.
 
If the part were a small dia then that would be an excellent idea, one to keep for the future.
I will make a mandrel to bolt it to and cut to close size with the angle grinder then turn to size.
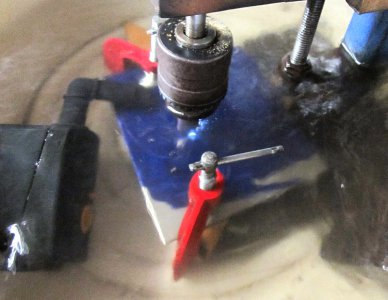
Here it is just starting in clean clear kero, you can see the spark, I'm using an old small aquarium pump to blow the kero across the bottom of the electrode to clear the debris.
Within 5 mins this clear fluid was jet black and you couldnt see theough it.
sparking.jpg

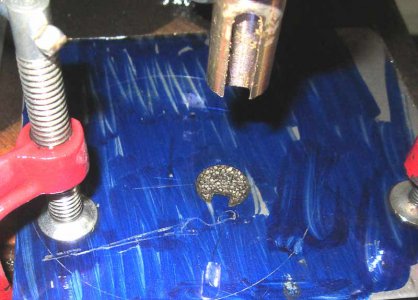
and here it is after 30 mins, an interesting finish in the hole.
half-way.jpg
no pics of the finished hole because I left it running for 45 mins when suddenly the cap started smoking.
Another blown cap and the coil was very hot.
I really need a competent electronics guy to take some measurements to find out where I'm wrong.
I think the welder transformer is punching out too high a voltage and amperage.
I will try a different cap today and see what happens.
Once I can keep it going I can see some interesting stuff in the future.
 
Could you just take a stainless washer, and steak the edge of the hole using a drive pin punch? Might have to heat it with a torch, and it wouldn't be precision, but it might work.
 
Ahh, but wheres the coolness factor? :laughing:
seriously though I really want to get this working correctly for all the things it can do in the future. Burning out broken drills and taps was no problem but this one is a tad more difficult.
 
Back
Top