-
Welcome back Guest! Did you know you can mentor other members here at H-M? If not, please check out our Relaunch of Hobby Machinist Mentoring Program!
You are using an out of date browser. It may not display this or other websites correctly.
You should upgrade or use an alternative browser.
You should upgrade or use an alternative browser.
Shop Made Chamfering Machine
- Thread starter FLguy
- Start date
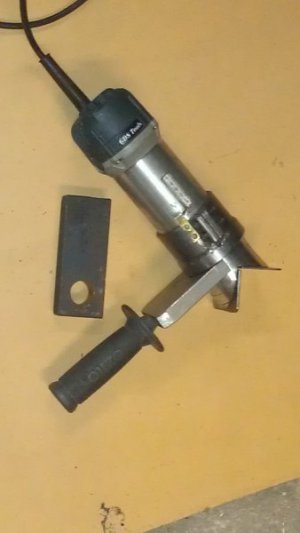
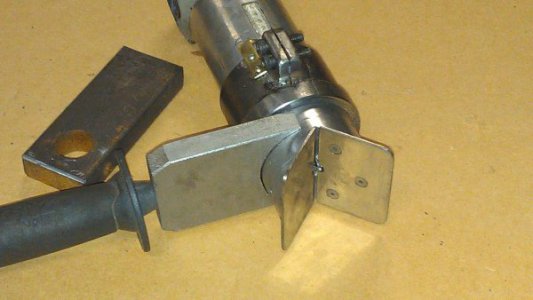
I'm building up one today using a 1 hp. router and I will use what ever cutter shape on it's side, not the end. Should get a better finish that way. The router has deepth adj. via. a scroll ring and I'm using a adj. "rip Fence". I'm using what ever was laying around in the shop nothing bought just for this project. The table and fence will be dressed with UHMW or nylon sheet to prevent marring any surfaces.That home made one on the youtube uses the end of the end mill to do the chamfering. It looks like the factory ones use the side of the end mill. I wonder if one cutting surface/location is better than the other? If you used the side you could move the end mill around when it gets dull in one spot.
- Joined
- Mar 19, 2014
- Messages
- 2,681
That sounds great GLguy! I think a lot of folks on the HM would love to see some pics of it when you are doneI'm building up one today using a 1 hp. router and I will use what ever cutter shape on it's side, not the end. Should get a better finish that way. The router has deepth adj. via. a scroll ring and I'm using a adj. "rip Fence". I'm using what ever was laying around in the shop nothing bought just for this project. The table and fence will be dressed with UHMW or nylon sheet to prevent marring any surfaces.
That home made one on the youtube uses the end of the end mill to do the chamfering. It looks like the factory ones use the side of the end mill. I wonder if one cutting surface/location is better than the other?
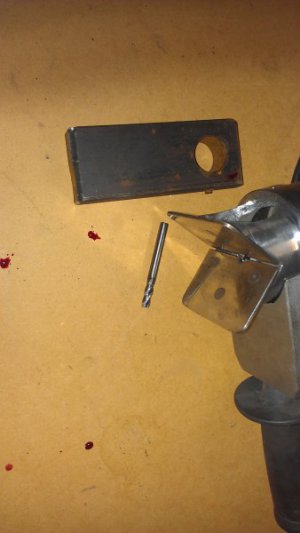
I don't have pics of my Makita router testing mockup but will post some when I get back to this. My own results thus far is that a 90-deg end mill is preferable. It sticks straight out from the router, so the 45-deg 'fence' has to be rigged up to control the angle & depth (like the Stefan YouTube and JoeInOz configuration). Regular EM's are easy to source, more sizes & flute selection & generally less costly. The EM cutting action seems to be better because the load goes through the center axis vs. maybe some bit deflection with side load? Aluminum was not bad but steel wasn't as nice. I think it was ~0.075" chamfer. I have done chamfering in the mill with 45-deg carbide multi-flute cutters. Those results look better than my router trials, so suspect the mill is benefitting from the rigidity of the setup. Everything is clamped down & solid vs. the router is a bit more floaty. Another issue I need to address on router is swarf. Wood dust in the in the motor windings is bad enough, but metal dust & shavings is going to be a problem.
- Joined
- Mar 19, 2014
- Messages
- 2,681
Thank you for your input! I suppose a carbide burr, grinding wheel design, abrasive belt, or? could be used to do the chamfering. I am personally looking for a narrow 45° chamfer with high accuracy. And machine to do it with that has good control.I don't have pics of my Makita router testing mockup but will post some when I get back to this. My own results thus far is that a 90-deg end mill is preferable. It sticks straight out from the router, so the 45-deg 'fence' has to be rigged up to control the angle & depth (like the Stefan YouTube and JoeInOz configuration). Regular EM's are easy to source, more sizes & flute selection & generally less costly. The EM cutting action seems to be better because the load goes through the center axis vs. maybe some bit deflection with side load? Aluminum was not bad but steel wasn't as nice. I think it was ~0.075" chamfer. I have done chamfering in the mill with 45-deg carbide multi-flute cutters. Those results look better than my router trials, so suspect the mill is benefitting from the rigidity of the setup. Everything is clamped down & solid vs. the router is a bit more floaty. Another issue I need to address on router is swarf. Wood dust in the in the motor windings is bad enough, but metal dust & shavings is going to be a problem.
Boy, there sure is a lot of things that require getting done before my chamfer machine, but I'll be using a South Bend lathe compound to adj. the fence giving me depth of cut adj. along with the routers micrometer depth of cut. Think horizontal then vertical. More than necessary but if I need to creep up to the desired dimension of the profile I want to use, (think, bull nose, large radii, ogees), SB compound and the routers adj. makes it safer and easier to do. I'm thinking the way my work backlog is it may be an other month before completion. No matter, I'm having fun making chips.
- Joined
- Jul 2, 2014
- Messages
- 7,594
Fun discussion, and I like all the different takes on it. Keeps the gray matter active. What would REALLY be nice is to be able to do that sort of chamfering on the ends of cylinders without a bunch of setup. Coolest would be doing straight edges and diameters on the same machine with the same setup, or a quick fence swap... (Boldly trolling for someone else to do the design... ;-)
Bob, I like the way you think. Say I make a V-block with 2 locating pins so that it's aligned perpendicular to the fence, maybe make 2 V-blocks for larger range of cly. / tube dias.. All the machine surfaces in contact with the part will have a thin layer of UHMW applied as these areas are AL. Thanks Bob for helping keeping my gray matter active!


