Time to fix up the truck.

Flyinfool

H-M Supporter - Diamond Member
H-M Lifetime Diamond Member
Joined
Apr 29, 2019
Messages
2,060
I figured that this is still fair game since it does involve metalworking.

I have a 2011 Chevy Silverado that was built in early Sept of 2010, so it is now 13 years old but only has 150K on the clock so it is pretty young mechanically.

The rear wheel wells are rusted out bad, the rest of the truck is pretty decent, so I decided to try my hand at some body work. I have never done body work before so this is all new to me and I am sure there are better ways of doing everything that I am doing. I also have nearly zero artistic ability so that does not help much either.

Last fall I did the passenger side. Unfortunately I did not get to take a lot of pics of the process. But I will post what I have.

I am now starting the drivers side and hope to remember to take more pics along the way.

For me this is a slow process. I do not have a garage to work in so everything is weather dependant, and at the end of every days work all tools bust be put away or they will grow legs by morning. and then everything has to come back out and get set up to start working again. Then just to make it more difficult on myself at the end of each nights work the truck must be derivable so that I can go to work in the morning.

So here is what I have from last year

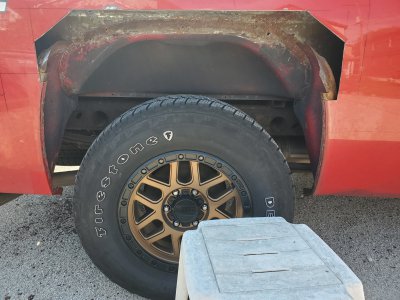
This is what it looked like when I started.


Step one was to cut away the cancer. This included the top of the inner wheel well. The lower parts of the wheel well were salvageable.

20220917_115643.jpg

20220917_115728.jpg

20220917_115753.jpg

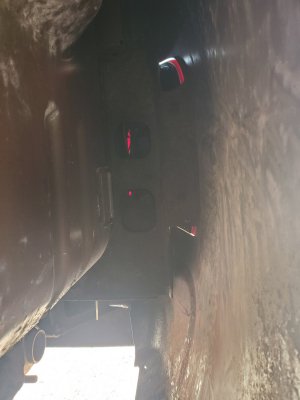
You can see that there was a lot of surface rust to clean up on the parts I was keeping. The process was to sand and wire brush away most of it and then use a rust conversion coating on what was left.and prime and paint everything using rust preventing paints.
 

Attachments

  • 20220917_115709.jpg
    20220917_115709.jpg
    525.9 KB · Views: 9
Now come the fun parts.

I purchased a exterior repair panel and a new top section of the wheel well. I did loose around 4 inches on each side of the lower inner wheel well so I had to fabricate new parts to fill the gap between the upper and lower wheel well.

Here is the inner wheel well installed and painted ready for the new outer skin.

20221012_182445.jpg

While working on this I made the "mistake" of removing the tail light and found that all of the inner structure in that corner was basically rusted away and gone. So I had to fabricate new parts to rebuild that and weld them in. The factory part was one piece but it was installed before the outer skin was mated to the box, I had the new part all made to look close to like the original part and then realized that there was no possible way to get it in there. So I had to cut it in half vertically and then weld the 2 halves back together once in place.
I never thought to snap a pic till it was all done and painted

20221023_105736.jpg
 
It is all the inner and preliminary stuff that takes all of the time. The actual time of putting it all together actually goes pretty fast.

So here is the final steps of putting in the outer skin.

Started by cutting the truck body an the patch pannel to match each other. I did this by cutting the patch panel about 3/4 inch oversize compaired to the hole it had to fill. I then installed it with Clecos and used a Sharpie to draw a line around it. Now I could cut the body to just the inside edhe of that line and have a perfect fit. There was only one spot about 3 inches long that had around a .030 gap to weld shut all the reast was just barely touching. I even supprised my self at the fit that I got. Welding body work is a royal PITA. It is just a series of hundereds of small tack welds with no 2 wels touching untill the area is fully cooled down to ambiant temp. Treat the whole seam as one weld whith each weld centered between the last welds. and never ay 2 fresh weld within 6 inches of each other. You just keep making tacks until you have gotten full coverage. I was lucky that most of the warpage that did happen was that the seam was depressed about 1/16 to 1/8 inch from the finished surface and only in an are about 2 inches wide. This meant that I did not have to grind the weld flush and risk opening up any pin holes that would have to be rewelded. It took just a little bit of fiber filled body filler to bring thae weld back to flush with the rest of the surface. and then just a bit of lightweight filler to smooth it all out. You can see that a lot of the area is still bare metal after all the filling was done. The black areas are the original paint that the factory put on the repair panels. A splash of red that was custom mixed to match the 13 years of paint fading and it is hard to tell where the repairs are. I also had to paint the bottom of the passenger front door since it was also covered about 3 inches high with surface rust. I do not have any pics of that since it was just a wire brush off the loose rust, rust killer, many coats of primer and sanding to make it all smooth again and a splash of paint and clear.

This is the new panel welded in with some light grinding to knock down the high spots.

20221020_175116.jpg

This id the fillers ready for prime and paint, it is a lot thinner than it looks.

20221022_080828.jpg

This is the side of the truck to show the door and the wheel well all painted.

20221023_160300.jpg

A closer view of the repaired wheel well. What looks like a white dent above and toward the front of the wheel is really a reflection of a lawn chair in the background.

20221023_160322.jpg

No it is not perfect by any stretch of the imagination, As I said in the begining this was my first ever attempt at body work. I did learn a lot along the way. I do plan to scuff and re clear the whole side of the box when I clear the other side. I was not able to get the gloss to anywhere near match the repaired areas to the 13 year old areas. There are also a couple of curtains that I have to sand out.
 
Now for the work I am doing currently.......

Again this is my starting point.

20220917_115643.jpg

This time I had to cut out the outer rust but no part of the inner wheel well was salvageable so it is all out. This left the outer panels free to really flop around in the wind so I had to make some temporary bracket to hold them in place so that the wind on the freeway would not just fold the panels over.

20230923_134910.jpg

This is a view looking to the rear from the wheel well of the inside of the fender area. LOTS of rust to clean up, and I can see from here that I will once again be rebuilding the tail light area.

20230923_134926.jpg

This id the view looking forward from the wheel well. Every one of those white dots is a spot of rust coming thru the inner factory coating, so every one of them needs to get hit with the wire brush to get off the loose paint so the the rust killer and get in to do its thing. This alone is the biggest and hardest part of the whole job.

20230923_134938.jpg

This is a view of just the wheel well to show the amount of rust cleanup that needs to be done everywhere.

20230923_134954.jpg

This where the project is at right now. I still have a LOT of rust cleanup to do. Once the cleanup and prep is done the welding of all the parts in place is just a weekend job. Another weekend for all of the final bodywork and priming and then splash on some paint and clear both sides of the box.

Sound easy huh?
 

Attachments

  • 20230923_134917.jpg
    20230923_134917.jpg
    153.8 KB · Views: 6
Yes you did a good job. We have that salt problem too here.
How's your frame look? Surface rust? Or getting holes?
 
Looks like you are doing a fine job. The previous owner of my 2003 truck had the rear fenders repaired professionally before I bought it in 2016. Those repairs started showing their ugly head again about 4 years ago.

But now the entire box is rusting away , and the front corners has dropped about 3”. Michigan winters are hard on vehicles, especially when the owners do not any preventative washings/ rust prevention. I know better, but never do any.


Sent from my iPhone using Tapatalk
 
Back
Top