- Joined
- Feb 5, 2015
- Messages
- 662
I'm always struggling for gift ideas, especially near Christmas, and some of you may be in the same situation. Here are some ideas that I've previously executed and I would sincerely appreciate it if you guys can pass along other suggestions of things that you've made, I'm running out of ideas.
My family and my deceased wife's family like to exchange hand-made gifts on special occasions. A number of us are woodworkers, two are glass-blowers, one makes jewelry, several paint and so forth. I've always loved woodworking and having metalworking machinery can be a big asset once one progresses past making picture frames, chess pieces and salt/pepper shakers for gifts.
Making these small projects is usually the least troublesome part of the process - where I have difficulty is coming up with IDEAS. When so many family members are crafts-oriented, it's difficult to come up with something that others have not already considered and built. So once I come up with an idea, I usually try to build a number of projects with common parts, to save time.
Here are some of the gifts that I've made over the past few years, most are woodworking but I've used my milling machine and lathe on all of these projects, sometimes to work the wood, sometimes to make the metal parts associated with them and sometimes to produce tooling to make the job simpler or better. Only recently (since acquiring a digital camera) have I started documenting these projects so, unfortunately, only a few projects have been saved "on paper".
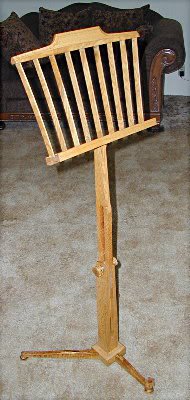
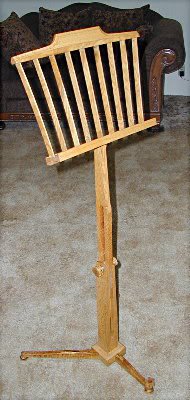
This is a music stand, made from Western Ash. The height adjustment slot was milled and the clamping mechanism turned, as were the metal feet and the angle adjuster on the front foot. The "fanned" shape of the sheet music holder was formed by the angles and spacing of the slots that position the thin slats of ash. These slots were produced in the milling machine with a trim router in a jig that adapts it to the quill.
For what it's worth, my highest spindle speed in the vertical mill is 3200 RPM. Before I hit on the idea of fixturing a trim router in the mill, I tried straight-flute router cutters for working wood but the speed isn't really adequate for small cutters and I found that two-flute end mills performed better and produced less burning, provided that they were sharp. It's important for health considerations (and for good housekeeping) to use some form of dust control when working wood. I rig a shop-vacuum pickup as close to the cutting tool as I can safely locate it.
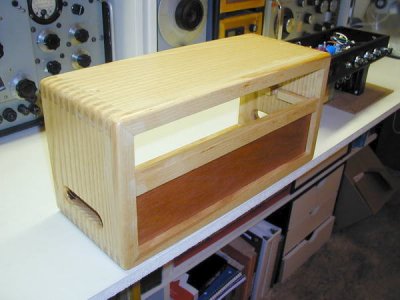
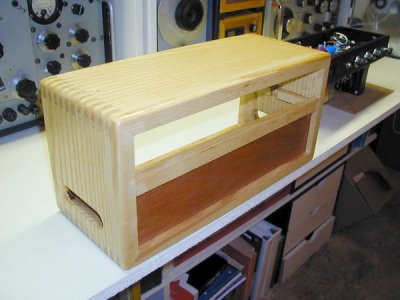
A made an arbor for a 7-1/2 inch "Skil saw" carbide blade, which is useful for slotting. Ganging a pair on an arbor is handy for producing finger joints if one doesn't happen to own a fixture for the table saw. The finger joints in this partly-completed oak guitar amplifier cabinet were made on the milling machine, as was all of the routing on the cabinet. (The vacuum tube amplifier chassis is partly visible in the background.)
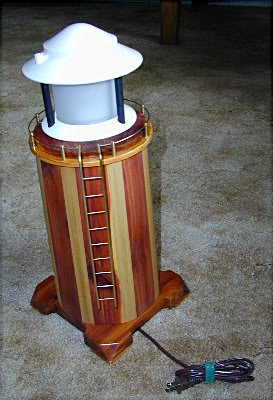
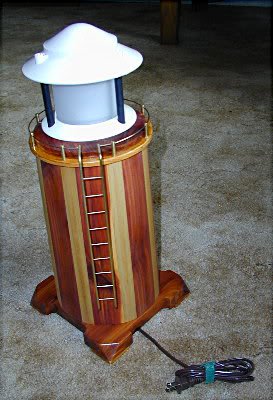
Numerous family members enjoy boating, both sail and power. One year I produced a number of gifts with a nautical orientation. Here is a night-light made from cedar and oak. There's a lot of turning involved but the mill was used to drill many small holes in the brass rods used for ladder and handrails. After cleaning, all of the brass parts were carefully soft-soldered together and then sprayed with clear poly to prevent tarnish.
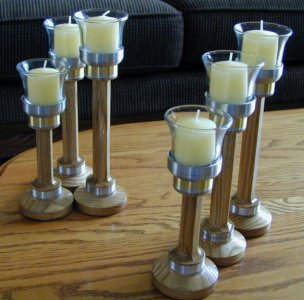
One year, with Christmas approaching, I cranked out a number of candle sticks, seven sets of three each (with different heights). The materials were Western Ash, aluminum and brass. I searched the internet for aluminum and brass tubing until I located the best prices. The design of the candlesticks sort of evolved from the tubing dimensions. Although it isn't easily observable, the ash portions of the candlesticks are octagonal - milled in a spacing head with an extra vise supporting the free end of the workpiece instead of a tailstock center. The ash and the various sections of tubing were epoxied together and, after curing, chucked and turned in the lathe.
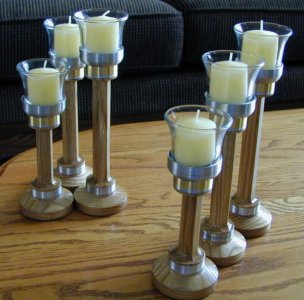
The bases of the candlesticks are covered with felt (obtained from the local fabric store) which covers a half-dozen holes drilled into each base. Into the holes are epoxied six cast lead bullets (158 grain .357 SWC). NOT cartridges, just the cast bullets. They are there for two reasons, the first of which is stability. The second reason was intuitive - I have formed an opinion that, comparing two identical objects, people intrinsically value the heavier object more than the light one. It's easy enough to provide a little extra weight in most projects and cast lead bullets are cheap.
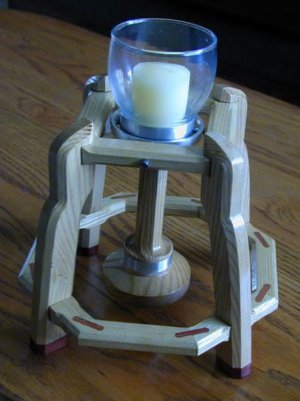
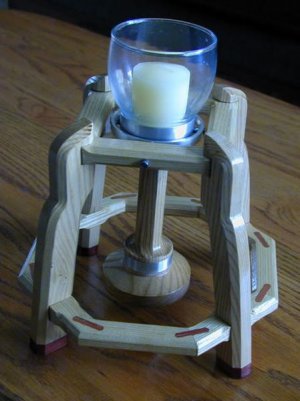
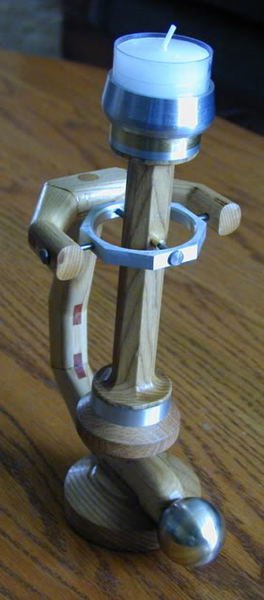
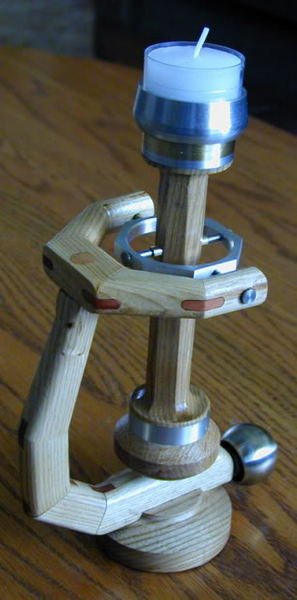
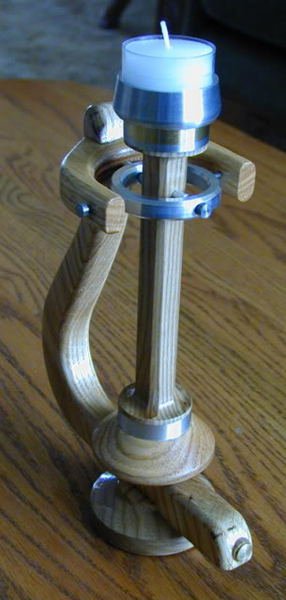
The candlesticks were received well so the following year, I made a variation on them for the family members that like boating. I got the idea from watching the movie, "Master and Commander" where I noted that the candles and lanterns on the sailing ship were suspended in two sets of gimbals. I duplicated the concept with these various candles. The external materials are oak, steel, brass and aluminum and the gimbals are lubricated with a spot of beeswax.
They - like the earlier sets - are weighted with cast bullets. In this case, the reasons were more rational - extra weight in the base provides more stability as the candles rock in their gimbals. Not that these candles were ever shipboard - they were intended as coffee table decorations. There are three different configurations, for variety. Note that one configuration is pieced together from small sections of wood; hardwood keys are used to help secure the structure. The keys and the keyways were produced on the vertical milling machine.
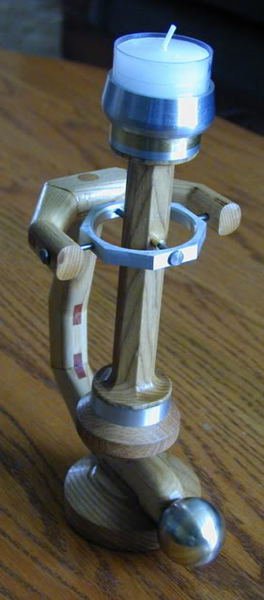
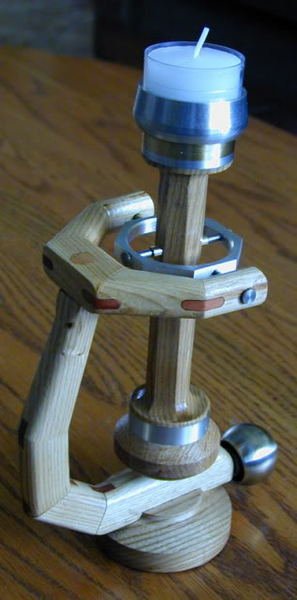
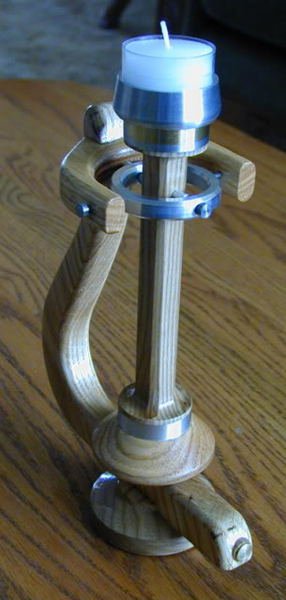
I used different construction techniques for similar gifts to avoid boredom and to learn if one method offered a time advantage (or was more attractive) than another one.
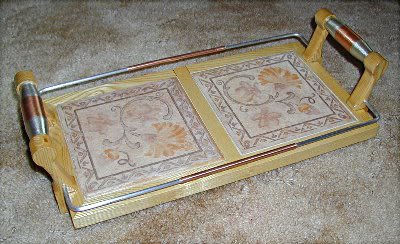
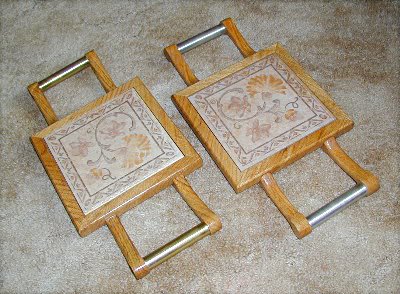
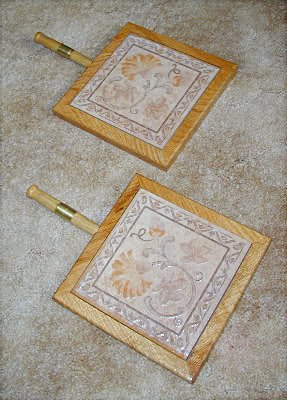
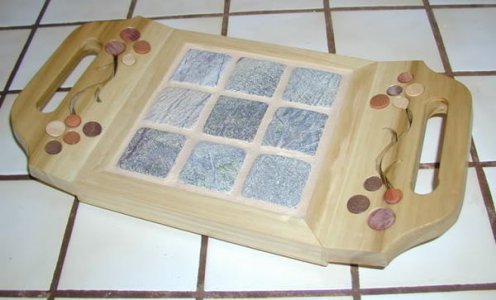
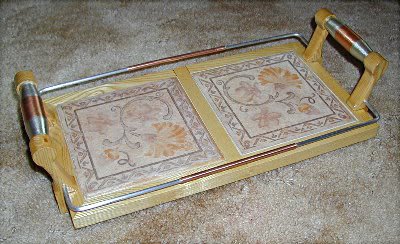
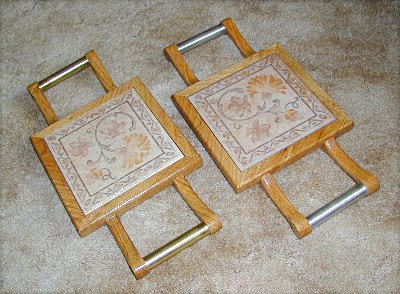
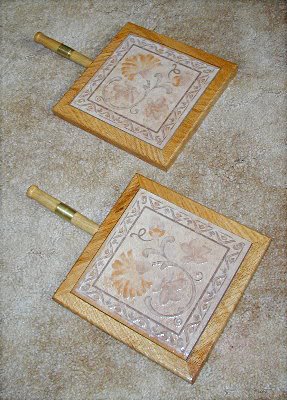
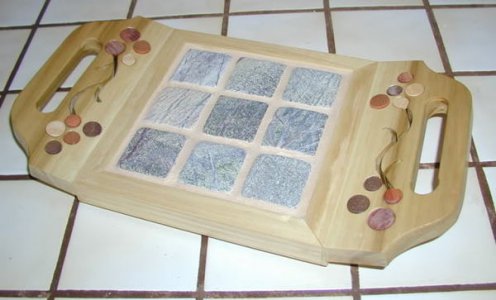
One year, a small tile store went out of business and individual ceramic tiles were about $0.05 each, I picked up a few and that was the year of the trivet. Mostly this was lathe work (the handles) although I did some of the wood routing in the vertical mill. In the last example, various colored hardwood inlays were lathe-turned to fit counterbores in the piece.
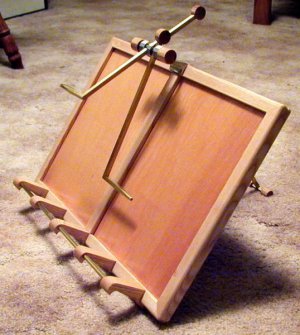
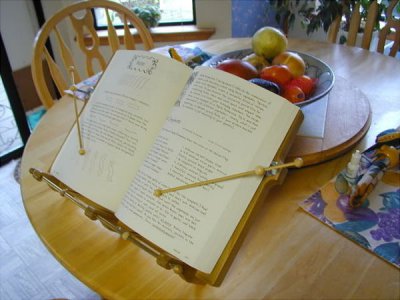
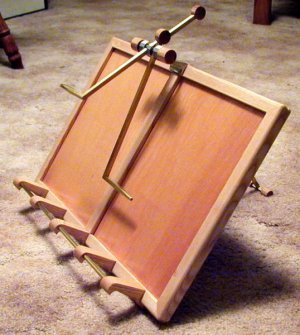
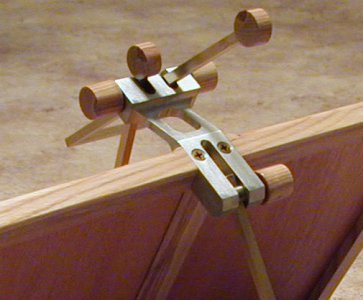
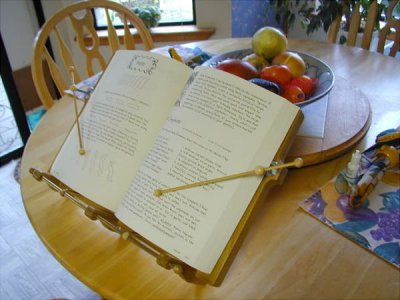
At a special request from a sister-in-law with a large family, I made this stand to hold her large cookbooks open at a specific page and with pointers to place at certain paragraphs in the page for quick reference. I got a little carried away with this project and it is definitely industrial quality. There are small spring-loaded friction clutches securing the pointer arms so that they may be placed in position and stay there. The friction is adjustable with external knobs and the supporting leg on the back side can be adjusted and locked at any angle from near-vertical to near-horizontal.
(The slight tint of the aluminum head was obtained by dipping the entire part into a solution of four parts denatured alcohol and one part shellac. I've used this simple, inexpensive, quick-drying solution for many years mainly as protection against rust and oxidation for parts that don't require hard use. As an example, when I make a cut off on the horizontal bandsaw, I smear the shellac mixture on the exposed end of steel rods before putting the stock back in the storage cabinet. I live on the ocean and ferrous metals can corrode or rust fairly quickly in this damp, high-rainfall climate.)
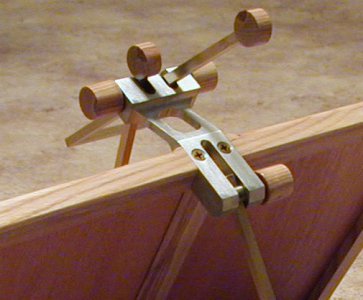
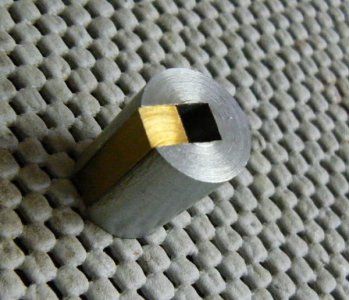
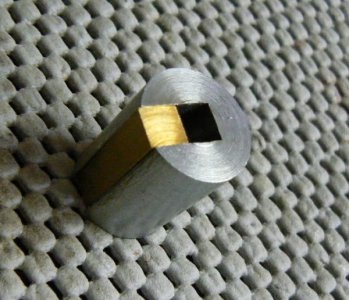
Note that many of the parts are made from 1/4 square brass rod. Most of the operations were lathe operations and I didn't have a 1/4 square collet so I quickly made the following workholder. Placed in a three-jaw chuck, with the external 1/4 square key located under one of the jaws, this was an effective chucking device for the square stock, although more cumbersome to load/unload than a collet. (It would have worked a lot better with a "lip" to secure against the front of the jaws.)
Other women in the family thought that the idea was a good one and asked for their own models which I made for the following Christmas. The original model took quite a while to make so I redesigned the next generation. I made two spring-loaded ball joints, riding on friction material and enclosed in a threaded 3/4-10 aluminum cartridge. The cartridges screw into blind holes on each side of the wood frame. Making the internal steel ball joints was time consuming because I have no ball-turning capability.
I produced the steel balls by making a table of X-Y movements (in an Excel spreadsheet) and using a combination of lathe handwheel (with travel indicator) and cross-slide dial to rough-turn the balls. After roughing, I blued the balls and filed/sanded them to shape until the bluing was barely removed. (Surprisingly, they were spherical within just a few thousands - considerably better than what I needed for smooth function.)
The pointer arms can be adjusted to any location on a book page and will remain in position because of the ball friction joint. The wooden balls on the pointers were for decorative and safety purposes and were obtained from a local crafts store. They are glued to bamboo skewers (normally used for barbecuing "shishkabob" and obtained from the grocery store). I made several of these projects, some fancy some plain - unfortunately I have a photograph only of the first (plain) one. (The fancy ones had freehand "grape vines" routed into the wood back with a trim router and various size wooden balls of different wood species glued into holes to resemble "grapes". The wooden balls also came from the crafts store.)
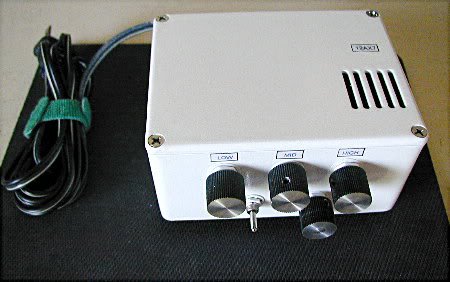
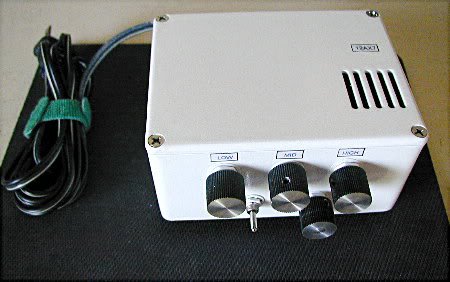
This little project is more electronic than craft. It is a miniature vacuum tube preamplifier (including both filament and high-voltage plate supplies), designed and built at specific request from a relative and provided for his birthday. Not much to look at but the packaging challenge was interesting. The density was so great that I couldn't even locate a conventional fuse holder on the rear panel. The fuse had to be soldered into the circuit, inside the enclosure.
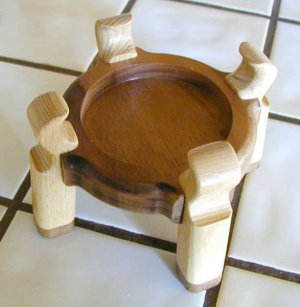
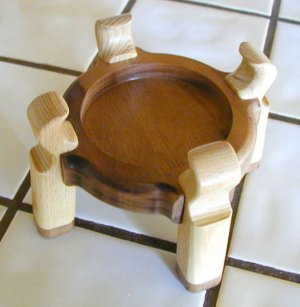
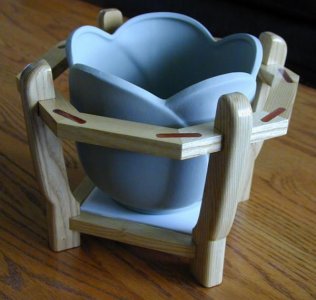
I mentioned earlier that one family member is a glass blower. I made this small oak and walnut stand to display one of his hand-made vases. It's nothing special except to note that the walnut center piece was made in the milling machine with a rotary table - fun but took three times more time to move and bolt down the rotary table than to do the work.
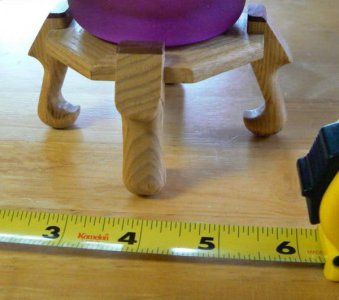
This is another small stand for a hand-painted vase, there's nothing special about this project except for the tiny legs. For some reason, I felt that the shape of these legs was particularly graceful and I wanted similar ones for other projects. Having made these before, one at a time, I knew that the job required a lot of time and was boring. So I came up with a different method, using the vertical mill.
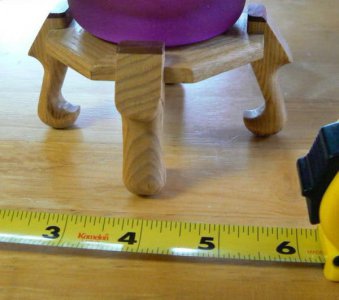
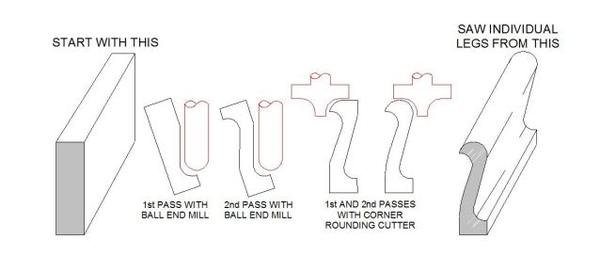
Using a long ball end mill, I placed a fairly thick (5/4) length of Western Ash in the milling machine vise, supported at both ends and using angle plates to tilt the board at about ten - twenty degrees (don't recall the exact angle). Then I milled the profile of the legs along one side, rotated the board in the vise and made a finishing pass along the other side. Now I had a long board with the required cross section - all that's required to produce individual legs is to slice off the legs and rout the radii. Used to take about 30 minutes to produce one leg by jigsawing, sanding and routing.
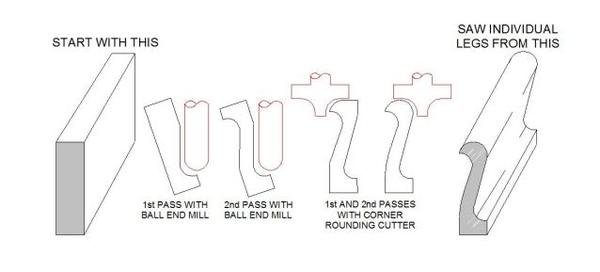
After first making the long profiled blank (about 30 minutes for the whole board), slicing off a leg, routing and sanding it took less than five minutes per leg. (One board produces about 20 legs.) I use a narrow-kerf saw to avoid waste on intricate parts like these. The saw is an interesting project which I'll discuss in a moment.
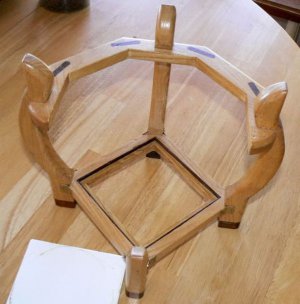
More uses for leftover ceramic tiles. I made a number of these "plant stands" one year, in various configurations. The ceramic tile at the bottom can be lifted out and wiped off, in case the plant leaks through the drainage hole after watering. These plain looking clay pots were found on sale for less than $1.00 each. I primed all of them and then my wife painted them various colors. The idea was to match the décor (color, at least) of the interior of the person's home for whom the gift was made.
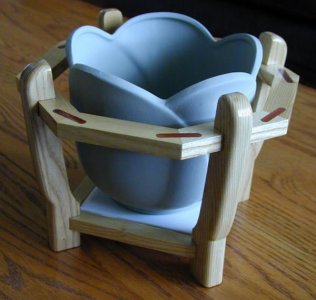
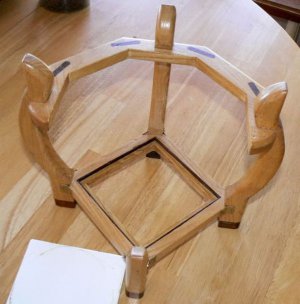
In many of these wood structures, like the above plant stands, I've used semi-octagonal hardwood frames. I made a jig for use with the milling machine to precisely mill the keyways for the hardwood keys that strengthen the glue joints. I also make the keys on the vertical mill. I corner round all four edges of a long hardwood board that has been cut to the correct cross-sectional dimension. Then I have a length of "keystock" that can be crosscut to the required thickness when I need keys.
I do that operation on this little saw:
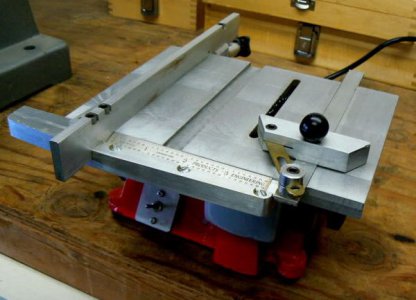
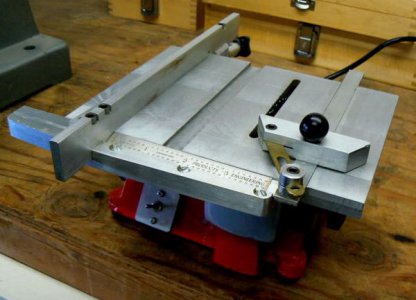
This saw was a fun project in its own right. After ripping open my thumb trying to perform fine work on my old table saw, my wife found this small saw at a Harbor Freight outlet in another town. Thinking that this might be the solution to my small-parts sawing problems, she bought it. It was, of course, not useful out of the box, to put it kindly. I disassembled the thing and did the normal cleaning and debugging, replacing the junky (and dangerous) on-off switch as a matter of routine.
After machining the motor mounts (they were cast and very rough), I flycut the table flat, trued the front and rear edges and milled a taper on them with a dovetail cutter. I made the rip fence and the miter gage shown to fit the little saw, they locate and can be clamped onto the tapered edges. The project took about ten hours (including design time) but the saw has paid for itself many times over, safely cutting many precise small parts and allowing me to keep my thumb and fingers. (With fixturing, I also use this little machine for thin slotting non-ferrous materials.)
It should go without saying that having machinery makes it easy to produce special tools, fixtures, or modifying existing tools. Frequently, male relatives and friends find even very simple tools gratifying because YOU made them.
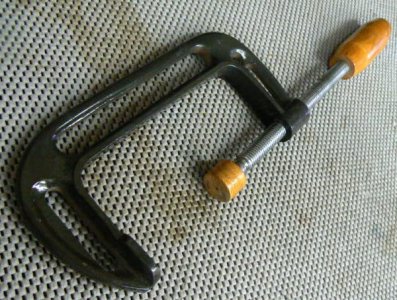
A couple of years ago, I bought an inexpensive set of Chinese C-clamps (four different sizes for around $15). I removed the cross pins and the swaged "caps" from the screws and milled the C-frame clamping surfaces flat and true. Then I milled out the web of the "C" in selected areas - just for looks. After turning and finishing some attractive hardwood handles and caps and attaching them to the clamp, this was one result:
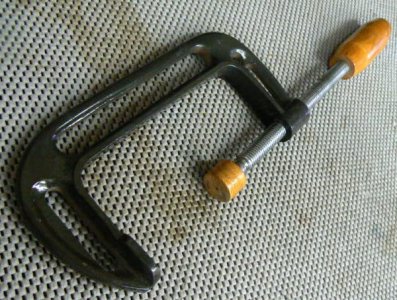
I gave the set of four to my father-in-law, a talented woodworker, and he was happy to receive the clamps, not owning anything that looked like them.
Because I have such a hard time coming up with gift ideas, I've learned to write them down as they occur to me, in the last page of my shop notebook before I forget. If anyone has any good ideas for these types of projects, please let me know. Making gifts like these goes a long way to rationalizing the continual purchase of tooling to the wife, LOL, especially when the gifts are for her mother.
My family and my deceased wife's family like to exchange hand-made gifts on special occasions. A number of us are woodworkers, two are glass-blowers, one makes jewelry, several paint and so forth. I've always loved woodworking and having metalworking machinery can be a big asset once one progresses past making picture frames, chess pieces and salt/pepper shakers for gifts.
Making these small projects is usually the least troublesome part of the process - where I have difficulty is coming up with IDEAS. When so many family members are crafts-oriented, it's difficult to come up with something that others have not already considered and built. So once I come up with an idea, I usually try to build a number of projects with common parts, to save time.
Here are some of the gifts that I've made over the past few years, most are woodworking but I've used my milling machine and lathe on all of these projects, sometimes to work the wood, sometimes to make the metal parts associated with them and sometimes to produce tooling to make the job simpler or better. Only recently (since acquiring a digital camera) have I started documenting these projects so, unfortunately, only a few projects have been saved "on paper".
This is a music stand, made from Western Ash. The height adjustment slot was milled and the clamping mechanism turned, as were the metal feet and the angle adjuster on the front foot. The "fanned" shape of the sheet music holder was formed by the angles and spacing of the slots that position the thin slats of ash. These slots were produced in the milling machine with a trim router in a jig that adapts it to the quill.

For what it's worth, my highest spindle speed in the vertical mill is 3200 RPM. Before I hit on the idea of fixturing a trim router in the mill, I tried straight-flute router cutters for working wood but the speed isn't really adequate for small cutters and I found that two-flute end mills performed better and produced less burning, provided that they were sharp. It's important for health considerations (and for good housekeeping) to use some form of dust control when working wood. I rig a shop-vacuum pickup as close to the cutting tool as I can safely locate it.
A made an arbor for a 7-1/2 inch "Skil saw" carbide blade, which is useful for slotting. Ganging a pair on an arbor is handy for producing finger joints if one doesn't happen to own a fixture for the table saw. The finger joints in this partly-completed oak guitar amplifier cabinet were made on the milling machine, as was all of the routing on the cabinet. (The vacuum tube amplifier chassis is partly visible in the background.)

Numerous family members enjoy boating, both sail and power. One year I produced a number of gifts with a nautical orientation. Here is a night-light made from cedar and oak. There's a lot of turning involved but the mill was used to drill many small holes in the brass rods used for ladder and handrails. After cleaning, all of the brass parts were carefully soft-soldered together and then sprayed with clear poly to prevent tarnish.

One year, with Christmas approaching, I cranked out a number of candle sticks, seven sets of three each (with different heights). The materials were Western Ash, aluminum and brass. I searched the internet for aluminum and brass tubing until I located the best prices. The design of the candlesticks sort of evolved from the tubing dimensions. Although it isn't easily observable, the ash portions of the candlesticks are octagonal - milled in a spacing head with an extra vise supporting the free end of the workpiece instead of a tailstock center. The ash and the various sections of tubing were epoxied together and, after curing, chucked and turned in the lathe.

The bases of the candlesticks are covered with felt (obtained from the local fabric store) which covers a half-dozen holes drilled into each base. Into the holes are epoxied six cast lead bullets (158 grain .357 SWC). NOT cartridges, just the cast bullets. They are there for two reasons, the first of which is stability. The second reason was intuitive - I have formed an opinion that, comparing two identical objects, people intrinsically value the heavier object more than the light one. It's easy enough to provide a little extra weight in most projects and cast lead bullets are cheap.
The candlesticks were received well so the following year, I made a variation on them for the family members that like boating. I got the idea from watching the movie, "Master and Commander" where I noted that the candles and lanterns on the sailing ship were suspended in two sets of gimbals. I duplicated the concept with these various candles. The external materials are oak, steel, brass and aluminum and the gimbals are lubricated with a spot of beeswax.
They - like the earlier sets - are weighted with cast bullets. In this case, the reasons were more rational - extra weight in the base provides more stability as the candles rock in their gimbals. Not that these candles were ever shipboard - they were intended as coffee table decorations. There are three different configurations, for variety. Note that one configuration is pieced together from small sections of wood; hardwood keys are used to help secure the structure. The keys and the keyways were produced on the vertical milling machine.


I used different construction techniques for similar gifts to avoid boredom and to learn if one method offered a time advantage (or was more attractive) than another one.
One year, a small tile store went out of business and individual ceramic tiles were about $0.05 each, I picked up a few and that was the year of the trivet. Mostly this was lathe work (the handles) although I did some of the wood routing in the vertical mill. In the last example, various colored hardwood inlays were lathe-turned to fit counterbores in the piece.


At a special request from a sister-in-law with a large family, I made this stand to hold her large cookbooks open at a specific page and with pointers to place at certain paragraphs in the page for quick reference. I got a little carried away with this project and it is definitely industrial quality. There are small spring-loaded friction clutches securing the pointer arms so that they may be placed in position and stay there. The friction is adjustable with external knobs and the supporting leg on the back side can be adjusted and locked at any angle from near-vertical to near-horizontal.
(The slight tint of the aluminum head was obtained by dipping the entire part into a solution of four parts denatured alcohol and one part shellac. I've used this simple, inexpensive, quick-drying solution for many years mainly as protection against rust and oxidation for parts that don't require hard use. As an example, when I make a cut off on the horizontal bandsaw, I smear the shellac mixture on the exposed end of steel rods before putting the stock back in the storage cabinet. I live on the ocean and ferrous metals can corrode or rust fairly quickly in this damp, high-rainfall climate.)


Note that many of the parts are made from 1/4 square brass rod. Most of the operations were lathe operations and I didn't have a 1/4 square collet so I quickly made the following workholder. Placed in a three-jaw chuck, with the external 1/4 square key located under one of the jaws, this was an effective chucking device for the square stock, although more cumbersome to load/unload than a collet. (It would have worked a lot better with a "lip" to secure against the front of the jaws.)

Other women in the family thought that the idea was a good one and asked for their own models which I made for the following Christmas. The original model took quite a while to make so I redesigned the next generation. I made two spring-loaded ball joints, riding on friction material and enclosed in a threaded 3/4-10 aluminum cartridge. The cartridges screw into blind holes on each side of the wood frame. Making the internal steel ball joints was time consuming because I have no ball-turning capability.
I produced the steel balls by making a table of X-Y movements (in an Excel spreadsheet) and using a combination of lathe handwheel (with travel indicator) and cross-slide dial to rough-turn the balls. After roughing, I blued the balls and filed/sanded them to shape until the bluing was barely removed. (Surprisingly, they were spherical within just a few thousands - considerably better than what I needed for smooth function.)
The pointer arms can be adjusted to any location on a book page and will remain in position because of the ball friction joint. The wooden balls on the pointers were for decorative and safety purposes and were obtained from a local crafts store. They are glued to bamboo skewers (normally used for barbecuing "shishkabob" and obtained from the grocery store). I made several of these projects, some fancy some plain - unfortunately I have a photograph only of the first (plain) one. (The fancy ones had freehand "grape vines" routed into the wood back with a trim router and various size wooden balls of different wood species glued into holes to resemble "grapes". The wooden balls also came from the crafts store.)

This little project is more electronic than craft. It is a miniature vacuum tube preamplifier (including both filament and high-voltage plate supplies), designed and built at specific request from a relative and provided for his birthday. Not much to look at but the packaging challenge was interesting. The density was so great that I couldn't even locate a conventional fuse holder on the rear panel. The fuse had to be soldered into the circuit, inside the enclosure.

I mentioned earlier that one family member is a glass blower. I made this small oak and walnut stand to display one of his hand-made vases. It's nothing special except to note that the walnut center piece was made in the milling machine with a rotary table - fun but took three times more time to move and bolt down the rotary table than to do the work.

This is another small stand for a hand-painted vase, there's nothing special about this project except for the tiny legs. For some reason, I felt that the shape of these legs was particularly graceful and I wanted similar ones for other projects. Having made these before, one at a time, I knew that the job required a lot of time and was boring. So I came up with a different method, using the vertical mill.

Using a long ball end mill, I placed a fairly thick (5/4) length of Western Ash in the milling machine vise, supported at both ends and using angle plates to tilt the board at about ten - twenty degrees (don't recall the exact angle). Then I milled the profile of the legs along one side, rotated the board in the vise and made a finishing pass along the other side. Now I had a long board with the required cross section - all that's required to produce individual legs is to slice off the legs and rout the radii. Used to take about 30 minutes to produce one leg by jigsawing, sanding and routing.

After first making the long profiled blank (about 30 minutes for the whole board), slicing off a leg, routing and sanding it took less than five minutes per leg. (One board produces about 20 legs.) I use a narrow-kerf saw to avoid waste on intricate parts like these. The saw is an interesting project which I'll discuss in a moment.
More uses for leftover ceramic tiles. I made a number of these "plant stands" one year, in various configurations. The ceramic tile at the bottom can be lifted out and wiped off, in case the plant leaks through the drainage hole after watering. These plain looking clay pots were found on sale for less than $1.00 each. I primed all of them and then my wife painted them various colors. The idea was to match the décor (color, at least) of the interior of the person's home for whom the gift was made.


In many of these wood structures, like the above plant stands, I've used semi-octagonal hardwood frames. I made a jig for use with the milling machine to precisely mill the keyways for the hardwood keys that strengthen the glue joints. I also make the keys on the vertical mill. I corner round all four edges of a long hardwood board that has been cut to the correct cross-sectional dimension. Then I have a length of "keystock" that can be crosscut to the required thickness when I need keys.
I do that operation on this little saw:

This saw was a fun project in its own right. After ripping open my thumb trying to perform fine work on my old table saw, my wife found this small saw at a Harbor Freight outlet in another town. Thinking that this might be the solution to my small-parts sawing problems, she bought it. It was, of course, not useful out of the box, to put it kindly. I disassembled the thing and did the normal cleaning and debugging, replacing the junky (and dangerous) on-off switch as a matter of routine.
After machining the motor mounts (they were cast and very rough), I flycut the table flat, trued the front and rear edges and milled a taper on them with a dovetail cutter. I made the rip fence and the miter gage shown to fit the little saw, they locate and can be clamped onto the tapered edges. The project took about ten hours (including design time) but the saw has paid for itself many times over, safely cutting many precise small parts and allowing me to keep my thumb and fingers. (With fixturing, I also use this little machine for thin slotting non-ferrous materials.)
It should go without saying that having machinery makes it easy to produce special tools, fixtures, or modifying existing tools. Frequently, male relatives and friends find even very simple tools gratifying because YOU made them.
A couple of years ago, I bought an inexpensive set of Chinese C-clamps (four different sizes for around $15). I removed the cross pins and the swaged "caps" from the screws and milled the C-frame clamping surfaces flat and true. Then I milled out the web of the "C" in selected areas - just for looks. After turning and finishing some attractive hardwood handles and caps and attaching them to the clamp, this was one result:

I gave the set of four to my father-in-law, a talented woodworker, and he was happy to receive the clamps, not owning anything that looked like them.
Because I have such a hard time coming up with gift ideas, I've learned to write them down as they occur to me, in the last page of my shop notebook before I forget. If anyone has any good ideas for these types of projects, please let me know. Making gifts like these goes a long way to rationalizing the continual purchase of tooling to the wife, LOL, especially when the gifts are for her mother.


