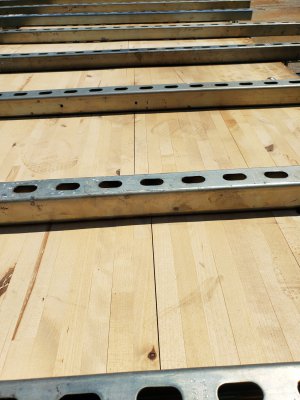
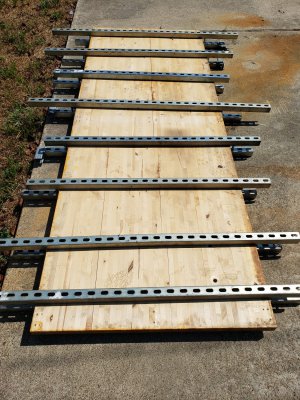
Any tips to un-warp a butcher's block bench top?

Well, now that it is only half as wide as before, do you have access to a planer, or do you would you like to build up your triceps with a handplane? Then you can joint the edge and glue it back together.
 
This^^^^ Your problem is solved. Plane each half flat, then rip a straight edge on each half an glue it back together with biscuit inserts.
 
Yes, you did rush it WAY too much. It will still continue to flatten in the sun as is. Worry about the crack after it's real close to flat. Then blow or suck some glue into the crack and clamp it firmly.

When it's back close to flat, PUT A FINISH ON THE RAW SIDE THAT MATCHES THE FINISH ON THE TOP SIDE. The poor piece has been under a lot of unnecessary stress from that oversight. It's a credit to the durability of the glue and wood that the other tops haven't split but they will if you ever take them off the frames holding them, unless you trouble yourself to put the matching finish on the bottom. BTDT many times.
DanK
 
Wood changes size/warps due to changes in moisture content, not heat. Heat will accelerate the change in moisture content. Forcing a warped piece will just break it. Finish will slow the passage of moisture but not likely stop it. If the top was only finished on one side the unfinished side will absorb/lose moisture faster than the finished side. Trying to force moisture change too fast will result in cracks. End gran will also allow the movement of moisture faster than on the flat sides. This can cause end checking. Given enough time, wood will come to equilibrium with the moisture levels of the air.
Trying to re-glue a cracked joint without re-machining it most likely won't workout well. So, put the parts someplace where the conditions will match its "in use conditions." allow air to flow around all sides. In 6 months or so check see how it is coming. Once it has stopped moving, you can joint or saw away the split area and glue it back together. Hand plane, router sled or widebelt sand. Then give all sides the same finish. Fasten the top to the frame in such a way that it can expand and contract with changes in moisture. Slotted holes for screws work well.
 
Cut it down into sizes that are useful around the house.
But the only size I find useful at the moment is tabletop size. I need to salvage it.

In 6 months or so check see how it is coming.
Unfortunately I need this next week, not in a few months.

Well, now that it is only half as wide as before, do you have access to a planer, or do you would you like to build up your triceps with a handplane? Then you can joint the edge and glue it back together.
This^^^^ Your problem is solved. Plane each half flat, then rip a straight edge on each half an glue it back together with biscuit inserts.
I would make a router sled and plane it flat.

I think this is probably the "right" answer for a solution in under 6 months but I don't have a planer or a drum sander. I do have a router and a lot more unistrut so I could probably build a crude router sled and plane it flat but I have a lot going on right now and that smells like a bigger project than my time budget allows. I might do it anyway, not sure.

You could make a series of parallel saw cuts lengthwise underneath and fill with epoxy then clamp
That's the only quick way I know of
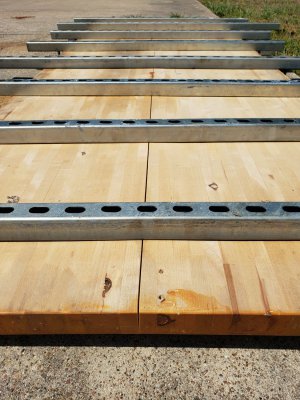
I predict this is the way I will go. I will probably at least epoxy fill the crack I created and then either cut the slots you described, or plane it. We will see...
 
Since the warp was likely caused by higher moisture on one side, when you cut it flat, over time it will equalize that uneven moisture level and likely curve back the opposite way. Maybe not as much but the odds are against you! You could flip one of the halves over when gluing it back together. That would make the warp only 1/2 as high when it gets fimished moving.
 
Had similar issue with making a tabletop out of old bowling alley pieces. Didn’t want sag so I used angle iron. Only took two pieces basically cutting the table in thirds. Worked great for support and it helped with fastening to the leg Assy.
 
I was surprised how much difference <24hrs outside made. I went to apply a bit more torque to the clamping bolts just now and found several of them loose enough to turn by hand. I went around and snugged them all up and then started applying the same torque as before ('wrist-strength'-ft*lbs with a t-handle wrench) and it started splitting again in new spots. So I said "screw it" and just went and got a ratchet and torqued all the bolts as tight as I could without damaging the surface of the tabletop. It sounded like a visit to the chiropractor and now I have an almost-flat table top with a bunch of splits on the underneath that I can fill with epoxy and (hopefully) skip the sawing-slits-underneath step.

I also flipped it since several people mentioned the coating on top causing more moisture to be absorbed underneath, so underneath is exposed to sun now. We can see where all the splits occurred and I don't want to beat a dead horse so I'll let the pictures tell the story.

20230917_143644.jpg

20230917_143631.jpg

20230917_143621.jpg

I'll give it probably another 24hrs in the sun, see if it gets any better. If it does, maybe leave it longer, I don't know. But sometime in the next couple days I'm going to have to call it "good enough", bring it inside and give it the epoxy treatment and put it to use. I know it won't be flat flat but flat enough, and later down the road after it's had time to settle into its new environment and take its permanent shape, and when I get time, I can set up a jig and plane it flat with a router skid.
 
If you look carefully, the wood broke, not the glue. If the glue failed, it would be a perfectly straight break, but it is not.
The failure is in the glue joint. The fact that there is some minor tearout of wood fibers doesn't change the fact that the major fault line is at the joint.

When I designed our kitchen in 2006, I was concerned that the doors and drawer fronts were made from unsupported edge glued pieces. I did an experimental glue-up using Titebond II and polyurethane. The test was to edge glue two boards and after appropriate cure time. subject them to breaking using a Crescent wrench and a scale to measure the force required to fail. The urethane glue-up failed at almost 50% greater applied force. The Titebond joints consistently broke on the glue line. The polyurethane joints failed by ripping the wood fibers, splitting the board.

When Titebond cures, it does so by water leaving the glue, causing the polymerization of the glue. As a result, it shrinks in the process. OTOH, polyurethane glues cure by catalytic action with water causing a foaming and subsequent pressure buildup which drives the glue into the wood fibers. Most urethane glue manufacturers recommend moistening the glued surfaces prior to applying the glue. This will shorten the cure time but, IMO, it also causes a polymerization at the surface, reducing penetration into the wood fibers. I very seldom will moisten the surface first, preferring that the glue penetrate as deeply as possible.

Our kitchen cabinets have 33 panels without a single failure after 17 years.
 
Back
Top