- Joined
- Jan 2, 2014
- Messages
- 9,042
Hi Brooks,
I'm one of them electronics guys..............but I'm no genius!
For me only one thing taught me how these rocker switches are wired and that was taking one apart to see how it works. Now that I know how they work, I can even picture in my mind which pins are connected when it's in a particular position.
I am _NOT_ suggesting you do that with yours, but I've done it enough times(*-see below) I popped one apart to take some pictures.
Here's all the parts in mine laid out in a row:

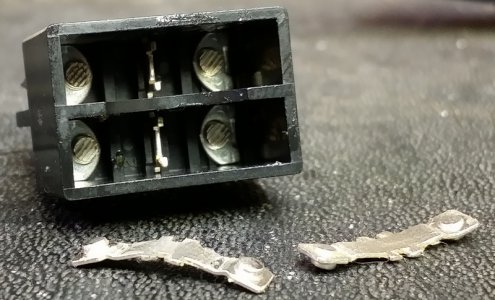
The two little silver bits (second from the right) above are the metal contacts. These things simply teeter-totter within the switch body (far right). They pivot on the middle pins (1 and 2 in your case), and connect them to either corner pin. Here's a shot looking inside the body:

the middle pin 1 connect to either 1A or 1B.
the middle pin 2 connects to either 2A or 2B.
the two haves are ganged together, such that when pin 1 connect to 1A, then 2 connects to 2A.
no pin on the "1" side every connects to a pin on the "2" side.
I guess I'm a visual learner and this I could actually see; unlike those friggin' tiny electrons they tell me whiz about in the wires......
-brino
(*) at work they use some decent metal power bars, with a good long and heavy input cord, a total of eight outlets, a switch, a circuit breaker and power light all in a tough aluminum housing.
However, when the switch starts misbehaving they simply put them in the garbage can. Whenever I find one in the trash it comes home with me. I have fixed 3 or 4 simply by cleaning the switch!
One other one just needed the switch replaced. I am slowly replacing all the crappy "dollar store" extension cords/power bars in my shop with these.
I'm one of them electronics guys..............but I'm no genius!
For me only one thing taught me how these rocker switches are wired and that was taking one apart to see how it works. Now that I know how they work, I can even picture in my mind which pins are connected when it's in a particular position.
I am _NOT_ suggesting you do that with yours, but I've done it enough times(*-see below) I popped one apart to take some pictures.
Here's all the parts in mine laid out in a row:

The two little silver bits (second from the right) above are the metal contacts. These things simply teeter-totter within the switch body (far right). They pivot on the middle pins (1 and 2 in your case), and connect them to either corner pin. Here's a shot looking inside the body:

the middle pin 1 connect to either 1A or 1B.
the middle pin 2 connects to either 2A or 2B.
the two haves are ganged together, such that when pin 1 connect to 1A, then 2 connects to 2A.
no pin on the "1" side every connects to a pin on the "2" side.
I guess I'm a visual learner and this I could actually see; unlike those friggin' tiny electrons they tell me whiz about in the wires......
-brino
(*) at work they use some decent metal power bars, with a good long and heavy input cord, a total of eight outlets, a switch, a circuit breaker and power light all in a tough aluminum housing.
However, when the switch starts misbehaving they simply put them in the garbage can. Whenever I find one in the trash it comes home with me. I have fixed 3 or 4 simply by cleaning the switch!
One other one just needed the switch replaced. I am slowly replacing all the crappy "dollar store" extension cords/power bars in my shop with these.

